Keep every accident and claim in one place. This article covers the Accidents page under Safety: the list of all accidents, how to find the ones you need, how to add an accident, and what is on the accident record (claim status, notes, attachments, map and the amounts). The driver's own view of these accidents is the Accidents tab of the driver profile: see Driver profile: Accidents tab.
Who can do this: users whose role gives them access to Accidents under Safety. Each action is shown only if your role allows it: opening the list, the eye icon (view), the pencil (edit), the bin (delete), Add Accident, and the Excel and Export all downloads. If a button below is missing for you, ask an administrator to check your role.
Before you begin
Drivers, trucks and trailers are chosen from your existing OpenRoad records. Add them first if an accident involves one that is not in the system yet.
- Violation Types, Type of Collision and Road Type on the accident have no choices until your company defines them. An administrator adds them in Settings → Preferences → Operations → Safety, on the Claims tab (see "Set up the choices for an accident" below). Until then these lists are empty.
- Paid By and Paid To on the money lines already offer standard choices (Driver, Deductible, Insurance, Third Party, Owner Operator, Third Party Insurance and your company name). Extra choices are optional and added on the same Claims tab.
Open the Accidents page
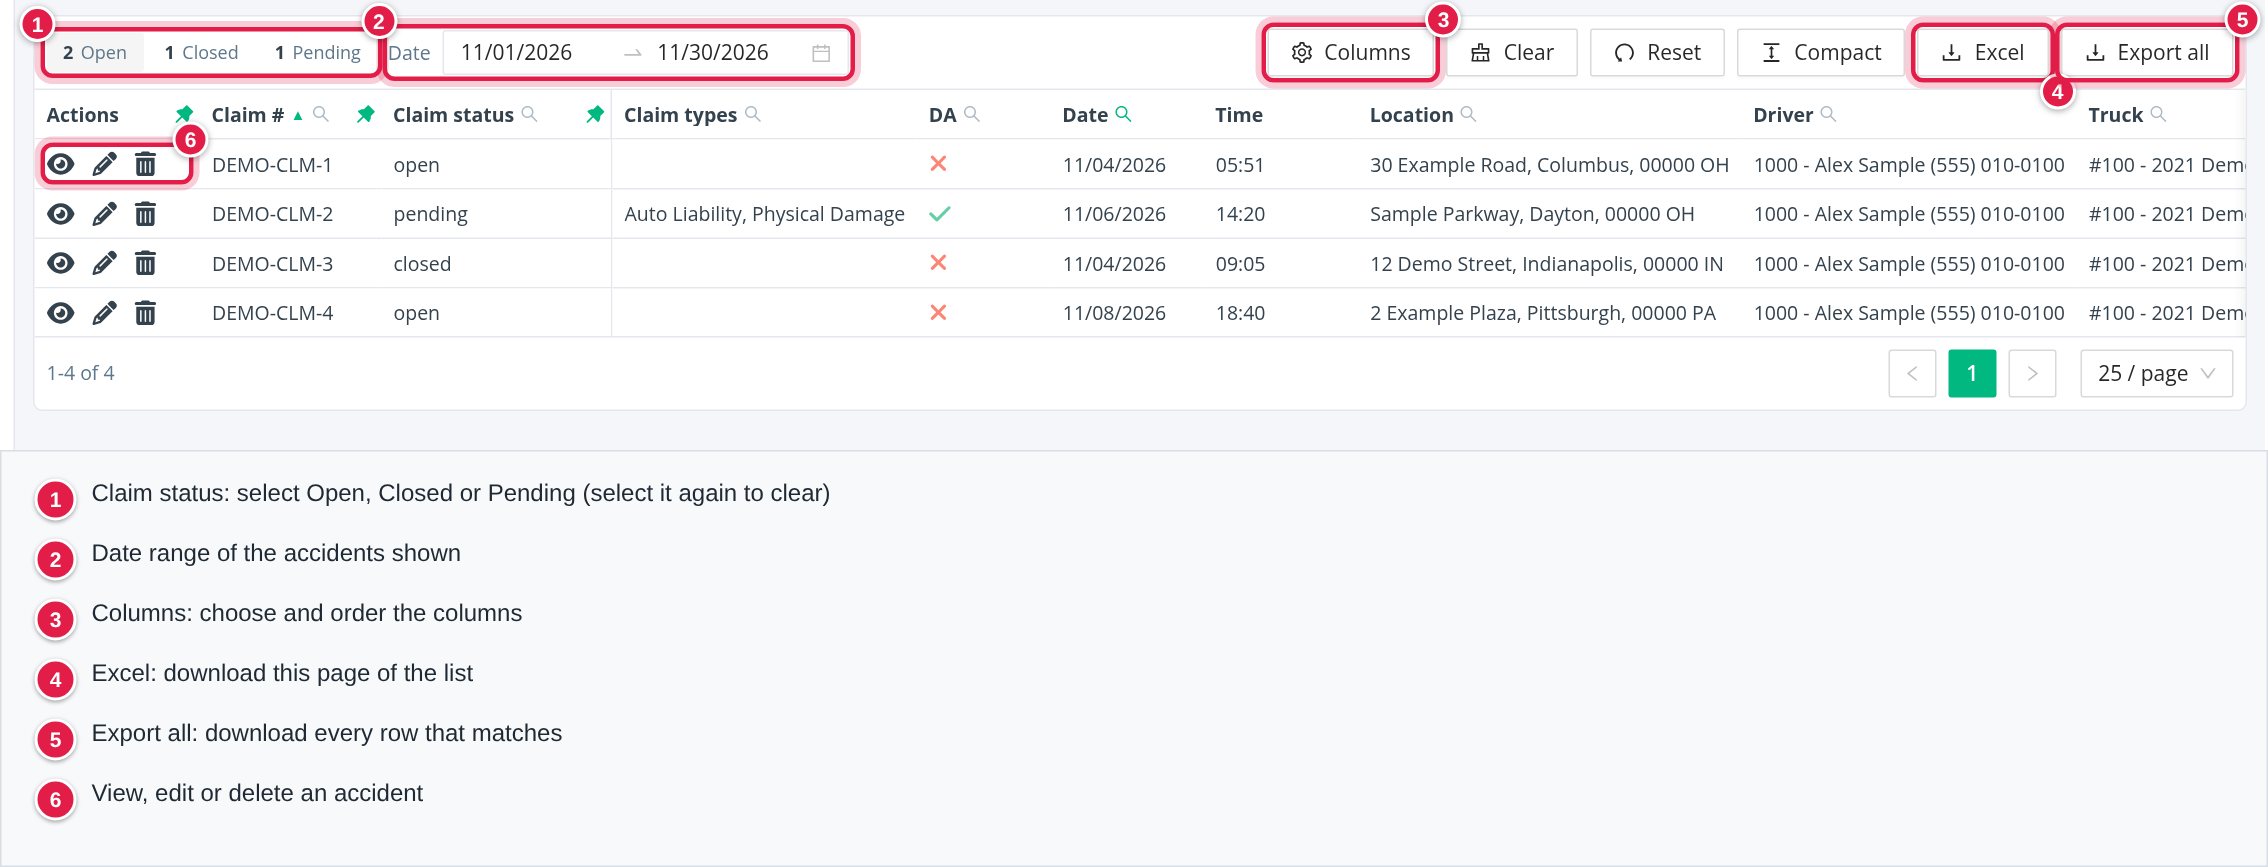
In the left menu open Safety and select Accidents. The page opens on the claims with status Open and the date range of the current month.
Read the list
Each row is one accident. These columns are shown to begin with:
| Column | What it shows |
|---|---|
| Actions | The eye (view), the pencil (edit) and the bin (delete) |
| Claim # | The claim number. The list is sorted by it, oldest number first |
| Claim status | open, closed or pending |
| Claim types | The claim types ticked on the accident, for example Auto Liability, Physical Damage |
| DA | DOT accident |
| Date and Time | When the accident happened |
| Location | The address |
| Driver, Truck and Trailer | Who and what was involved |
| DTT and DTTL | Damage to truck and damage to trailer |
| Damage to Cargo? | Damage to the cargo |
| Injury, Fatal and Tow | Whether the accident had them |
| Upload | A laptop icon when the accident has attachments. Select it to see them |
| Claim #2 and Claim #3 | Extra claim numbers, for example from an insurer |
Yes/No columns show a green tick for Yes and a red cross for No. An empty value shows as a dash. The table is wide, so scroll to the right to see every column. There are many more columns you can add: see "Choose the columns" below.
Find the accidents you need
- Claim status. The three choices at the top left (Open, Closed, Pending) show how many accidents have each status. Select one to show only those claims. Select it again to clear it and see every status.
- Date. Select the date box to pick a range on the calendar, or one of the shortcuts on its left (for example Today, This Week, This Month, Last Month, This Year). The accidents shown are the ones with a date inside the range.
- Search a column. Columns with a small magnifier next to the heading (for example Claim #, Claim status, Location, Driver, Truck) can be filtered. Select the magnifier and type or choose a value. A green magnifier means a filter is on.
- Clear takes the filters, search and sort back to the default view. Reset puts the column order, visible columns, pins and page size back to how they were. Compact makes the rows shorter.
If the list looks empty, the cause is nearly always the default view: only Open claims in the current month. Clear the status, or widen the date range.
Choose the columns
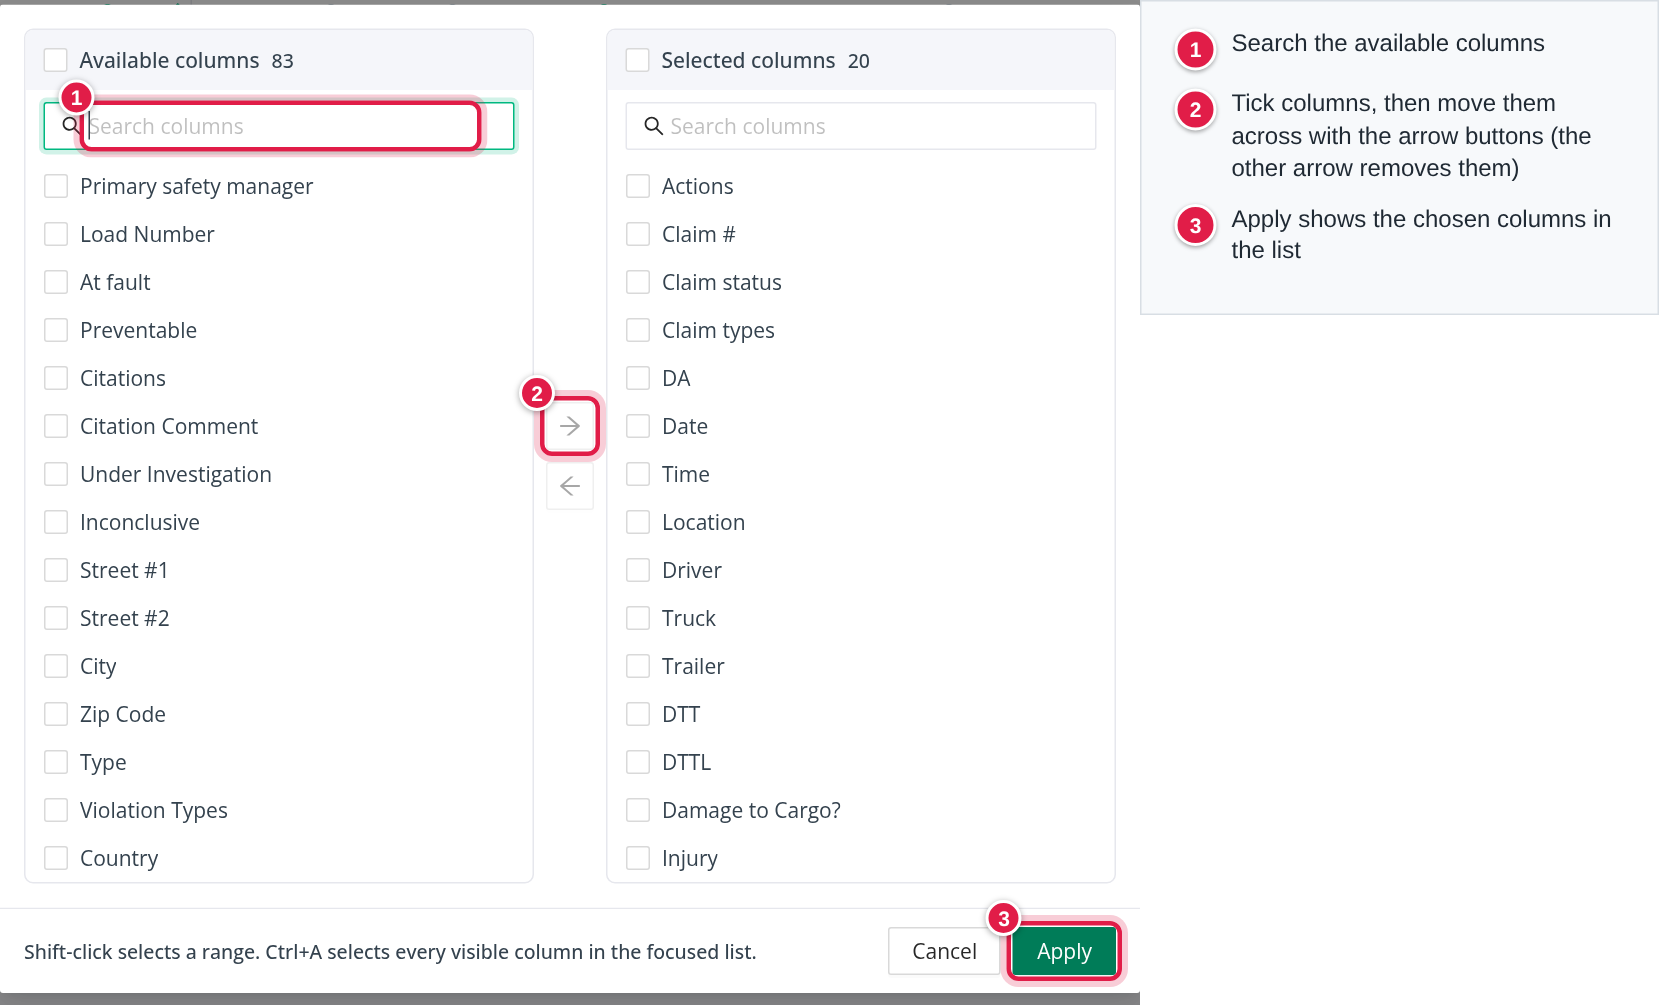
Select Columns. The left list holds the columns you can add and the right list the ones shown now. Tick columns, move them across with the arrow buttons, then select Apply. Use Cancel to leave without changes. Your choice is remembered on the computer and browser you use.
Download the list
Excel downloads the accidents on the page you are looking at. Export all downloads every accident that matches the current filters. Both use the columns you have chosen.
Add an accident
- Select Add Accident next to the page title.
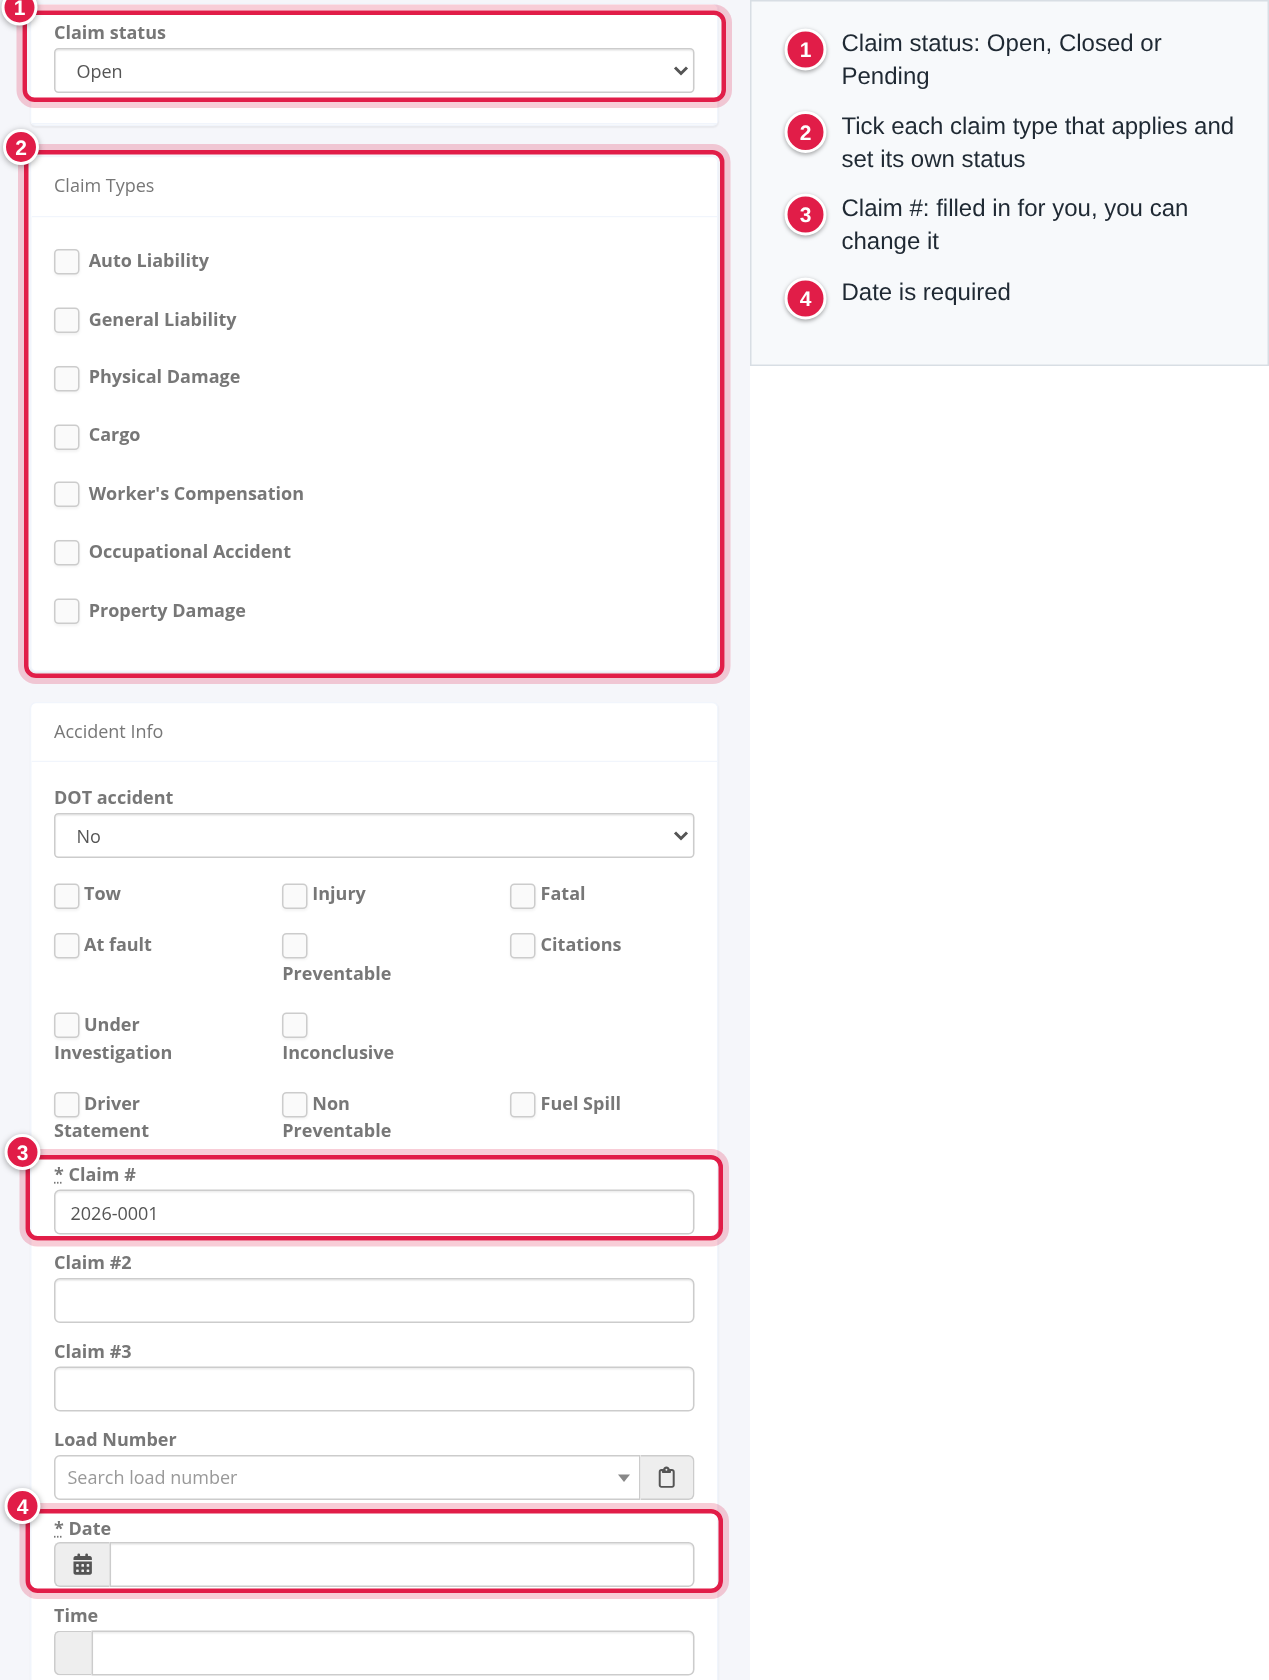
- The New accident form opens as a page. Set the Claim status and tick the Claim Types that apply; each ticked type gets its own status.
- Fill in Accident Info. Claim # is filled in for you (for example 2026-0001) and can be changed. Date is required. Add the Time, the address and anything else you know.
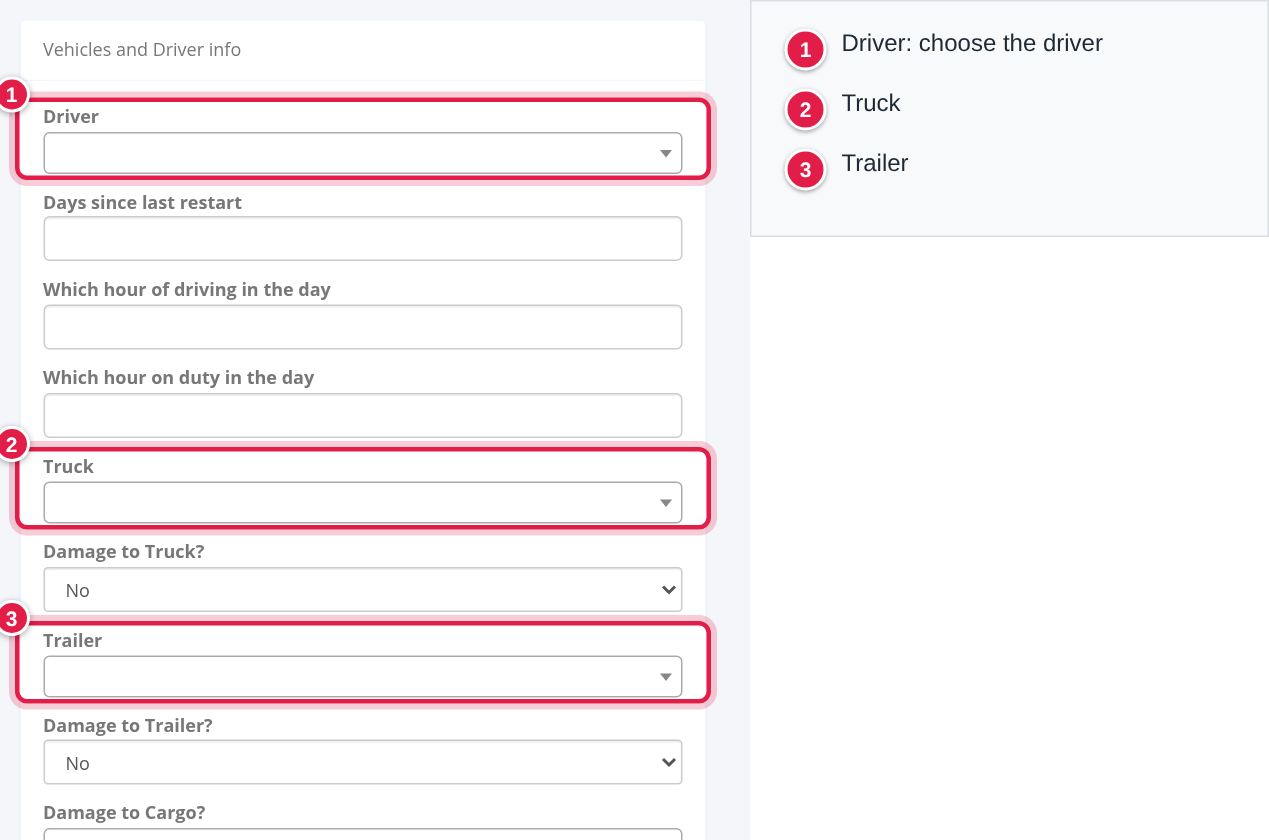
- Under Vehicles and Driver Info choose the Driver, the Truck and the Trailer, and say whether the truck, trailer or cargo was damaged.
- Fill in the other cards that apply (Post Incident, Weather, Road Type, Other Info, Injuries, Police Information).
- Select Save at the bottom of the page. The accident record opens.

The accident shows on the driver's Accidents tab once the driver is chosen and the date is inside the tab's date range.
The accident record
Select the eye icon (or the claim) on a row to open the record. It shows everything about the claim in three columns and cannot be changed here. Select Edit at the top right to change it.
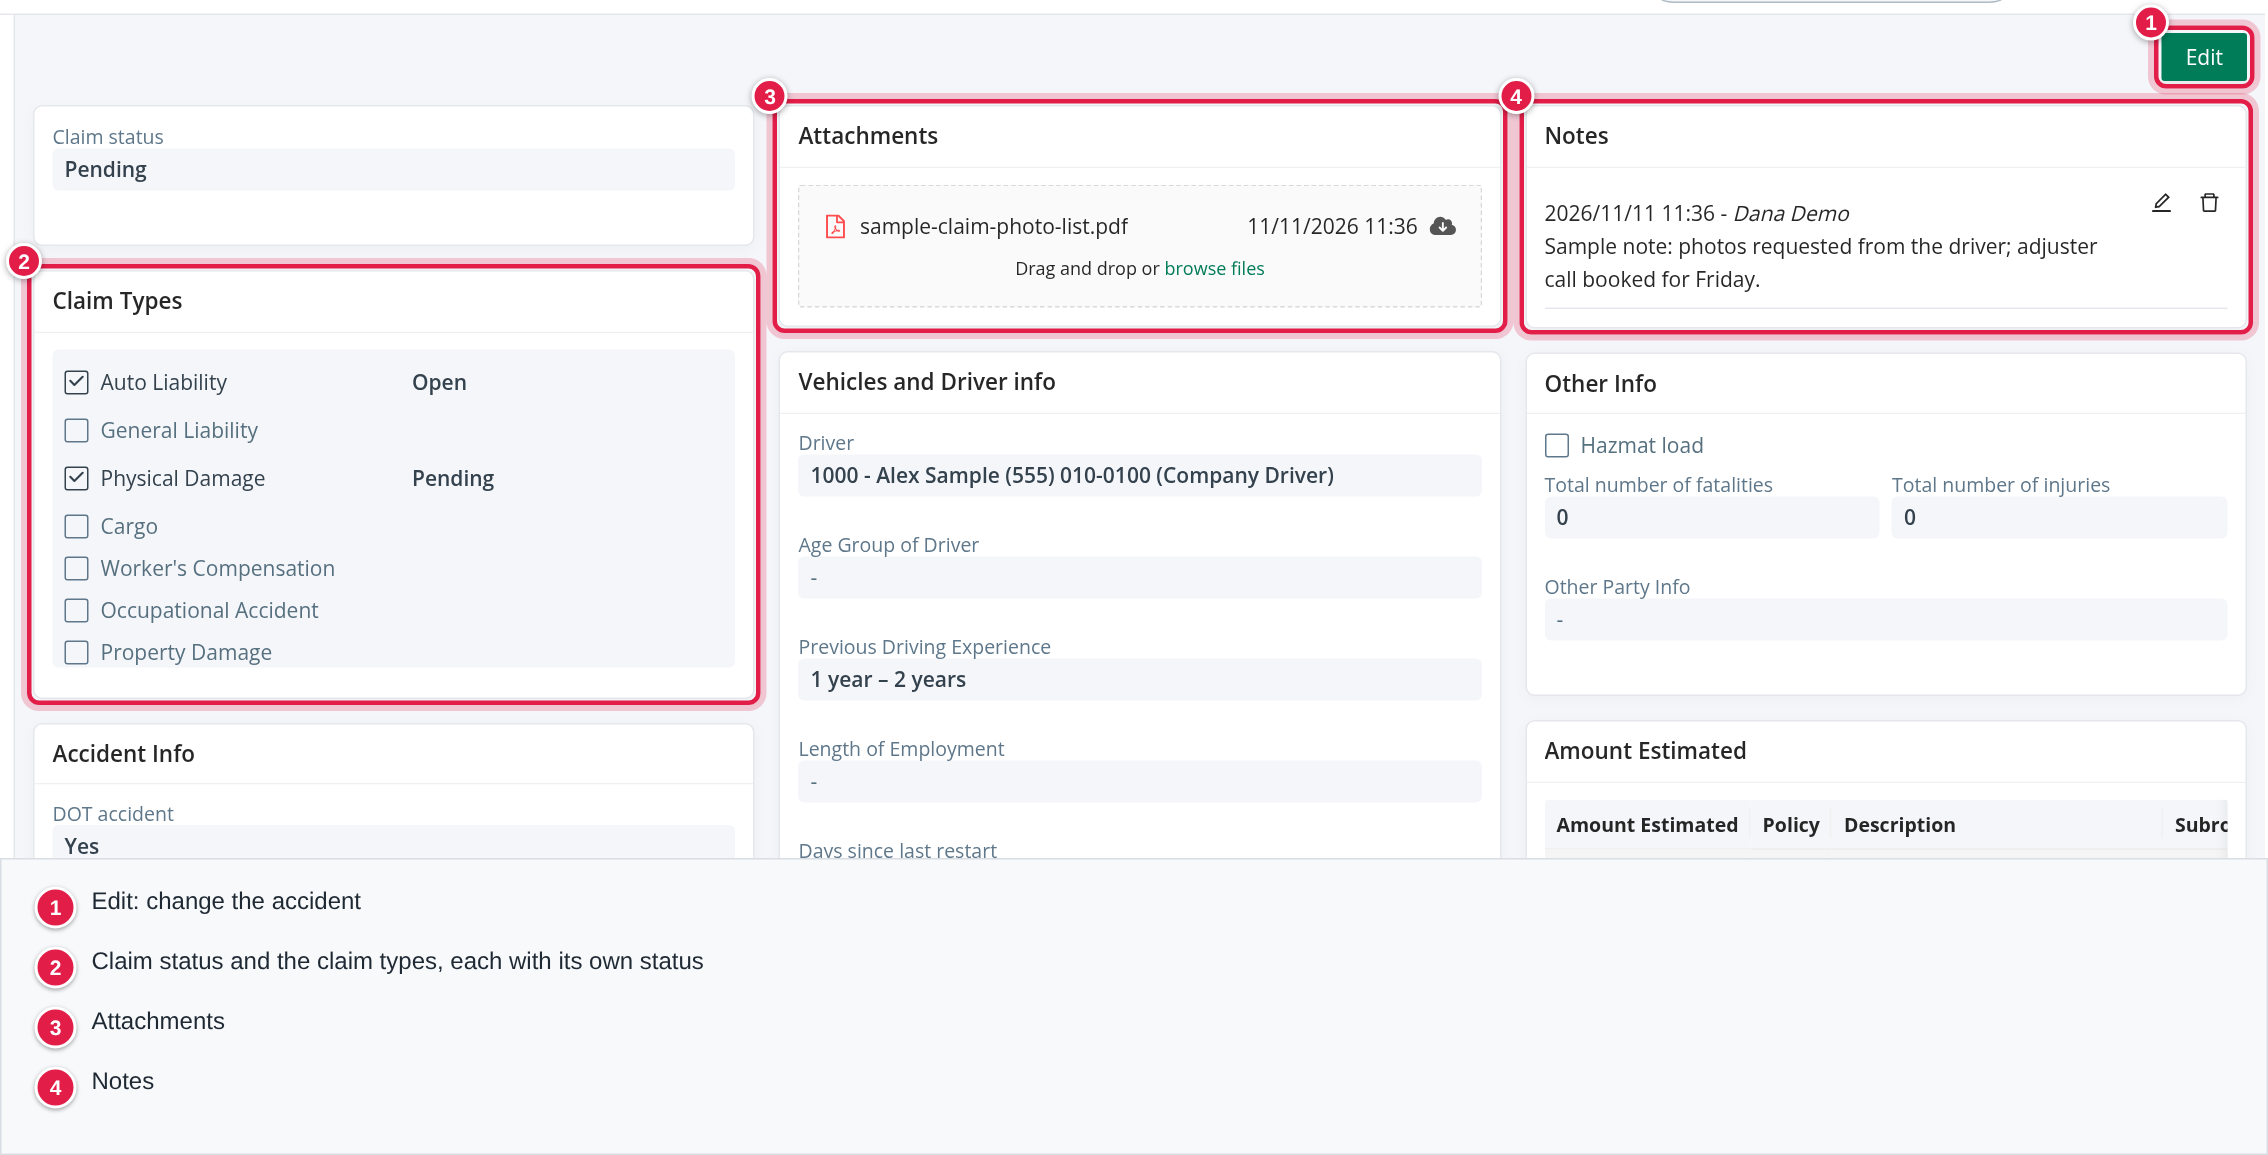
The cards on the record, from left to right:
| Column | Cards |
|---|---|
| Left | Claim status, Claim Types, Accident Info (DOT accident, tow, injury, fatal, at fault, preventable, claim numbers, load number, date, time and address), Type and Violation Types, Type of Collision, Map |
| Middle | Attachments, Vehicles and Driver info, Post Incident, Weather, Road Type |
| Right | Notes, Other Info, Amount Estimated, Amount Paid, Injuries, Police Information |
Claim status and claim types
Claim status is Open, Closed or Pending for the whole claim. Under Claim Types each ticked type (Auto Liability, General Liability, Physical Damage, Cargo, Worker's Compensation, Occupational Accident, Property Damage) shows its own status next to it, so one accident can have, for example, an open liability claim and a pending physical damage claim.
Notes
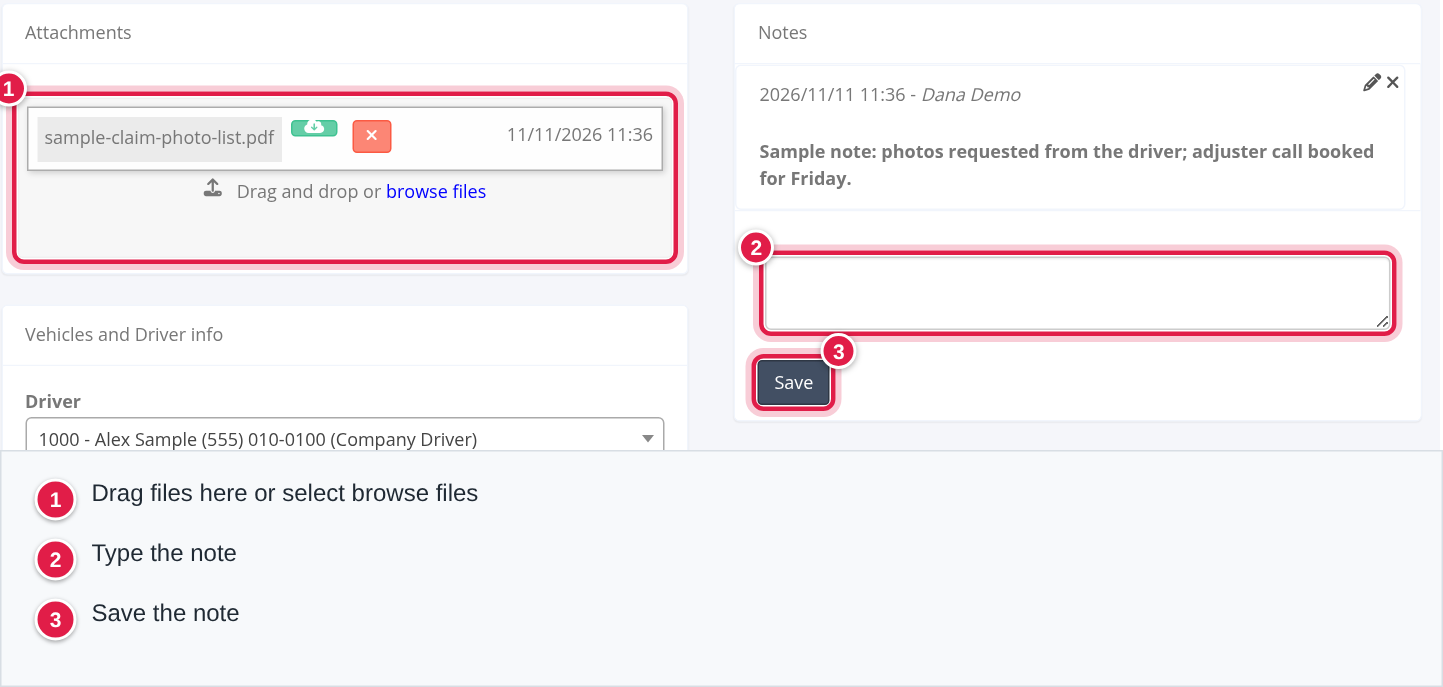
Notes lists every note with the date, time and who wrote it, newest first, or No notes yet. The pencil edits a note and the bin deletes it (on the edit page they are a pencil and a cross). To add a note, select Edit, type in the box in the Notes card and select its Save button.
Attachments
Each file is listed with its date and a download icon. To add files, drag them into the Attachments card or select browse files. On the edit page a red cross next to a file removes it, after a confirmation. The laptop icon at the top of the card opens the full list of uploads in a small window.
Map
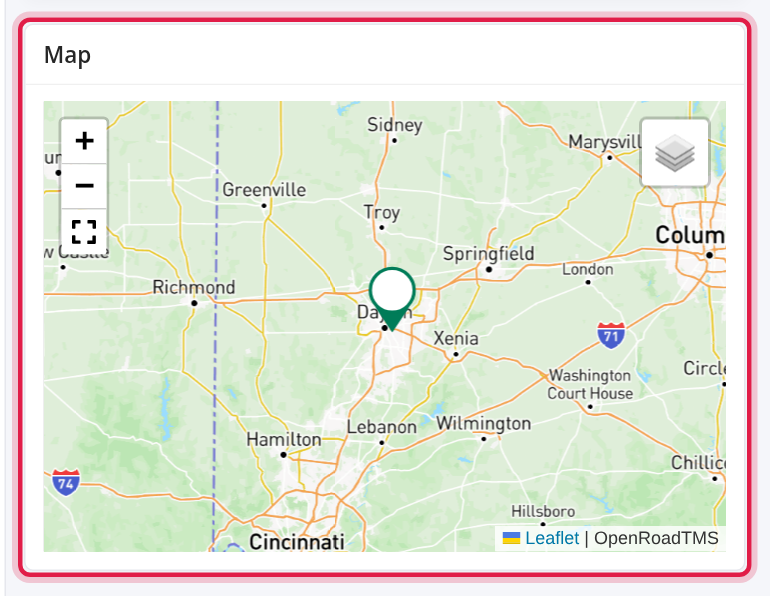
The Map card shows a pin where the accident happened.
Amounts
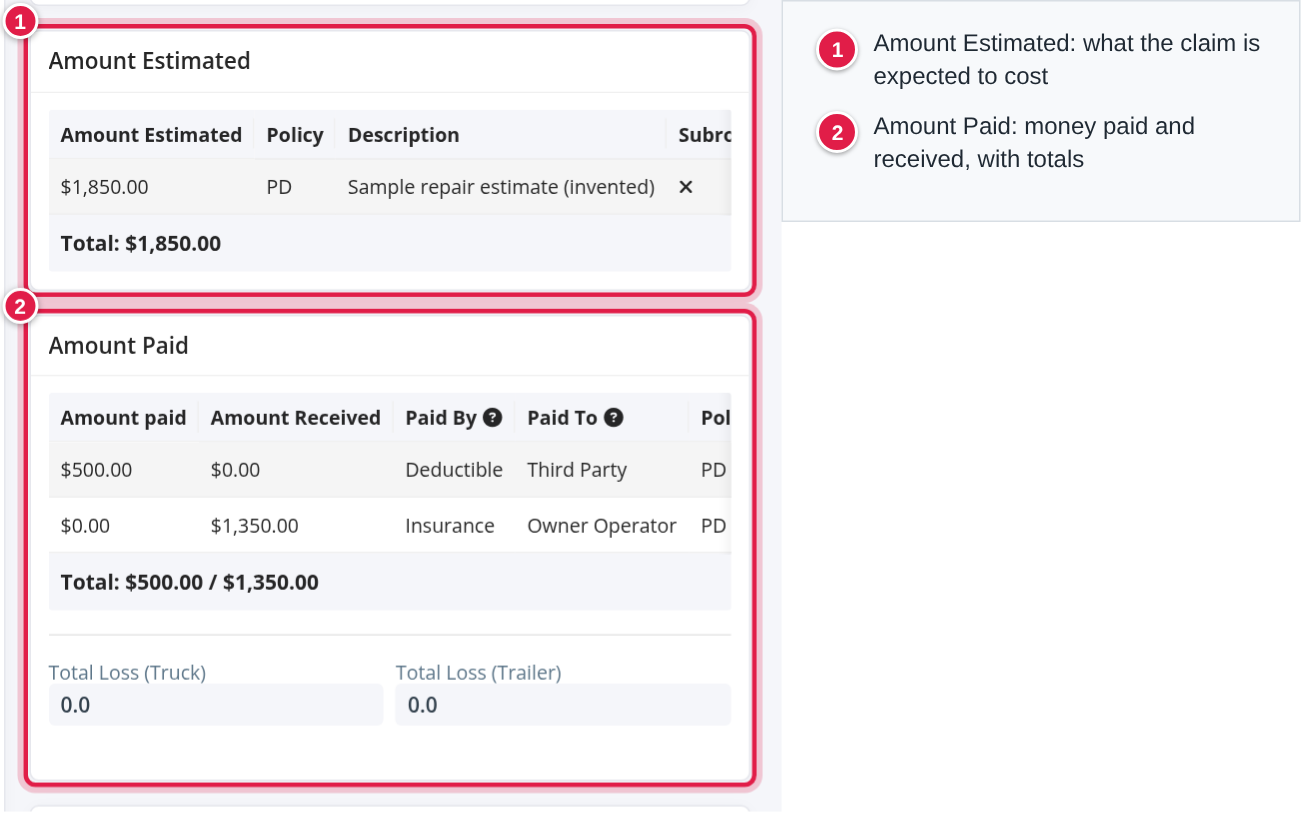
Amount Estimated lists what the claim is expected to cost: Amount Estimated, Policy, Description, Subrogation, Write Off, Write Off Note and Last Updated, with a Total. The table is wide: scroll sideways to see every column.
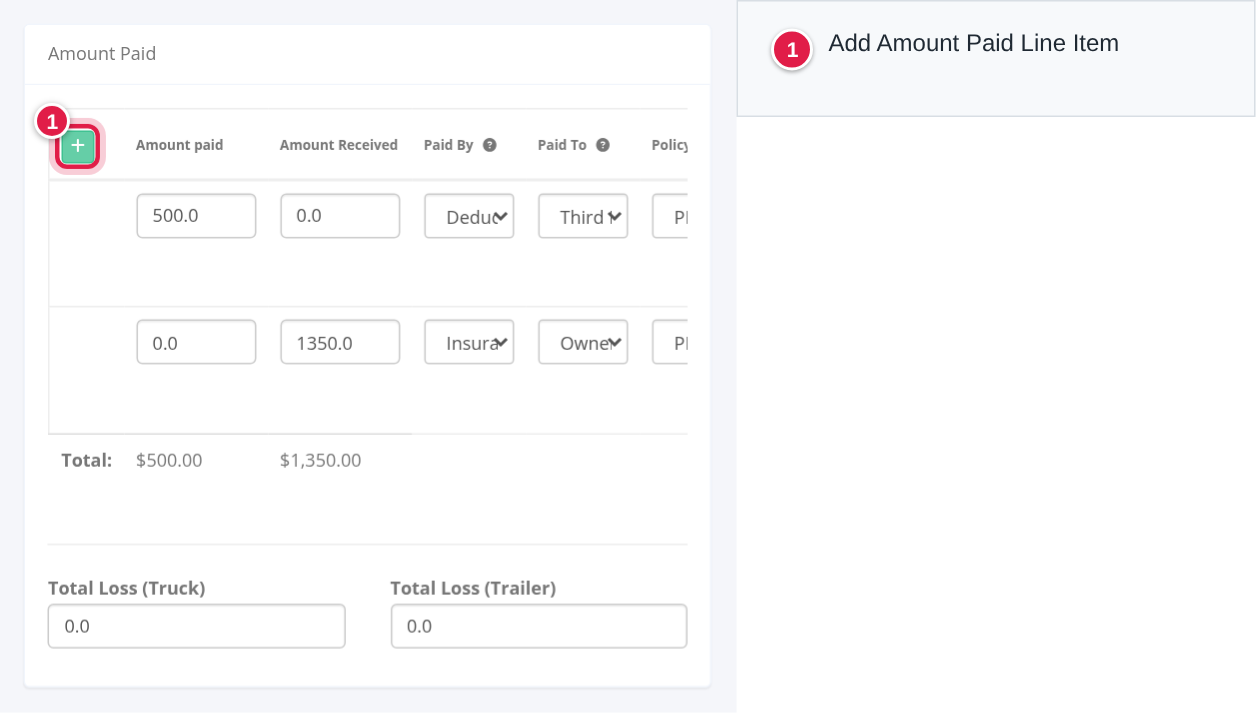
Amount Paid lists the money that moved: Amount paid, Amount Received, Paid By, Paid To, Policy (AL, Cargo, GL, OCAC, PD, WCC or Expense), Description, Subrogation, Write Off, Write Off Note and Last Updated, with the totals paid and received. Below it are Total Loss (Truck) and Total Loss (Trailer).
To add a line, select Edit, select the green + in the Amount Estimated or Amount Paid card, fill in the row and select Save at the bottom of the page.
Edit or delete an accident
- Edit: select the pencil on the list or Edit on the record, change what you need and select Save at the bottom. The Accidents button at the top right takes you back to the list.
- Delete: select the bin on the list. A window asks Delete claim followed by the claim number, and says the claim will be removed from the Accidents list. Select Cancel to keep it or Delete claim to remove it.
Set up the choices for an accident
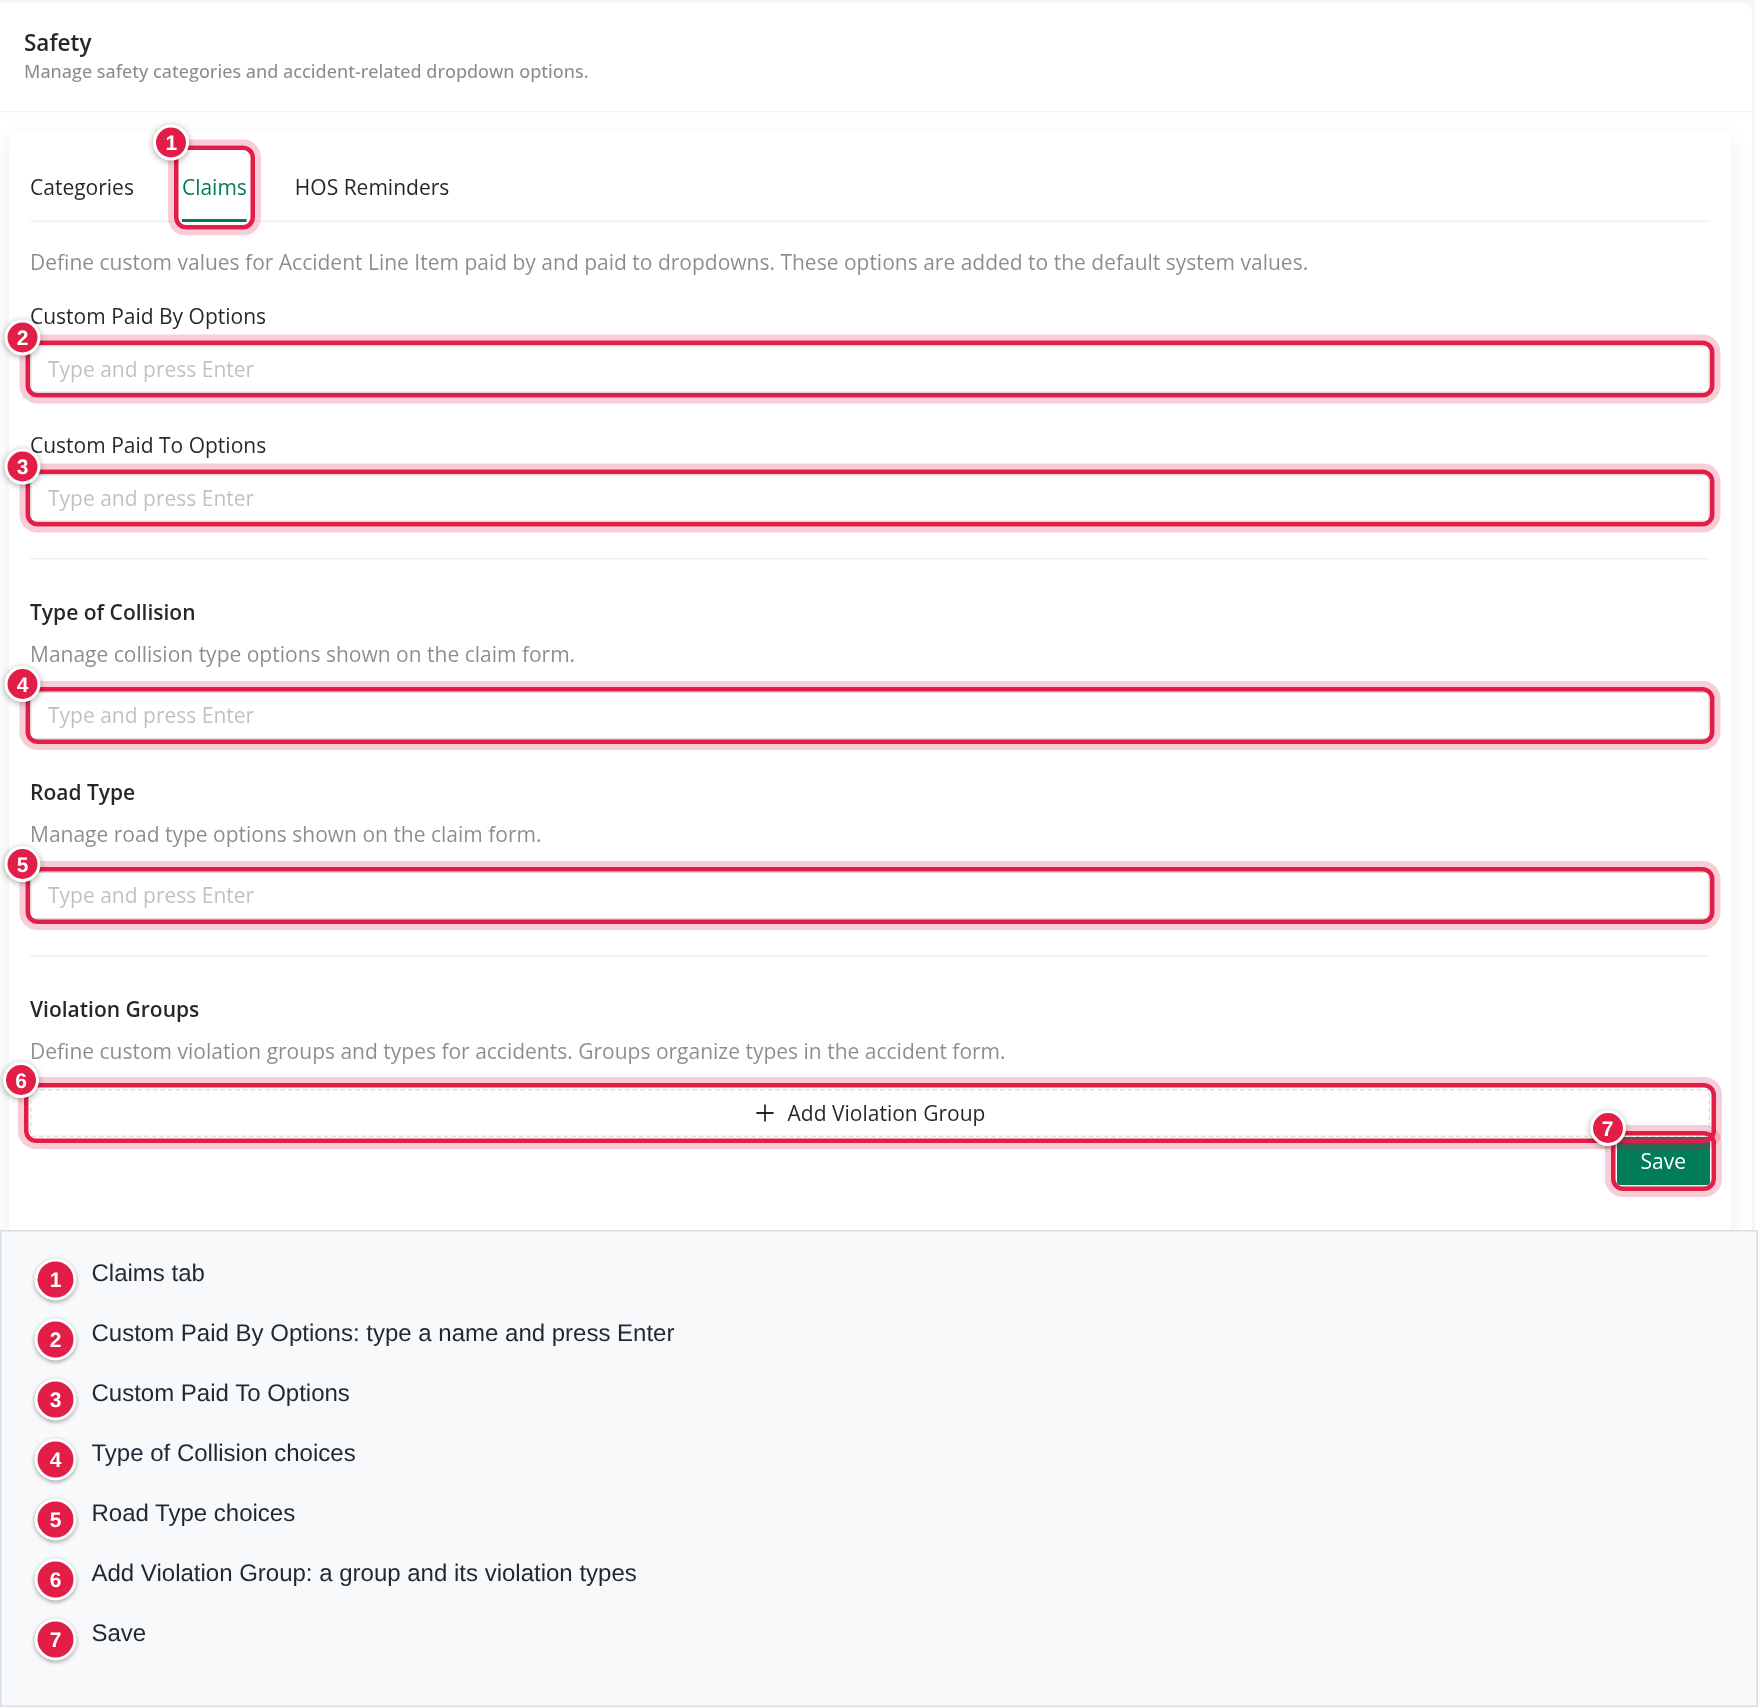
An administrator opens Settings → Preferences → Operations → Safety and selects the Claims tab.
- Custom Paid By Options and Custom Paid To Options: type a name and press Enter. They are added to the standard choices on the money lines.
- Type of Collision and Road Type: type each choice and press Enter. They fill the lists on the accident form.
- Violation Groups: select Add Violation Group, name the group and add its violation types. The types show on the accident under Violation Types, grouped by name.
- Select Save.
On the accident form, administrators also see an Edit options in Safety settings link under these lists that opens the same page.
Frequently asked questions
Was this article helpful?
That’s Great!
Thank you for your feedback
Sorry! We couldn't be helpful
Thank you for your feedback
Feedback sent
We appreciate your effort and will try to fix the article