Weather Alerts shows the active U.S. weather alerts on a map together with your drivers' trucks, lists the drivers who are in or near an alert area, and lets you record that you reached a driver or send the driver a message. In the settings you can also choose the safety instructions that are used for each type of alert.
Who can do this: users with the Admin, Dispatcher, Capacity or Safety role (and Superadmins) can open the page, add comments, send SMS messages and mark drivers as grounded. Your account's access settings can change this. Changing the weather settings needs access to Settings, and the two checkboxes Weather Alerts to send automated messages and Send messages on repeat events can only be changed by a Superadmin.
Before you begin
- Weather alerts must be turned on for your account. If Weather alerts is missing under Safety in the menu, ask your OpenRoad contact to turn it on.
- A driver is shown on the map only when all of these are true:
- The driver is Active and has an active truck assigned. - The truck reports its position. Positions come from your GPS or ELD connection (Samsara, Motive, Geotab or SkyBitz). - The driver has a load in progress that OpenRoad is following with the truck's position.
- A driver is listed under the map only when the truck is inside an alert area or within the radius set in the weather settings (20 miles unless you change it, see "Weather settings" below).
- Send sms goes through your Samsara connection, so the driver must be linked to Samsara.
- Automatic messages are a separate feature from the Weather Alerts page. The map, the driver list, comments and Send sms work without it. Automatic messages to drivers, and the Weather Alerts settings page that controls them, only exist when that feature is turned on for your account. If you do not see the settings page, ask OpenRoad support to check it.
- For automatic messages to reach a driver: the feature above is on, a Superadmin has ticked Weather Alerts to send automated messages, and the driver is set up for messaging through Samsara or Motive (see "Weather settings" below).
Open the page
Select Safety in the menu, then Weather alerts. The top of the page has the Weather By Time list and Created at. Below them is the map with its Legend, then the filters and the list of drivers.
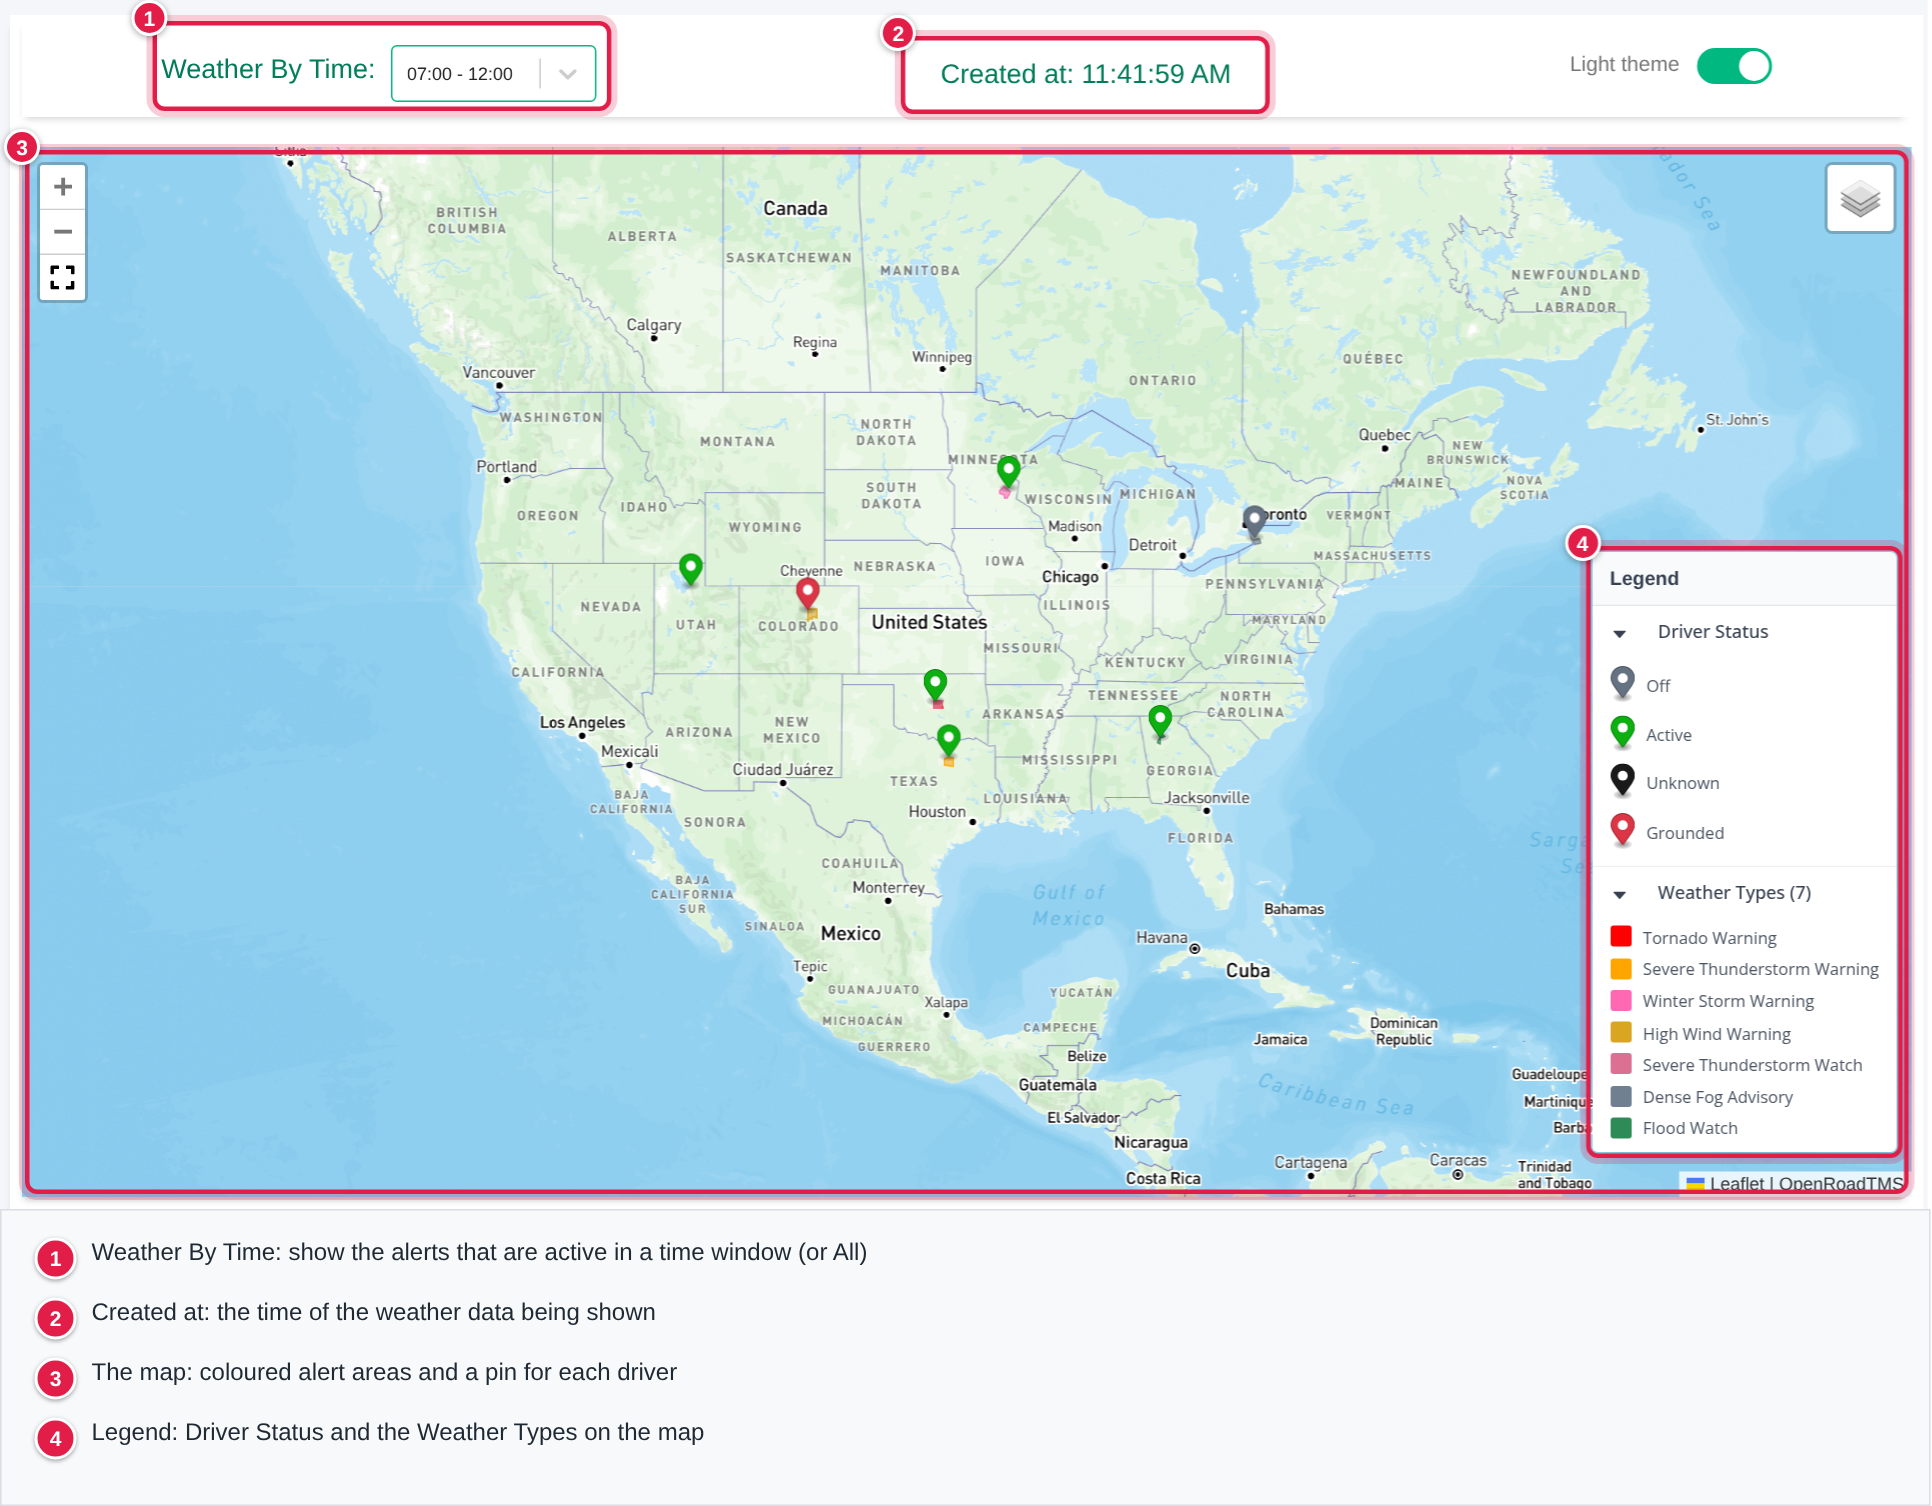
- Weather By Time shows the alerts that are active in a time window: All, 07:00 - 12:00, 12:01 - 18:00 or 18:01 - 06:59. The times are Central Time. The window that matches the current time is chosen when you open the page.
- Created at is the time of the weather data being shown.
Read the map
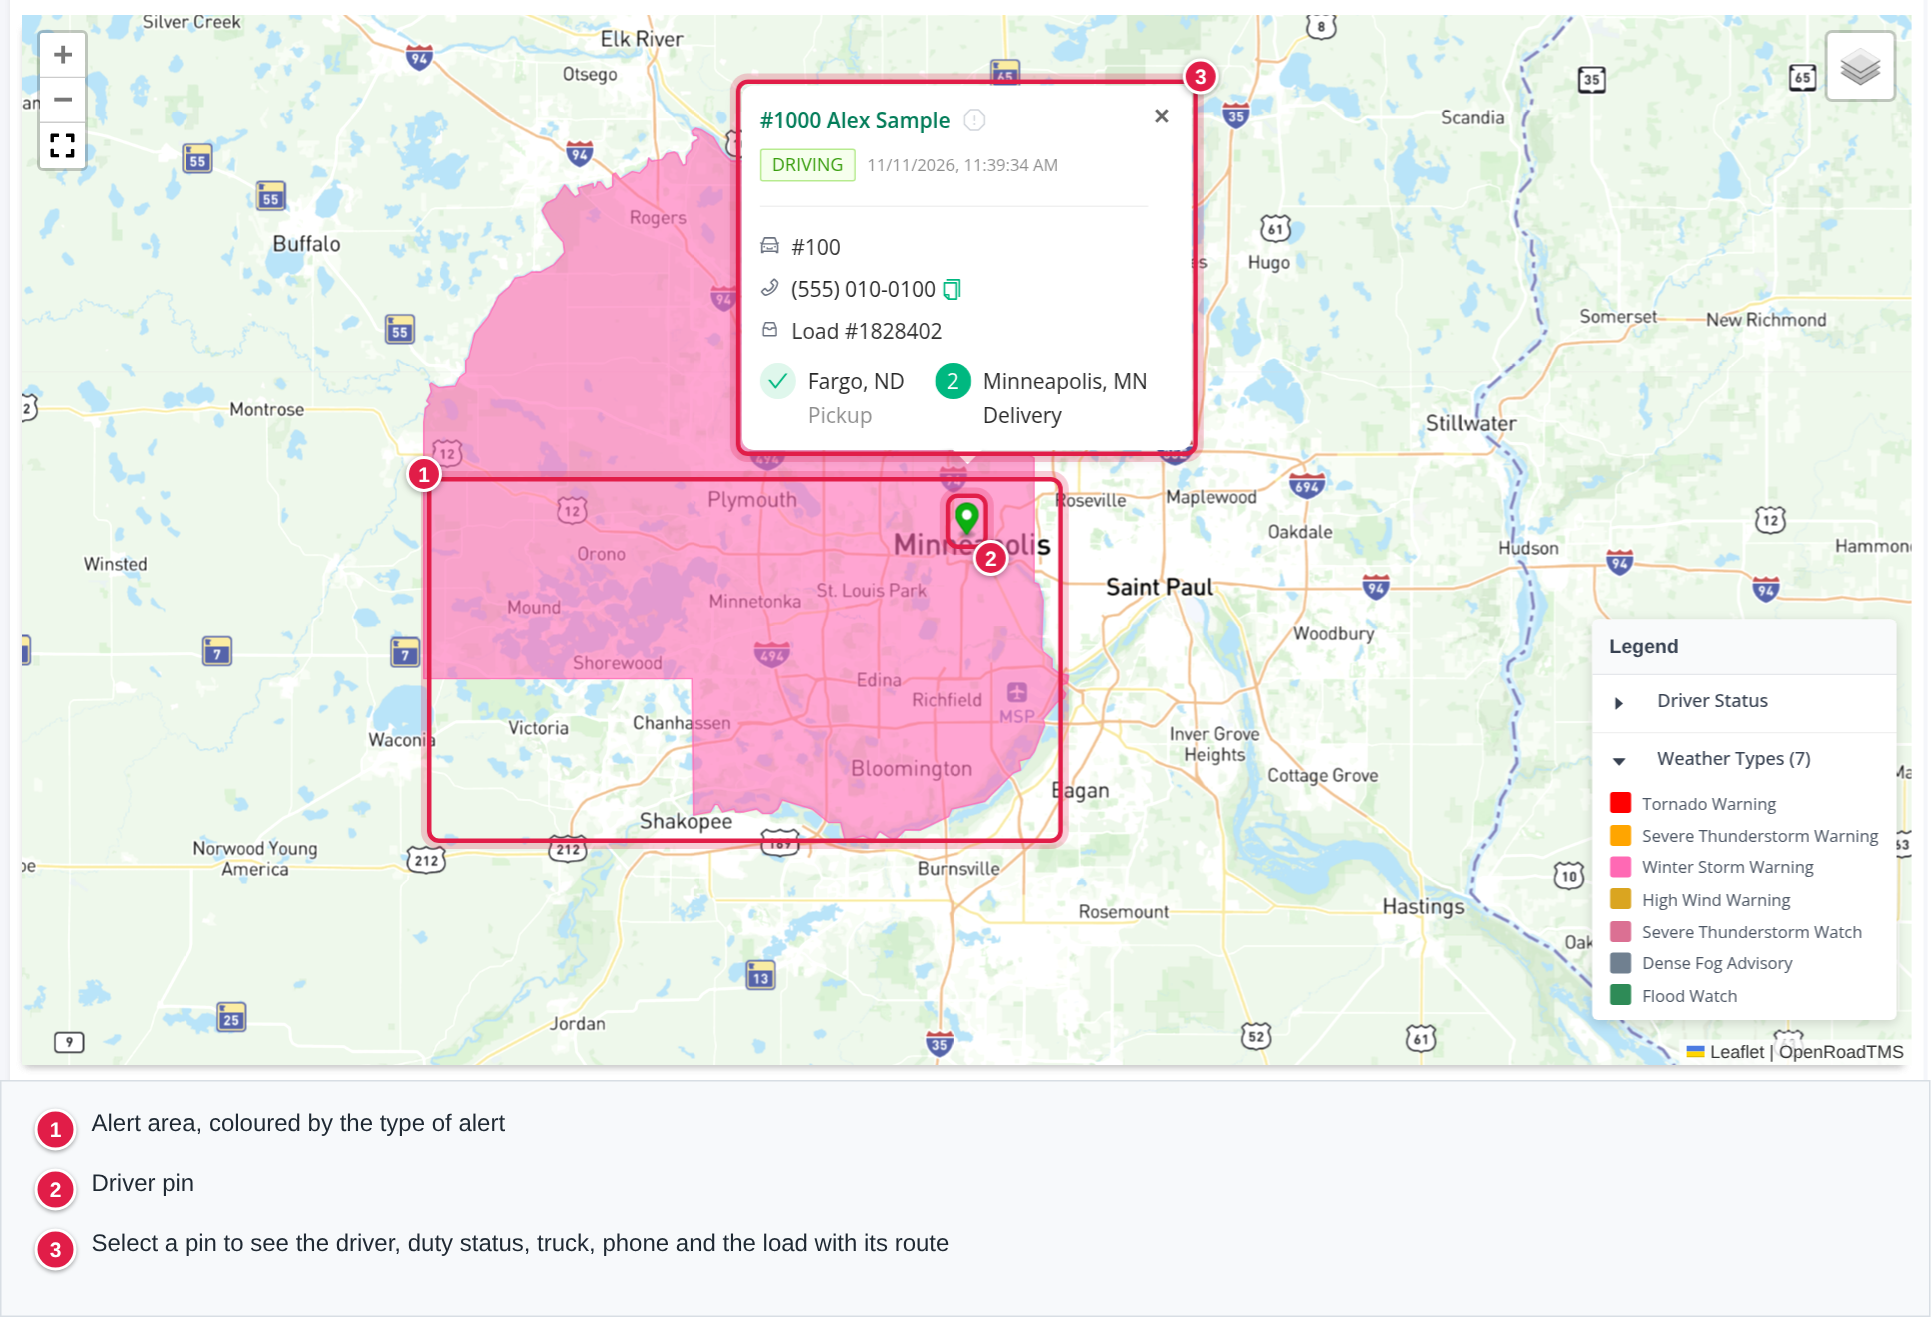
- Alert areas are coloured by the type of alert. The colours are explained in the Legend.
- Pins show your drivers. A green pin is a driver who is driving, on duty or doing a yard move. A grey pin is a driver who is off duty, in the sleeper berth or using personal conveyance. A dark pin is a driver whose status is not known. A red pin is a driver marked as grounded. The Driver Status part of the Legend shows the colours.
- Use the plus and minus buttons on the map to zoom in and out.
See a driver on the map
Select a pin, or select the driver number (for example #1000) in the list below the map. The page scrolls up and the map zooms in on the driver. The window on the pin shows the driver's name and number, the grounded icon, the duty status with the time it was received, the truck, the phone number (with a copy icon), the load and the stops of the load.
Read an alert
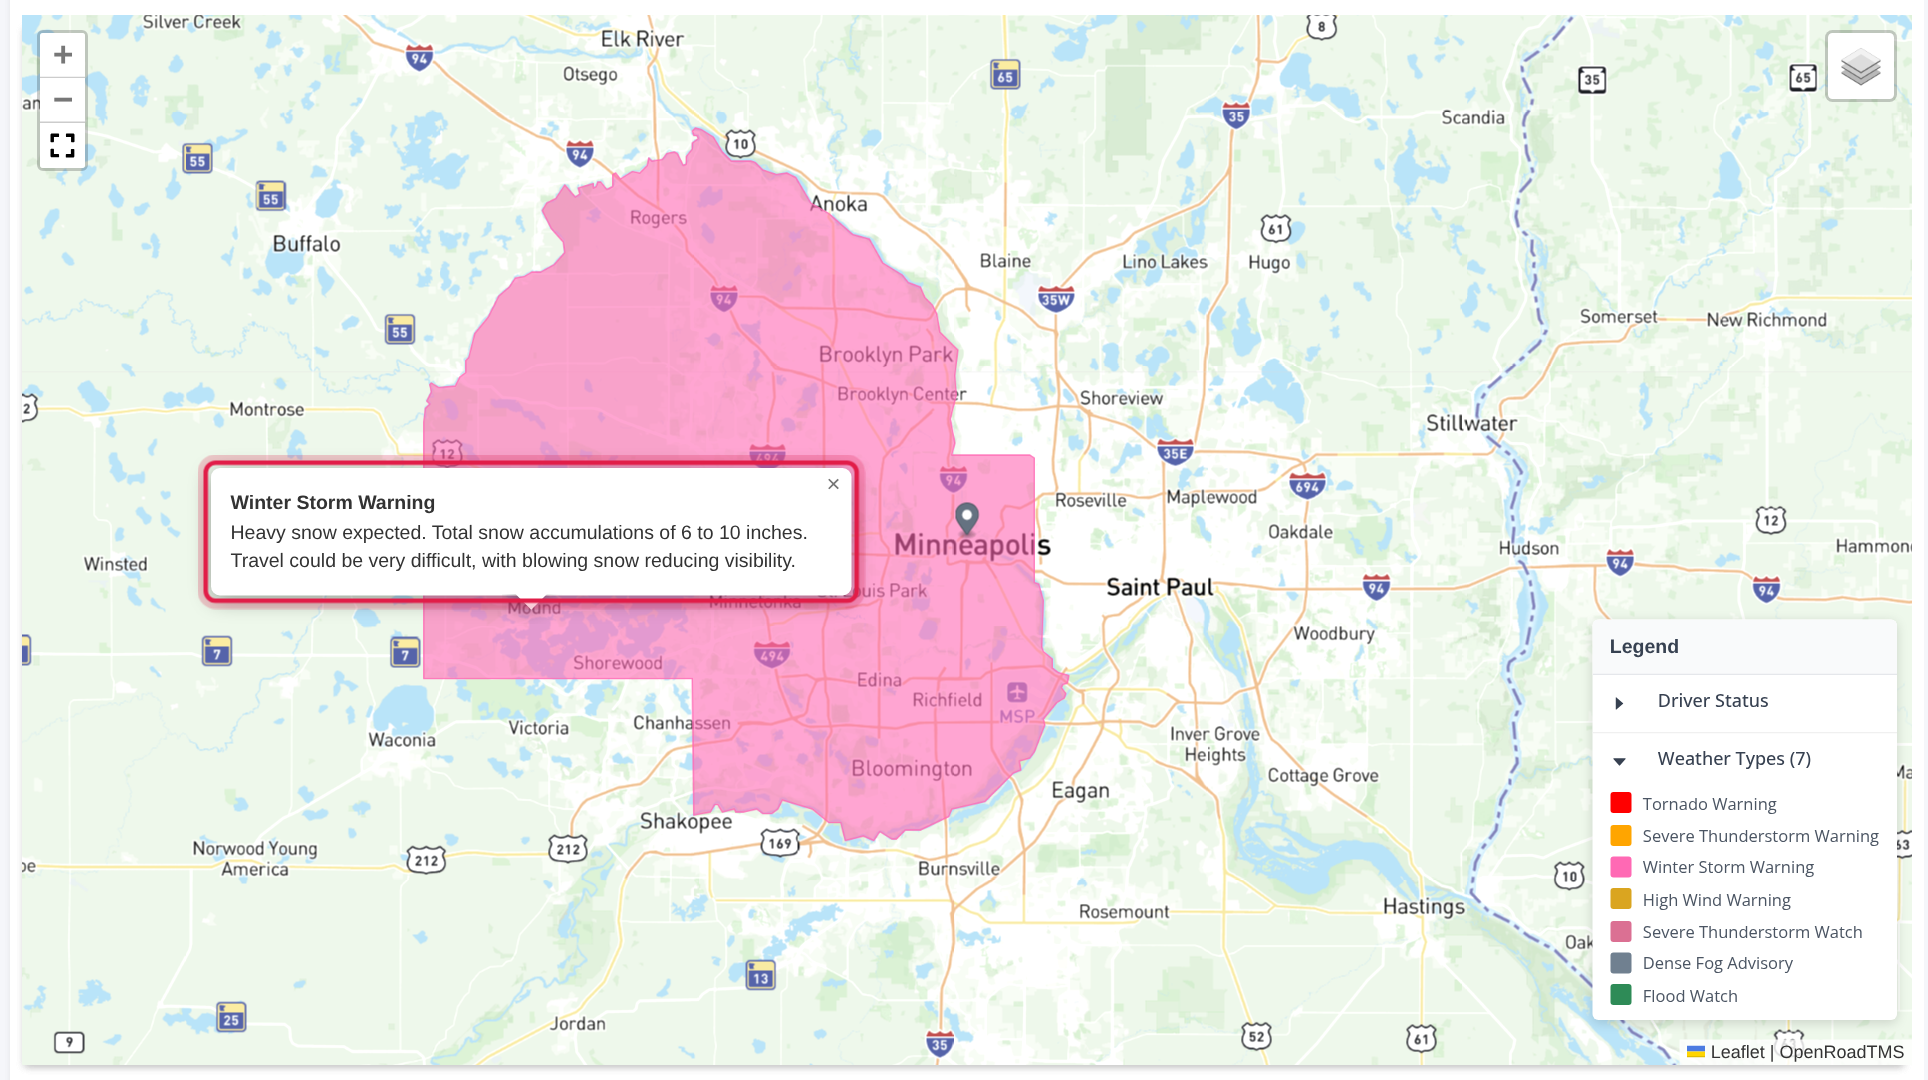
Select a coloured area on the map to read the name and the description of the alert.
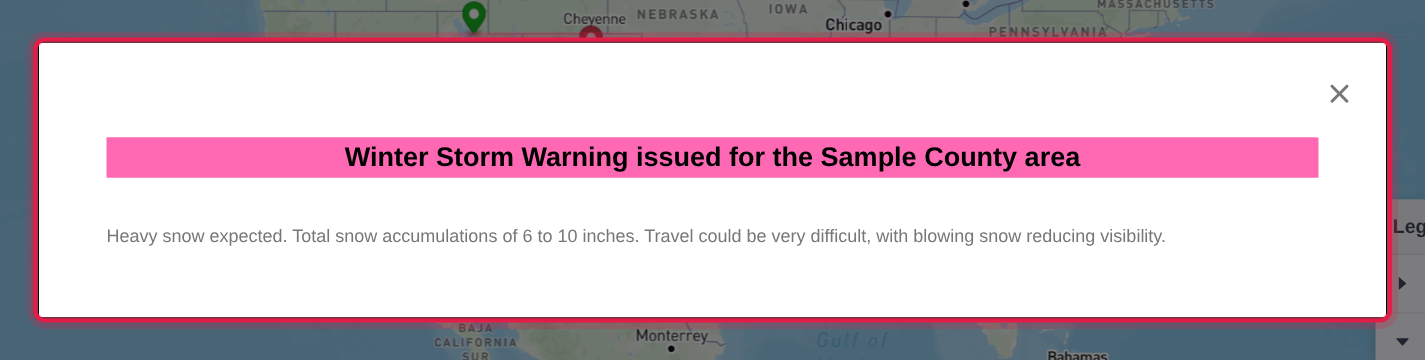
You can also select an alert type in the Legend under Weather Types. A window opens with the headline and the full description of the alert. The Legend lists only the types that are on the map right now.
Filter the drivers
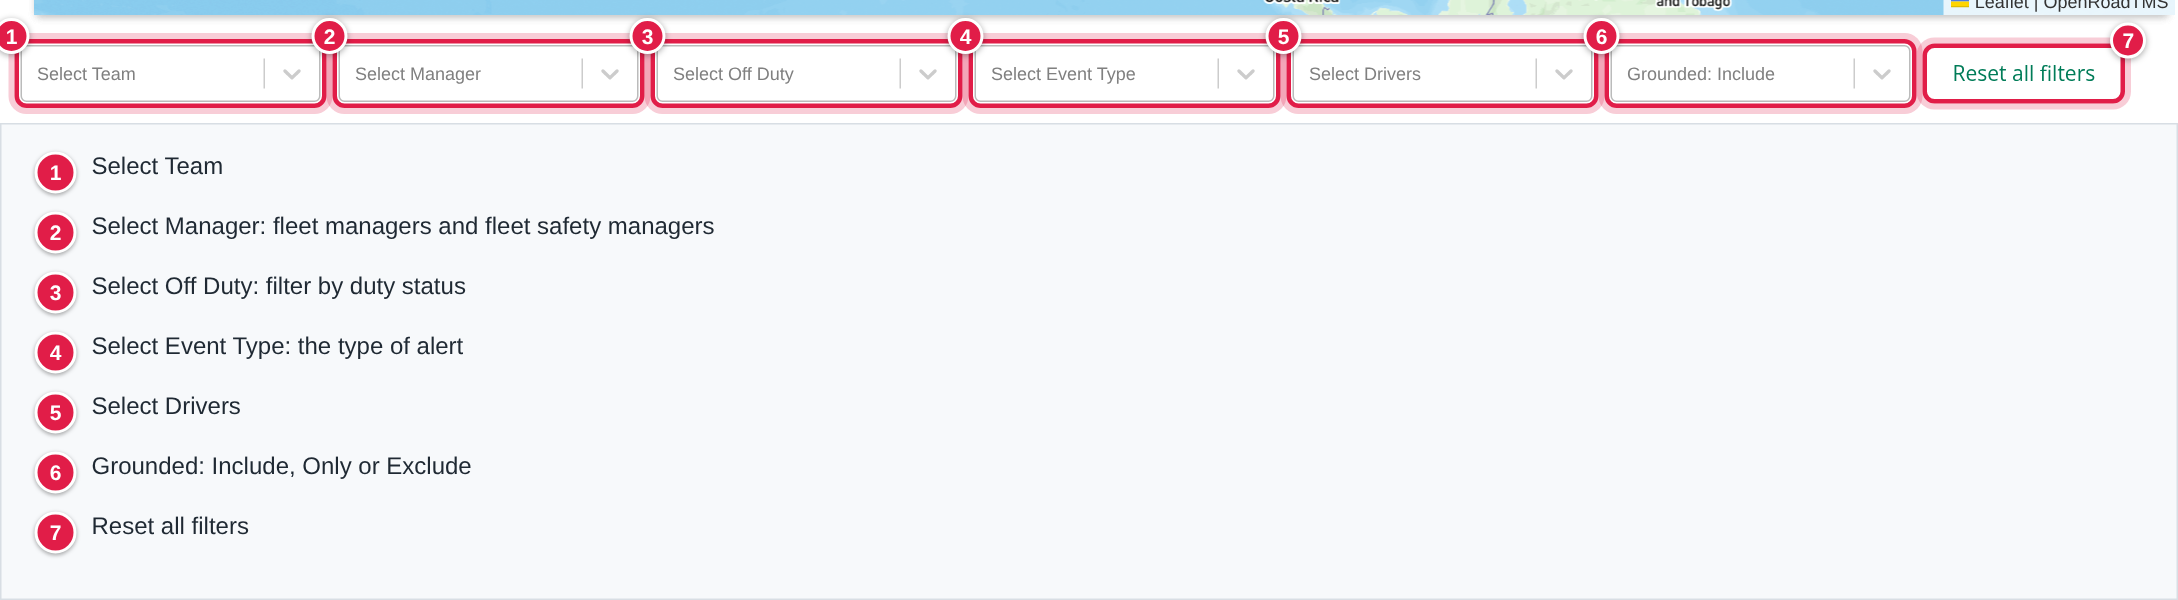
Use the filters above the list of drivers. They narrow the list and the pins on the map:
| Filter | What it does |
|---|---|
| Select Team | Drivers whose fleet manager or fleet safety manager belongs to the team |
| Select Manager | Drivers of the chosen fleet manager or fleet safety manager |
| Select Off Duty | Drivers with the chosen duty status, for example DRIVING or OFF_DUTY |
| Select Event Type | Drivers who have the chosen type of alert. It changes the list only; the pins stay on the map |
| Select Drivers | Only the chosen drivers |
| Grounded: Include | Choose Grounded: Include, Grounded: Only or Grounded: Exclude |
Select Reset all filters to clear them.
The list of drivers in alert areas
The list shows the drivers whose truck is in or near an alert area. Each row shows the Driver No., Grounded, Full Name, Truck Number, Phone, Location, Duty Status (Samsara), Duty Updated (Samsara), Fleet manager, Fleet safety manager and Event.
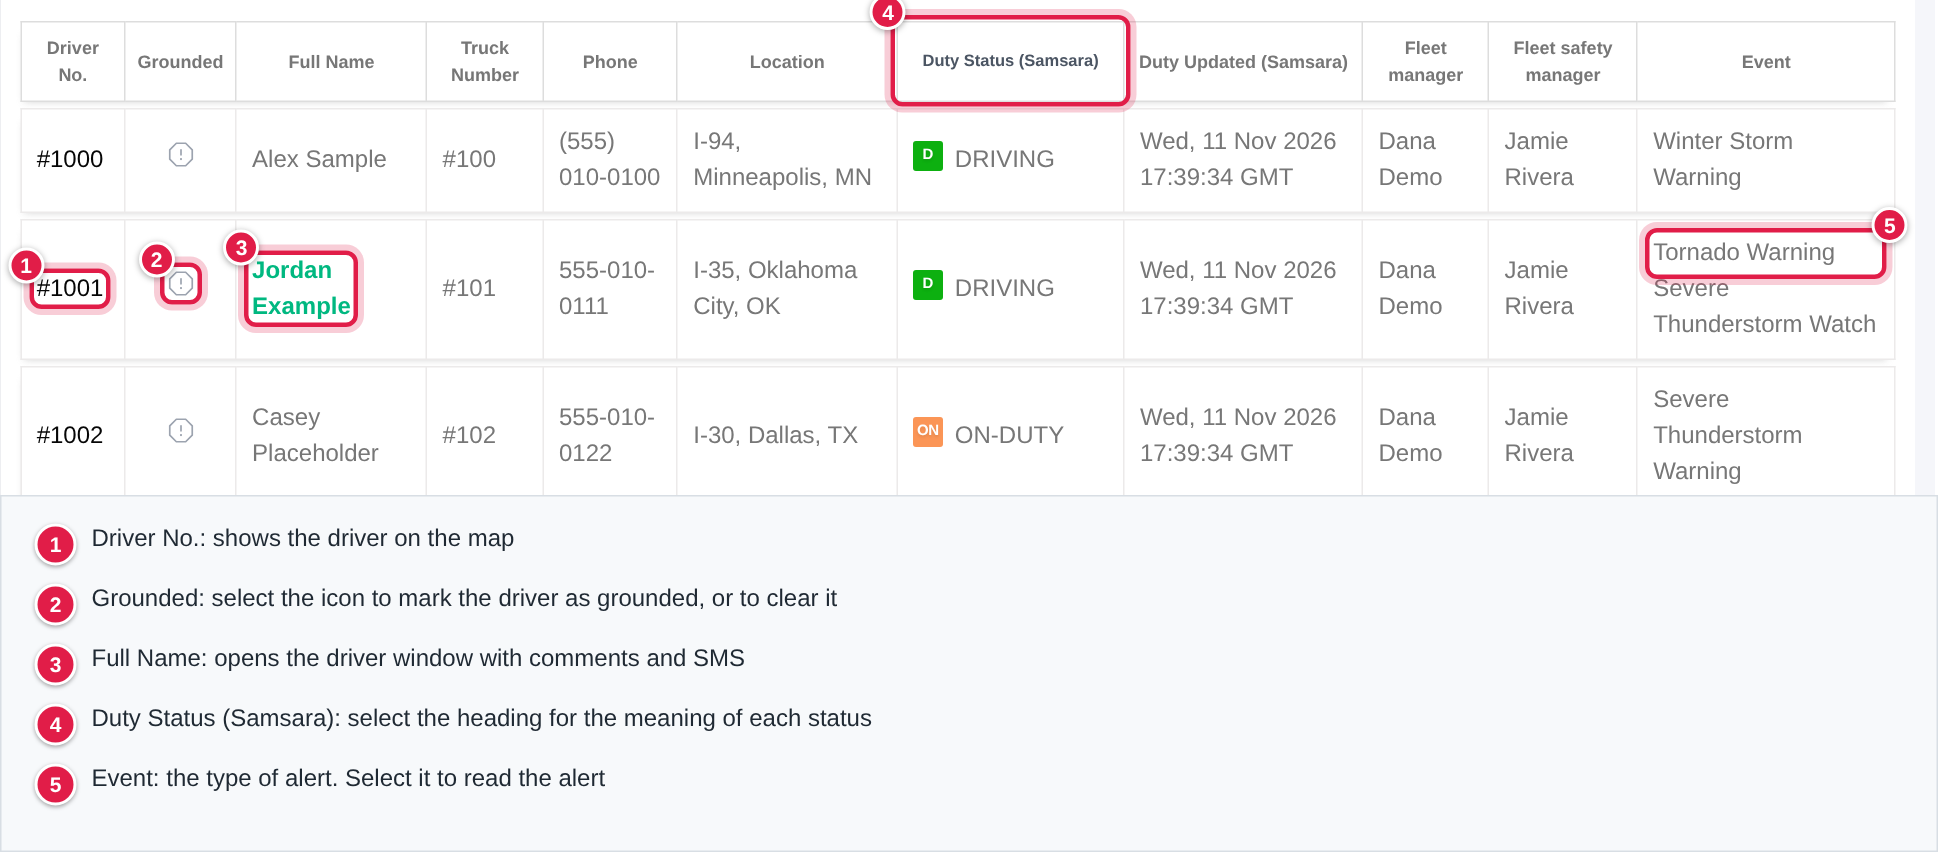
- Driver No.: shows the driver on the map.
- Grounded: select the icon to mark the driver as grounded. The icon turns red and the pin on the map turns red. Select it again to clear it.
- Full Name: opens the driver window (see below). A driver who was advised today is shown in green.
- Duty Status (Samsara): select the heading to see what each duty status means.
- Event: the types of alert the driver is in. Select one to read the alert.
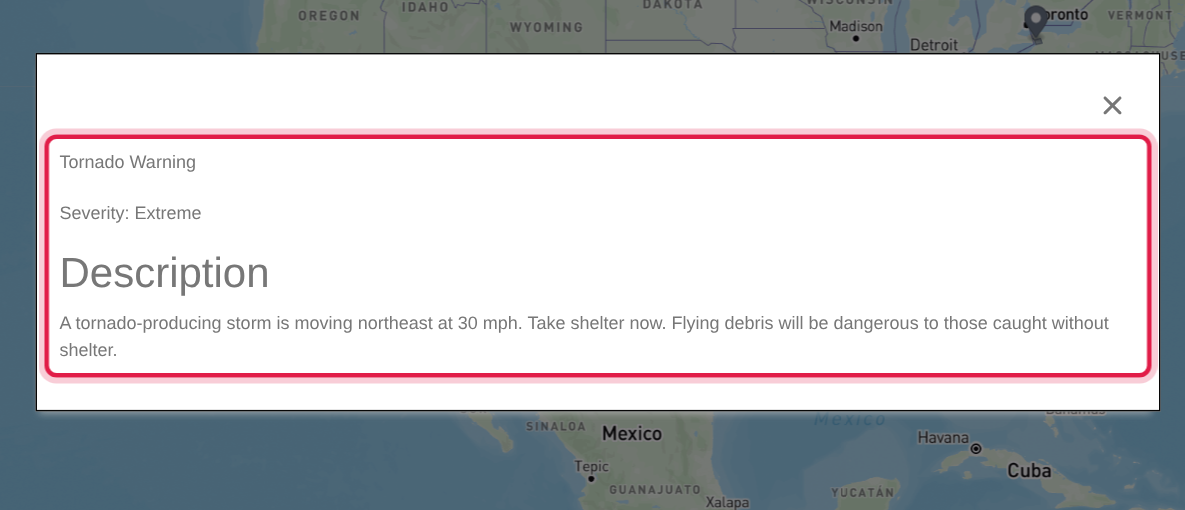
Read an event
The window shows the name of the alert, its Severity and the Description.
Comment on a driver or send an SMS
Select the driver's name in the list. The driver window shows the phone number and the location, and under Last comments the comments written today with the author, the time and Advised or Not advised.
- Type the comment in Enter your comment.
- Keep Status of call ticked if you reached the driver (the comment is then shown as Advised). Clear it if you did not.
- Select Add comment.
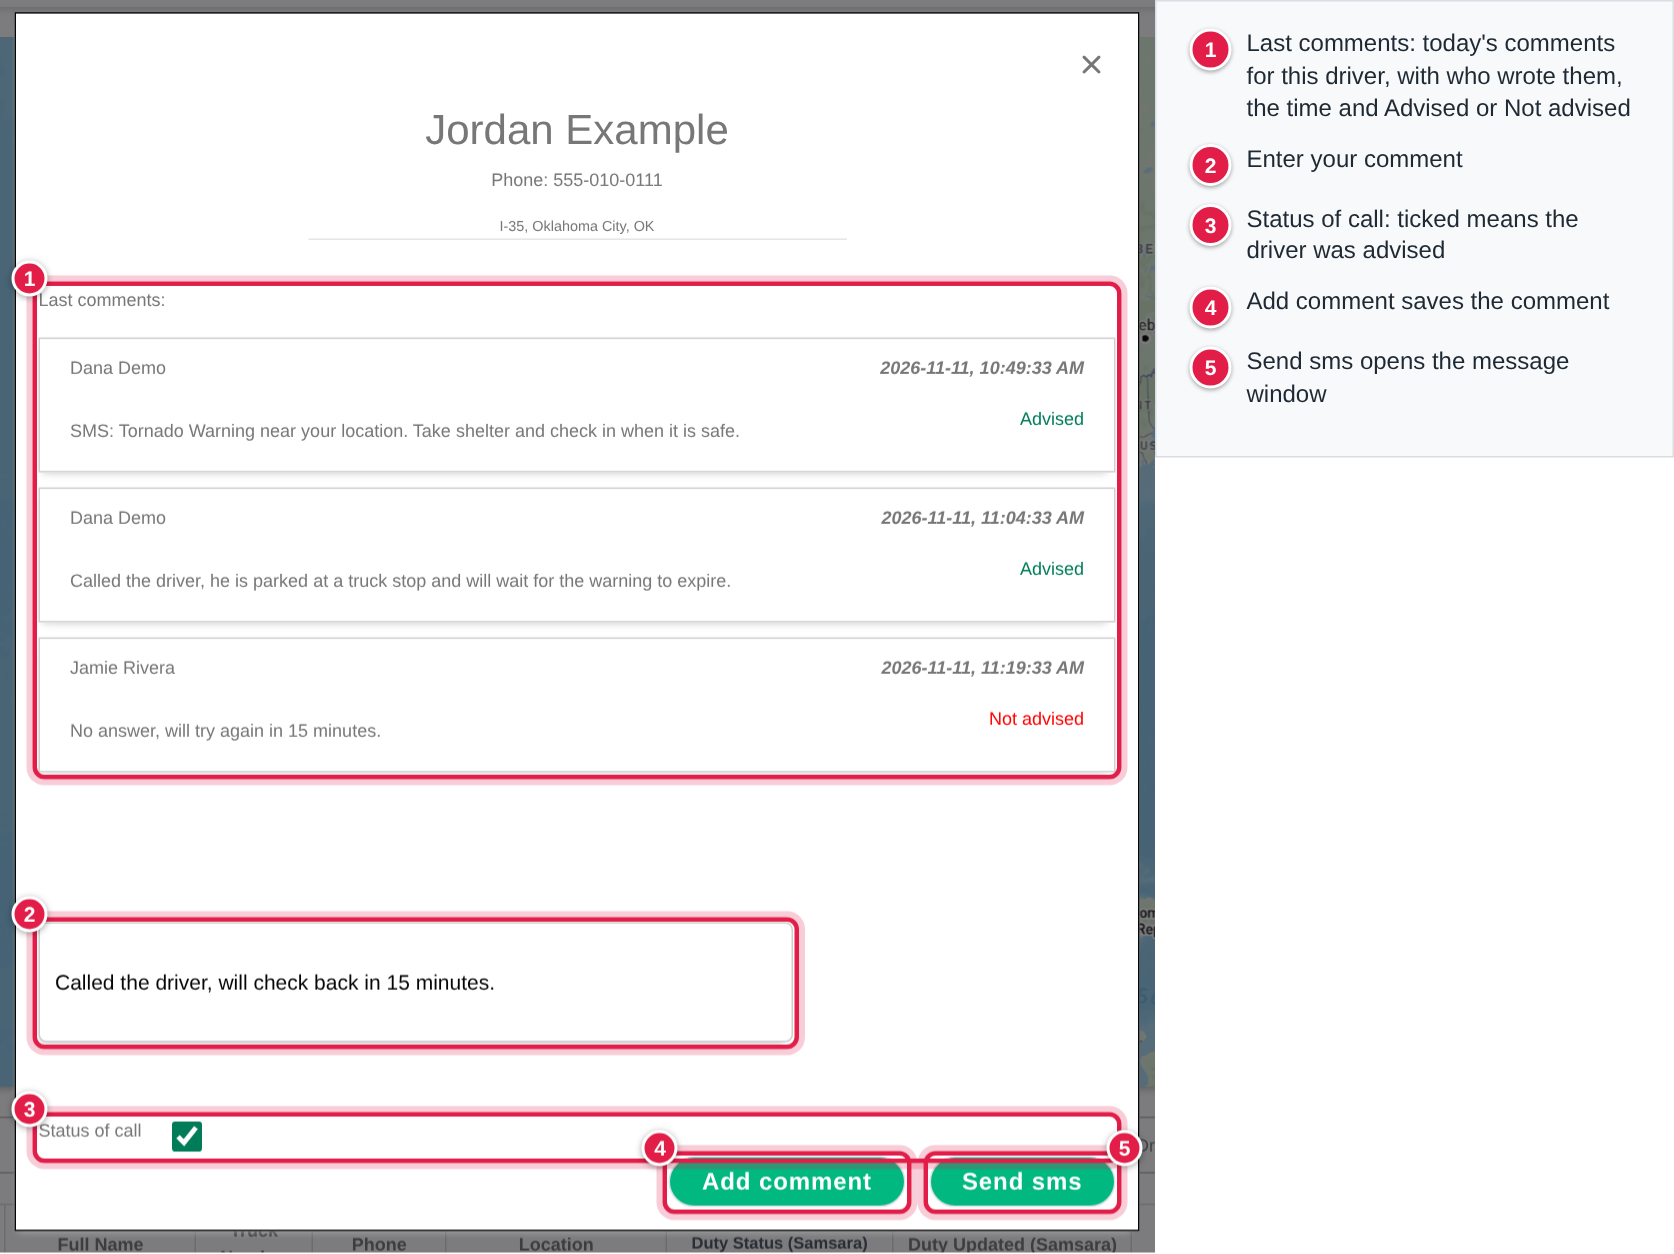
To send a message instead, select Send sms. The window Please confirm SMS! opens with the message already written: a greeting with the driver's first name, the event, the description of the alert and your name. You can change the text, or select the trash can to clear it and write your own. The message can be up to 1000 characters. Select Send sms to send it. The window also shows the driver's phone number, so you can call the driver instead.
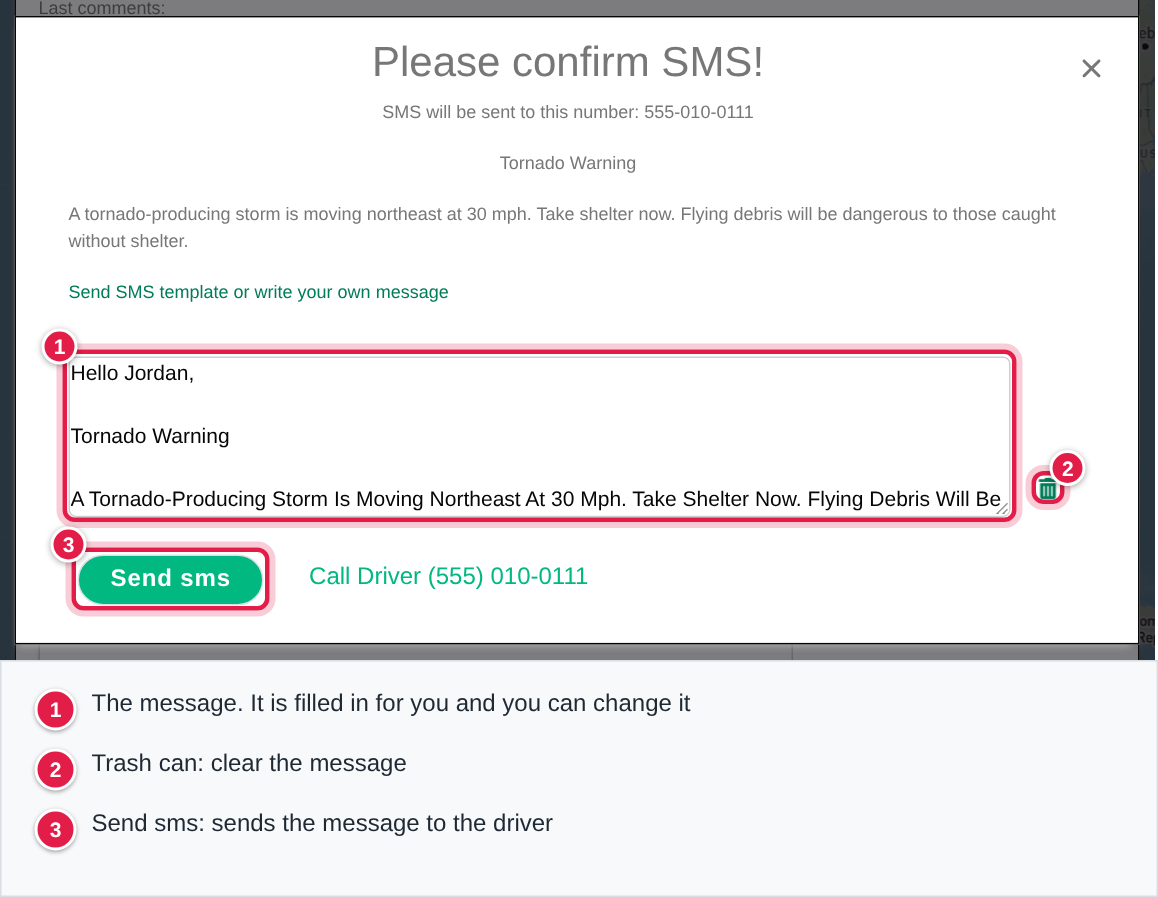
A message sent from this page is also saved as a comment that starts with SMS:.
Weather settings
Open Settings, then Preferences, then Operations, then Weather Alerts.
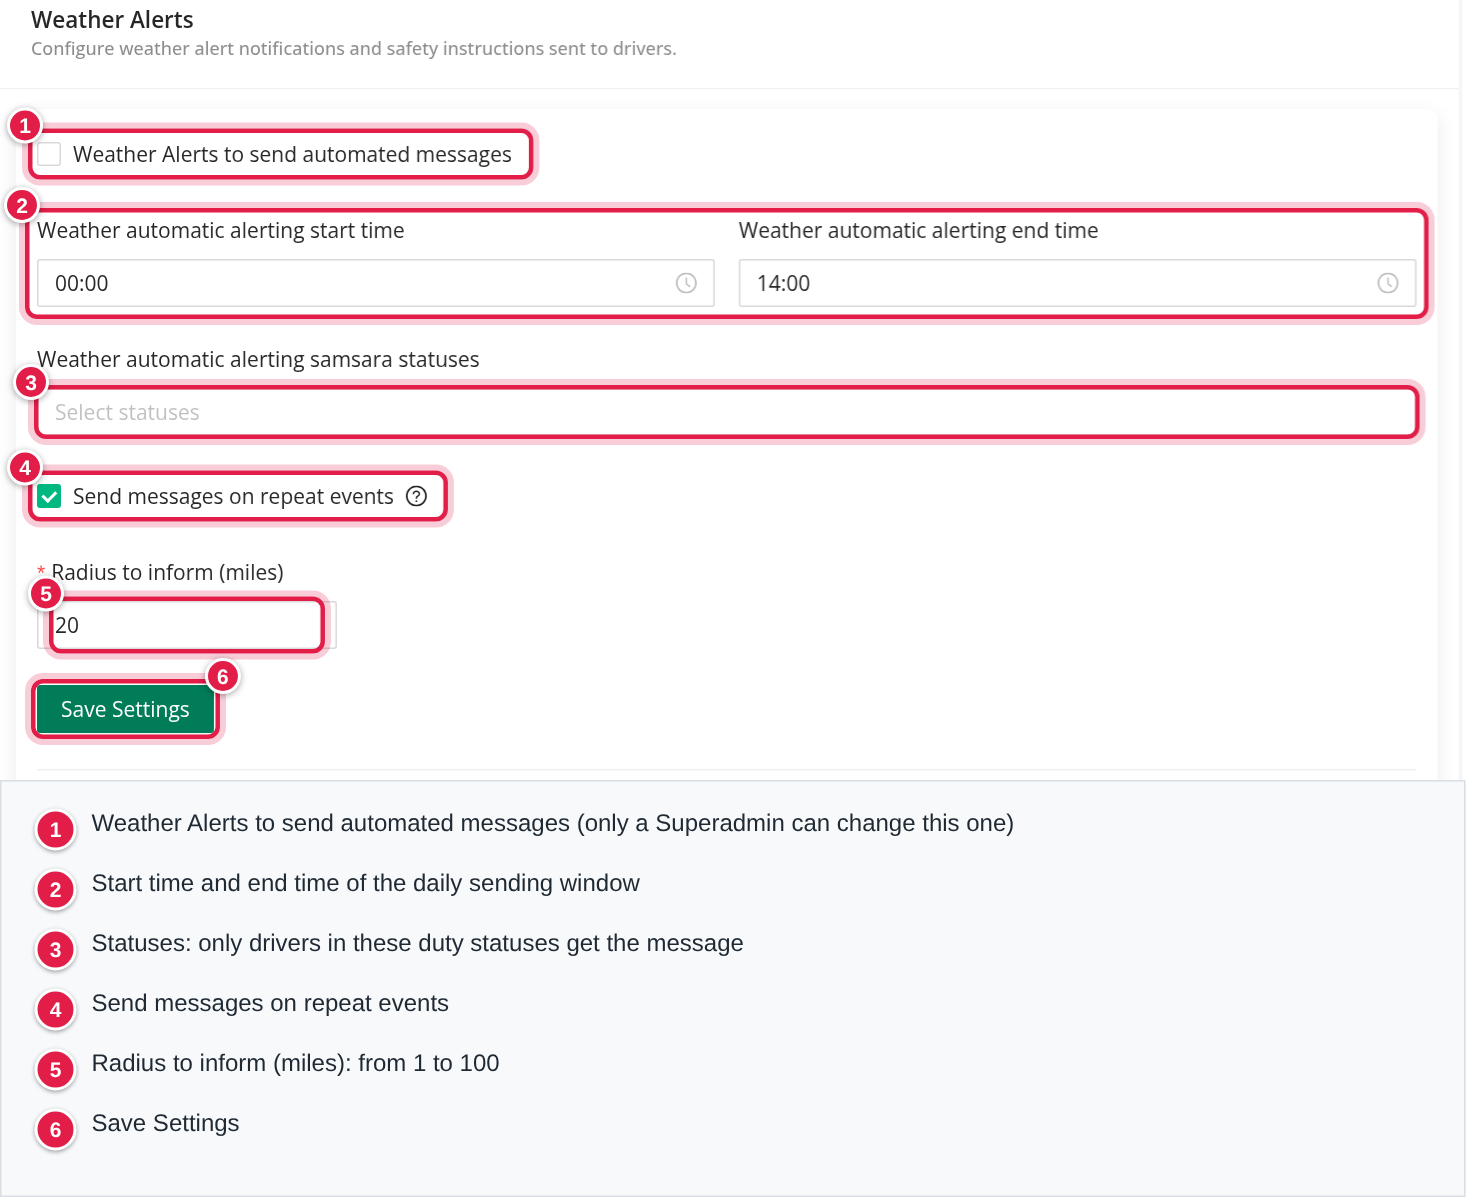
| Setting | What it does |
|---|---|
| Weather Alerts to send automated messages | Turns automatic messages to drivers on or off. Only a Superadmin can change it |
| Weather automatic alerting start time and end time | The daily window in which automatic messages are sent. The start time must be before the end time |
| Weather automatic alerting samsara statuses | Only drivers with one of these duty statuses get a message: Driving, Off Duty, On Duty, Personal Conveyance, Sleeper Berth, Yard Move |
| Send messages on repeat events | When it is off, a driver who moves from one alert of a type to another alert of the same type does not get a second message. Only a Superadmin can change it |
| Radius to inform (miles) | How close a truck must be to an alert area to count as in it, from 1 to 100 miles. It also decides which drivers are listed on the Weather alerts page |
Select Save Settings to keep your changes.
An automatic message contains the names of the alerts, a short summary of the weather (when one can be made) and the safety instructions for each alert type. The message is saved as a comment on the driver, shown as written by SYSTEM.
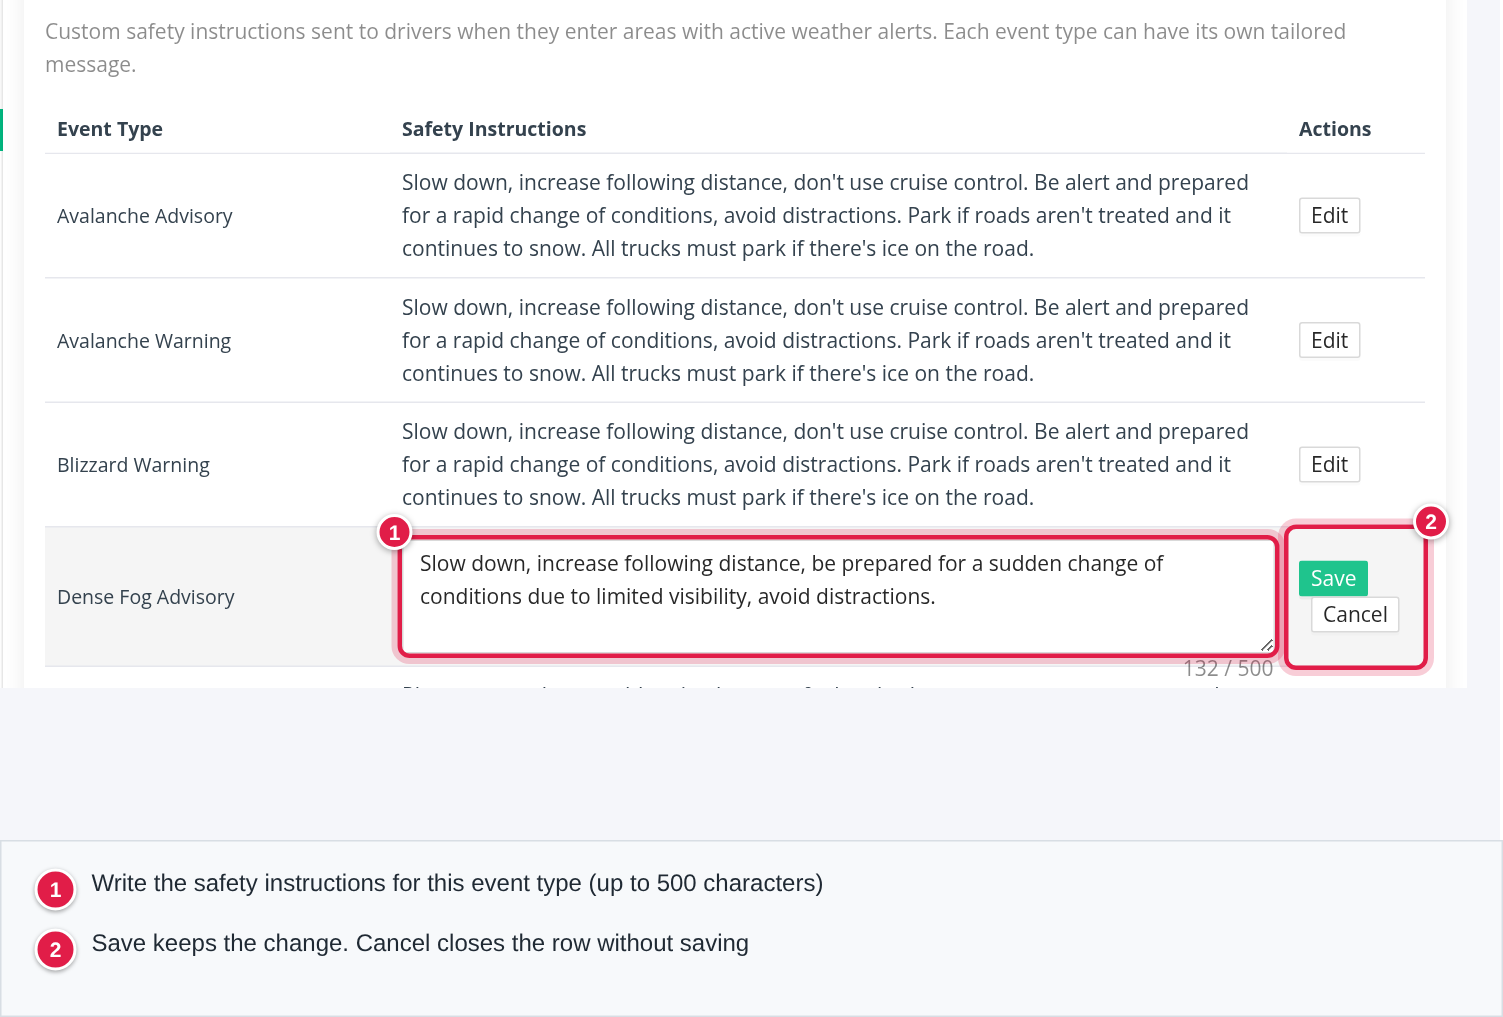
Event Instructions
Under Event Instructions every alert type has its own safety instructions. Select Edit on a row, change the text (up to 500 characters) and select Save. Cancel closes the row without saving.
Frequently asked questions
Was this article helpful?
That’s Great!
Thank you for your feedback
Sorry! We couldn't be helpful
Thank you for your feedback
Feedback sent
We appreciate your effort and will try to fix the article