The Billing page lets you review your delivered loads, preview the invoice packet, and email it to your customer in one click. Billing does not have to wait for the end of the payroll period: you can bill every day.
Before You Begin
Make sure you have the following ready:
- Loads in Delivered status. Only delivered loads are ready to bill.
- A POD on each load. Drivers attach the proof of delivery (bill of lading) from the mobile app when they deliver. You can also upload it yourself from the Billing page (see Part 2).
- Customer billing information. Each customer needs a billing method, payment terms and an AP email. See the article Setting Up Customer Billing Information and Your Invoice.
- Your billing profile. Add your logo and company details in Settings → Billing so invoices show your branding instead of the OpenRoad logo.
Part 1: Find the Loads Ready to Bill
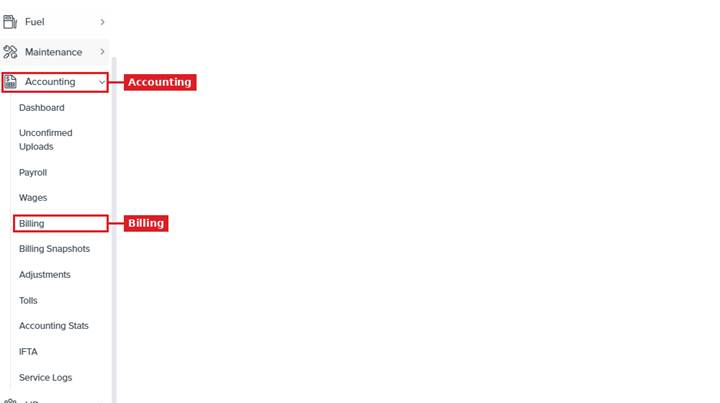
- From the left menu, go to Accounting → Billing.
- In the Load Statuses bar at the top, keep Delivered selected (1) so the table shows your delivered loads.
- Select the date range you want to bill (2) (for example, yesterday or This Week) and click Search (4).
- Optional: select a customer (3) to see only that customer's delivered loads.
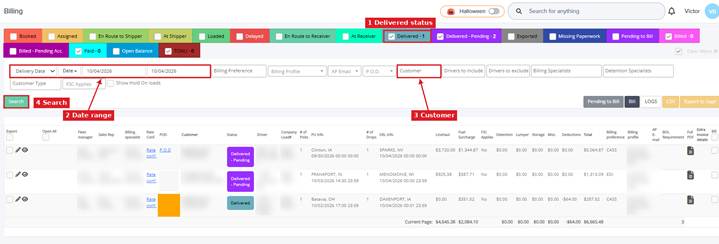
Each row shows the main details of the load, so you can see quickly if it is complete: POD, rate confirmation, customer, pickup information, financials and the customer's billing preference.
Tip: Use the billing preference column to work in batches. For example, bill all the customers that receive invoices by email first, then handle the ones that use a portal.
Note: If you cannot see the buttons on the right side of the page, zoom out in your browser. We recommend using Google Chrome.
Part 2: Review Each Load and Its POD
Before you bill, confirm that the load amounts and documents are correct.
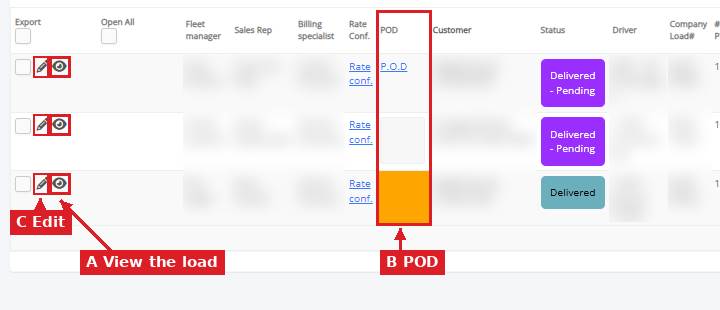
- Click the eye icon (A) at the start of the row to open the load. Hold Ctrl while you click to open it in a new tab, so you keep your place on the Billing page.
- Check the financials (line haul, fuel surcharge and total) and the rate confirmation. For example, for a TONU, make sure the broker's updated rate confirmation is attached, not the original one.
- If something is wrong, edit the load and correct it.
- Check the POD column (B):
- POD attached: click the POD link to open the PDF in a new tab, and confirm it is the right document and that it is signed.
- No POD: do not bill the load yet. Contact the driver and ask them to upload it from the app.
- You have the POD yourself: click the empty space in the POD column (B) of that load. A window opens to choose the file from your computer. Select the file and click Open. When the message P.O.D uploaded successfully appears, the POD is attached and its link shows in the POD column.
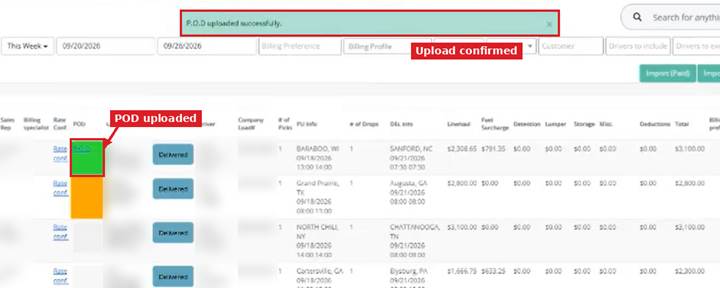
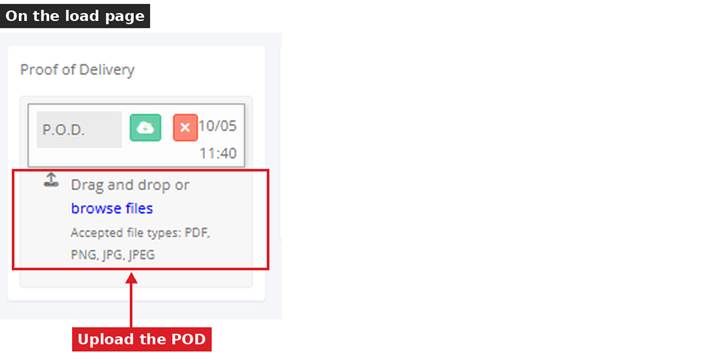
You can also upload the POD from the load itself: click the pencil icon (C) to open the load page and use its Proof of Delivery section (accepted file types: PDF, PNG, JPG and JPEG):
Tip: The POD link opens the PDF in a new tab, so you keep your place on the Billing page.
Important: A load should not be billed without its POD. Once your drivers are trained on the mobile app, PODs arrive automatically when they deliver.
Part 3: Preview the Invoice
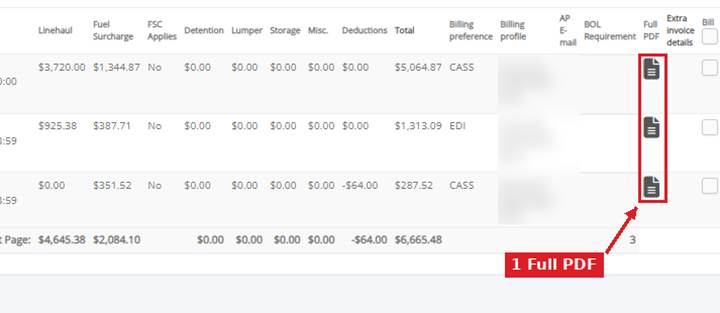
- On the row of the load, click Full PDF (1) at the far right.
- Open the file that downloads. It is the complete packet your customer will receive: the invoice, the rate confirmation and the bill of lading.
- Check that the bill of lading matches the addresses on the rate confirmation, and that the invoice amounts match the rate confirmation.
Tip: If the invoice shows the OpenRoad logo or is missing your company details, update your billing profile in Settings → Billing.
Part 4: Bill the Loads
- Select the loads you want to bill using the checkboxes on the right side of the table (1). You can select several loads at once.
- Click the black Bill button (2) in the top right corner.
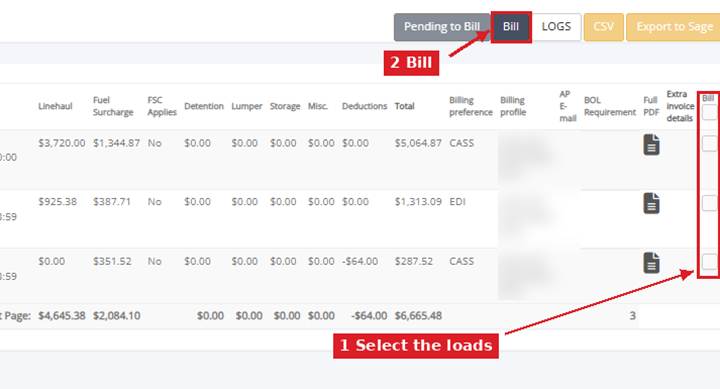
OpenRoad emails the Full PDF of each load to the customer's AP email and changes the load status from Delivered to Billed.
Important: Clicking Bill sends the invoice to your customer right away. Review every selected load before you click it.
Note: The invoice goes to the AP email saved in the customer's profile, not to the broker contact your dispatchers work with. Make sure that email is correct (see Setting Up Customer Billing Information and Your Invoice).
Part 5: Customers Billed Through a Portal (ePay Manager)
Some customers do not accept invoices by email and ask you to upload your paperwork to their portal, such as ePay Manager. OpenRoad does not connect to these portals, so the upload is done manually:
- On the Billing page, click Full PDF on the load and save the file to your computer.
- Log in to the customer's portal and upload the file there.
Tip: Set the customer's billing preference to ePay in their profile. The billing preference column then shows which loads need a portal upload.
Frequently Asked Questions
Do I have to wait for the end of the week to bill? No. Billing can be done any day. Only driver settlements follow the payroll period.
Can I bill several loads at the same time? Yes. Select all the loads you want with the checkboxes on the right and click Bill once.
A load has no POD. What do I do? Do not bill it yet. Ask the driver to upload the POD from the app, or upload it yourself: click the empty space in the POD column of that load on the Billing page and select the file.
Where is the invoice sent? To the AP email saved in the customer's billing information.
I cannot see the Bill button or the right side of the table. Zoom out in your browser so the full table fits on your screen. We recommend using Google Chrome.
Was this article helpful?
That’s Great!
Thank you for your feedback
Sorry! We couldn't be helpful
Thank you for your feedback
Feedback sent
We appreciate your effort and will try to fix the article