Wages is the new module for driver statements in OpenRoad TMS. It is where you set up how each driver is paid, and where you review, adjust, lock, send and export the weekly statement of every driver. It replaces the Payroll page. Each driver gets one statement per pay week, built from their loads, miles, accessorials, fuel card transactions, deductions and hours worked.
Important: Wages replaces Payroll. During November 2026, accounts move from Payroll to Wages one at a time, and OpenRoad will contact you before your account moves. Statements of weeks before your move stay available on the Payroll page. Once every account has moved, the Payroll page will be retired.
How Wages works at a glance
Set up once (Part 1):
- A payroll schedule says which week a statement covers and when the driver is paid.
- A compensation says how the driver is paid: per mile, a percentage of the load, or a flat hourly, daily or weekly rate.
- Each driver gets a payroll schedule, a compensation and a tax type on the Accounting tab of the driver profile.
- A payroll password protects locking and unlocking.
- The Wages settings decide how statements are built for everybody.
Every week (Parts 2 to 7): open Accounting, Wages, review the week, add what is missing (hours, bonuses, accessorials, deductions), lock the statements, send them to your drivers and export them to your payroll or accounting software.
Before you begin
- Wages must be switched on for your account. OpenRoad Support does this when your account moves. Once it is on, Wages appears under Accounting in the left menu. If you do not see it, contact OpenRoad Support at help@openroadtms.com.
- What each user can do is controlled per permission: opening the page, locking, unlocking, sending, exporting, entering hours and editing earnings are separate rights, set under Settings → Account → Access. A Superadmin can do everything.
- Have the information your payroll or accounting software needs on the driver profiles, for example the Company ADP ID for W2 drivers, or the company Pay To ID # for Dynamics GP.
Part 1: Set up Wages
1.1 Payroll schedules
Settings → Account → Payroll Schedules. Each driver needs a payroll schedule: it sets the pay period of the statement and the date on which the driver is paid. Without a schedule the system cannot calculate the pay period or pay date, and the driver gets no statement.
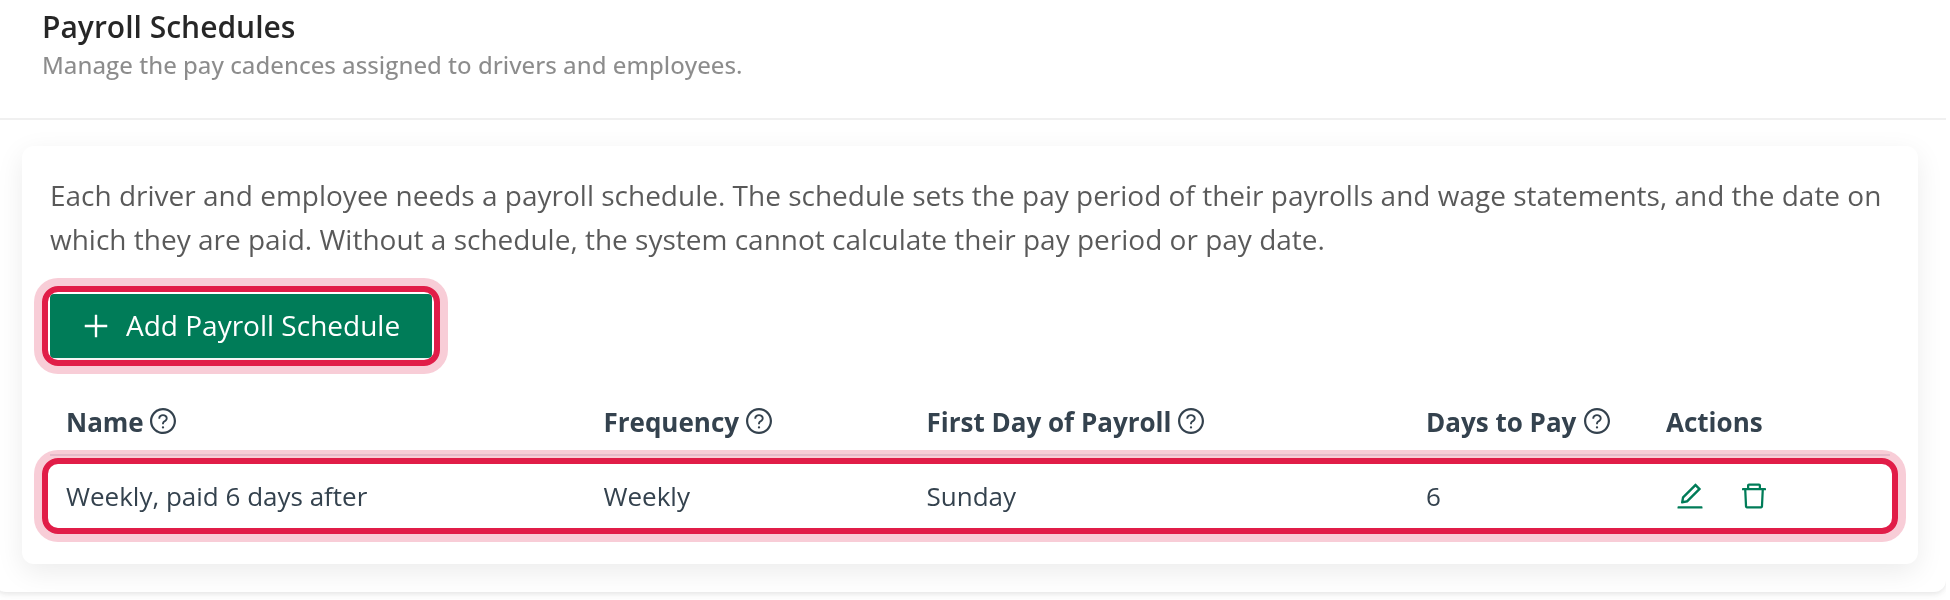
Click Add Payroll Schedule and fill in Name, Frequency (for example Weekly), First Day of Payroll (the weekday a pay week starts, for example Sunday) and Days to Pay (how many days after the week ends the driver is paid, for example 6). Only weekly schedules create the tabs of the Wages list.
1.2 Compensations
Settings → Account → Compensations. A compensation is a pay structure that you assign to drivers. There are three Types: Per Mile, Percentage and Flat.
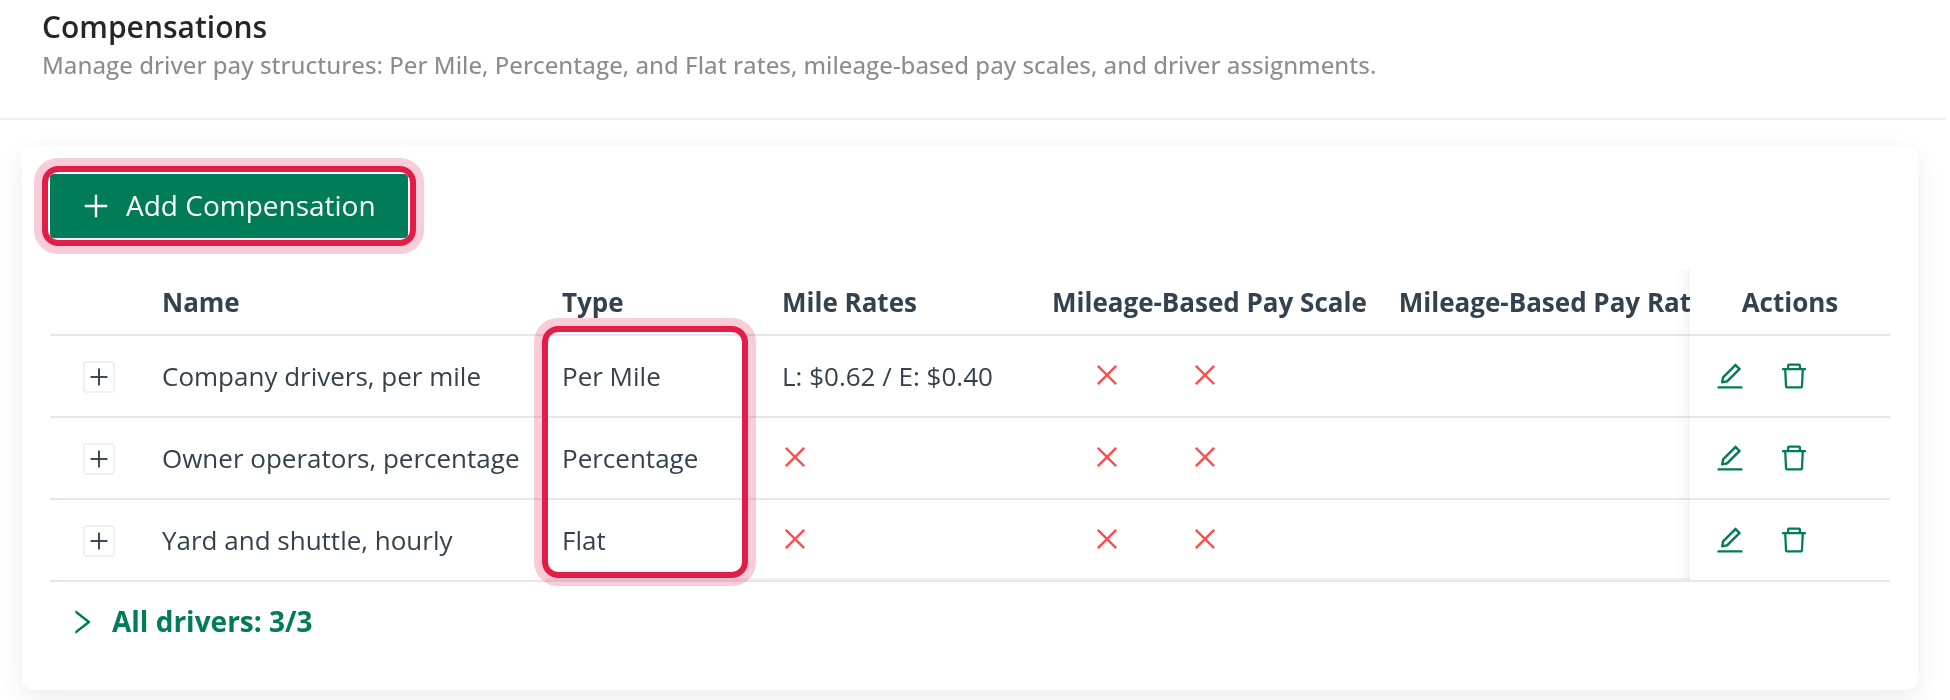
The list shows each compensation with its Type, Mile Rates and whether it uses a Mileage-Based Pay Scale. Click Add Compensation to create one, the pencil to edit it, and All drivers at the bottom to see which drivers use which compensation.
Per Mile
The driver is paid for every mile: loaded rate × loaded miles + empty rate × empty miles, load by load.
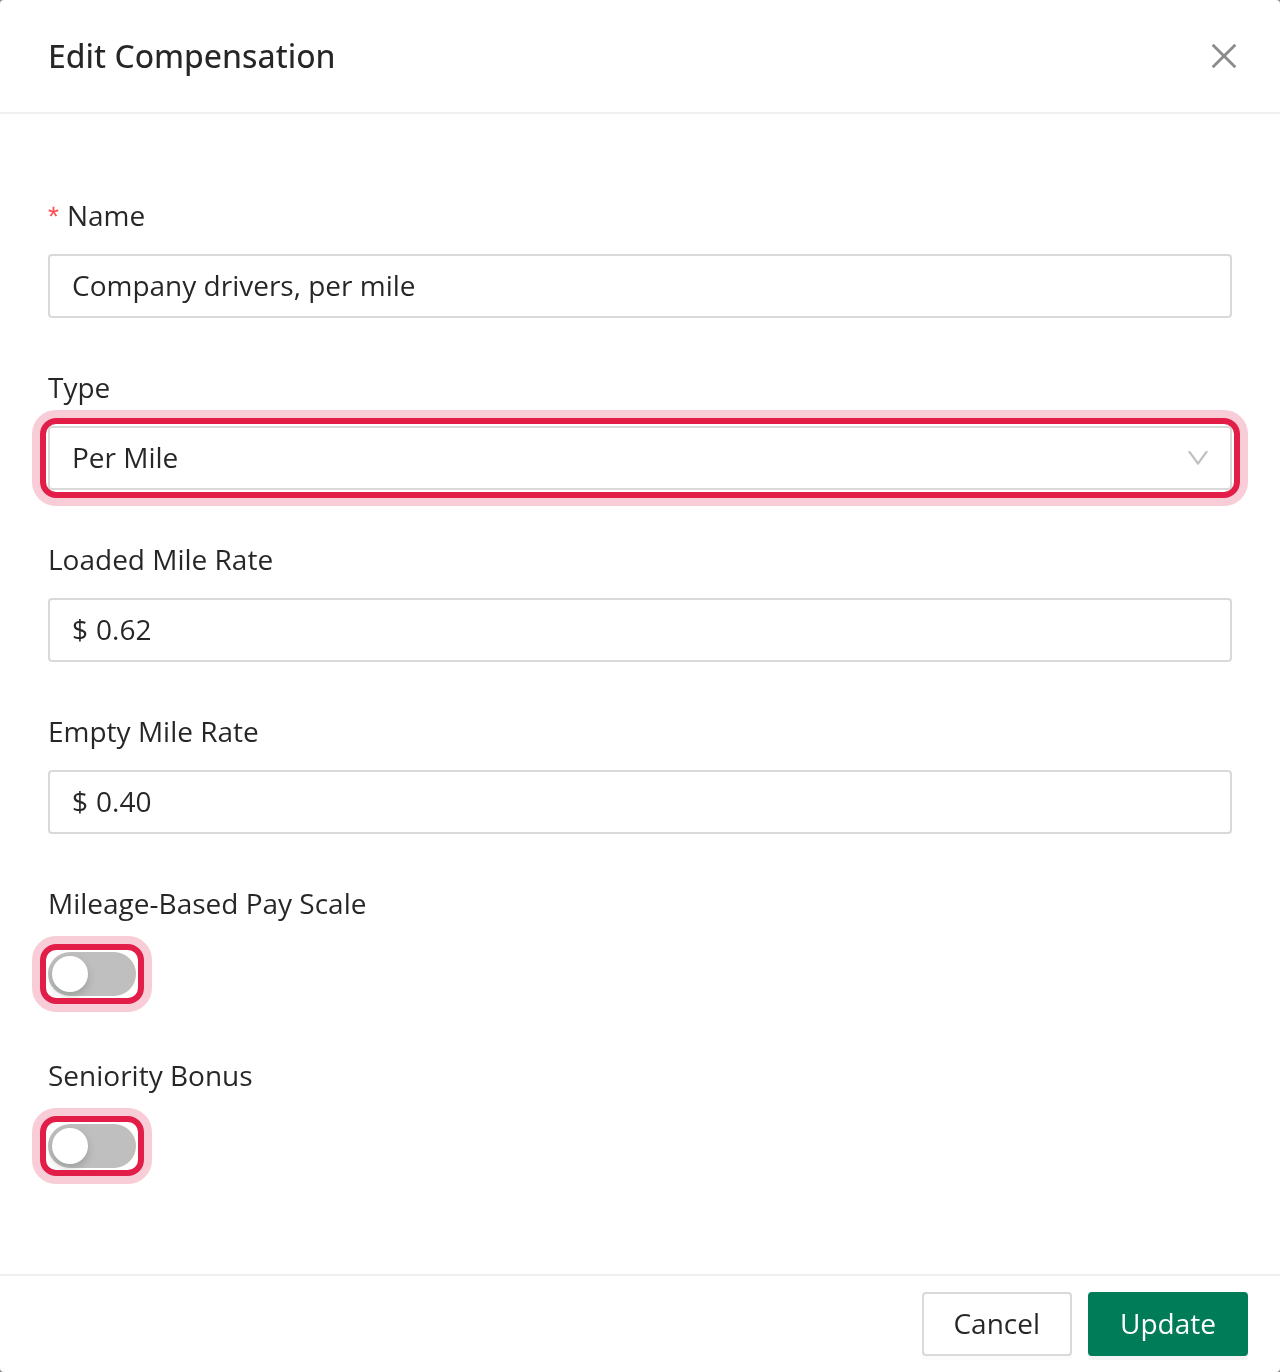
- Loaded Mile Rate and Empty Mile Rate are the rates per mile.
- Mileage-Based Pay Scale: when switched on, a rate chosen from the total miles of the load (a band) is added to both rates.
- Seniority Bonus: when switched on, the driver also earns cents per mile for each completed year of service, paid and shown as its own line.
Percentage
The driver is paid a percentage of what the load earns.
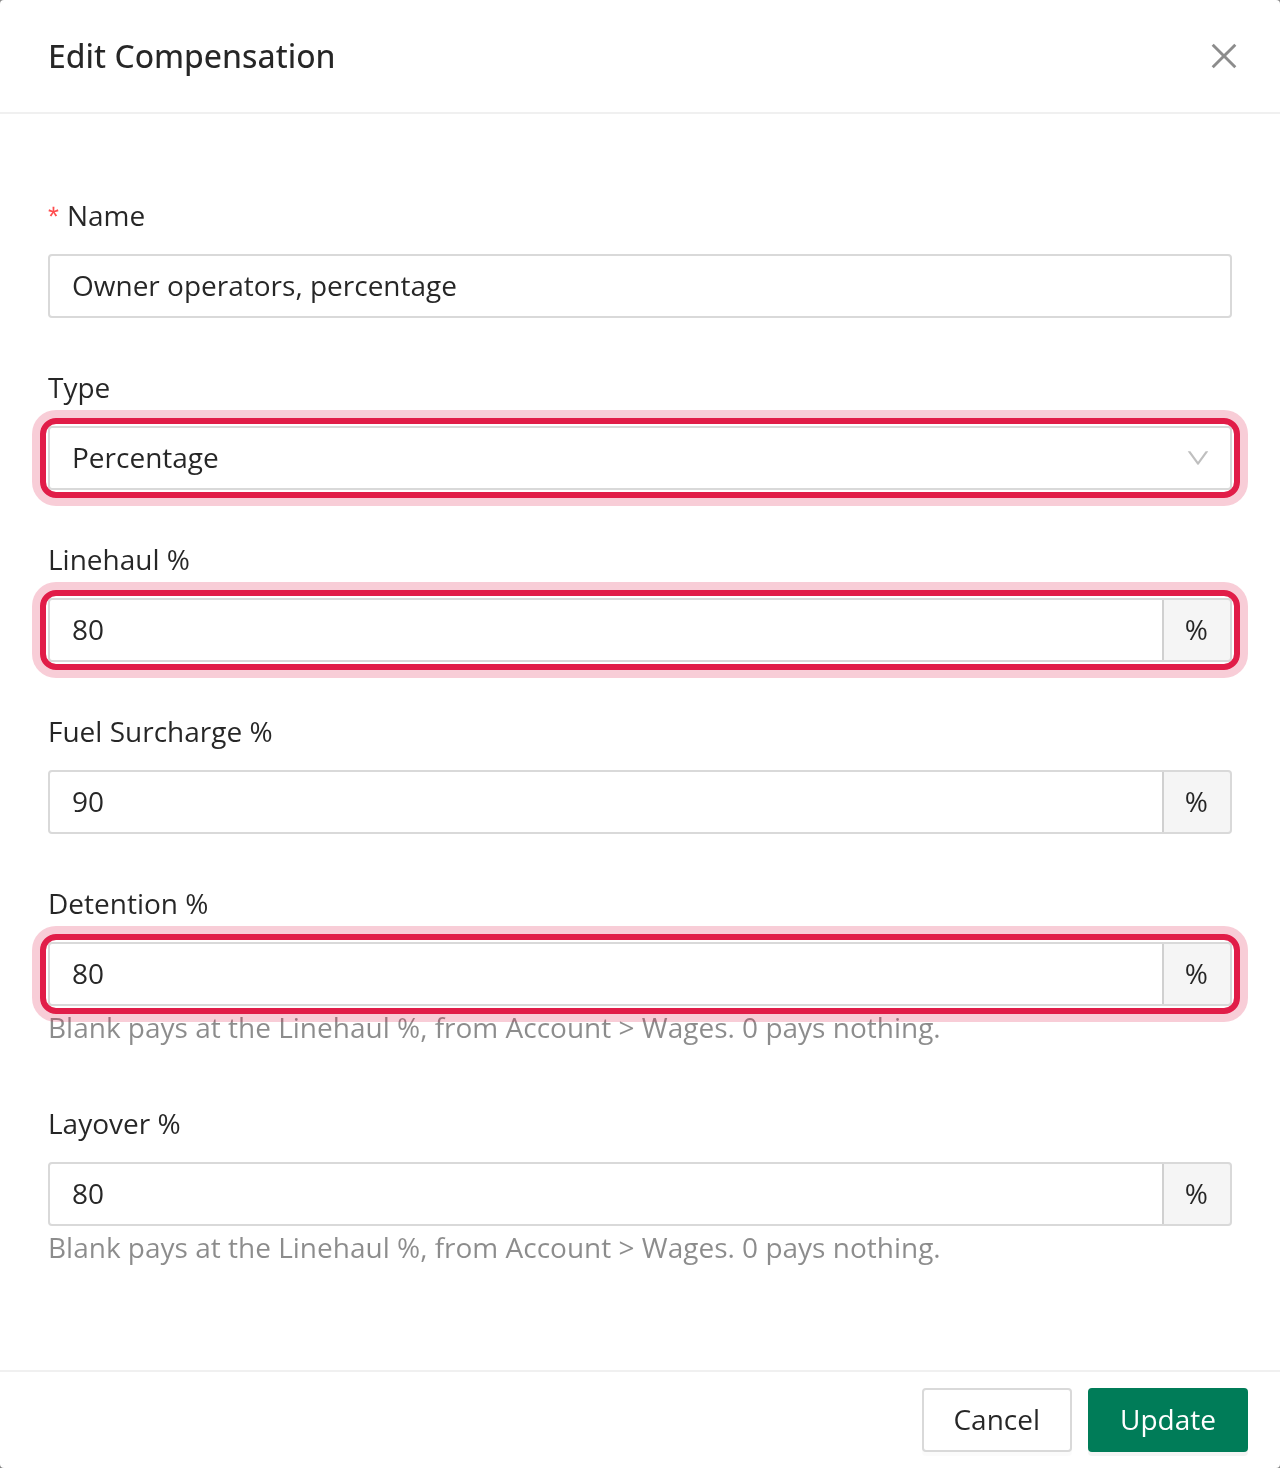
- Linehaul % is paid on the linehaul, Fuel Surcharge % on the fuel surcharge, Detention % on detention and Layover % on layover. Accessorials pay the percentage of their pay type.
- When Detention % or Layover % is left blank, it pays at the Linehaul % or the Fuel Surcharge %, as chosen in Settings → Account → Wages (see 1.5). A value of 0 pays nothing.
- With Planned Miles as the statement miles, the fuel surcharge is scaled by the planned loaded miles.
Flat (Hourly, Daily or Weekly)
The driver is paid a fixed amount for each hour, day or week that you enter on the statement.
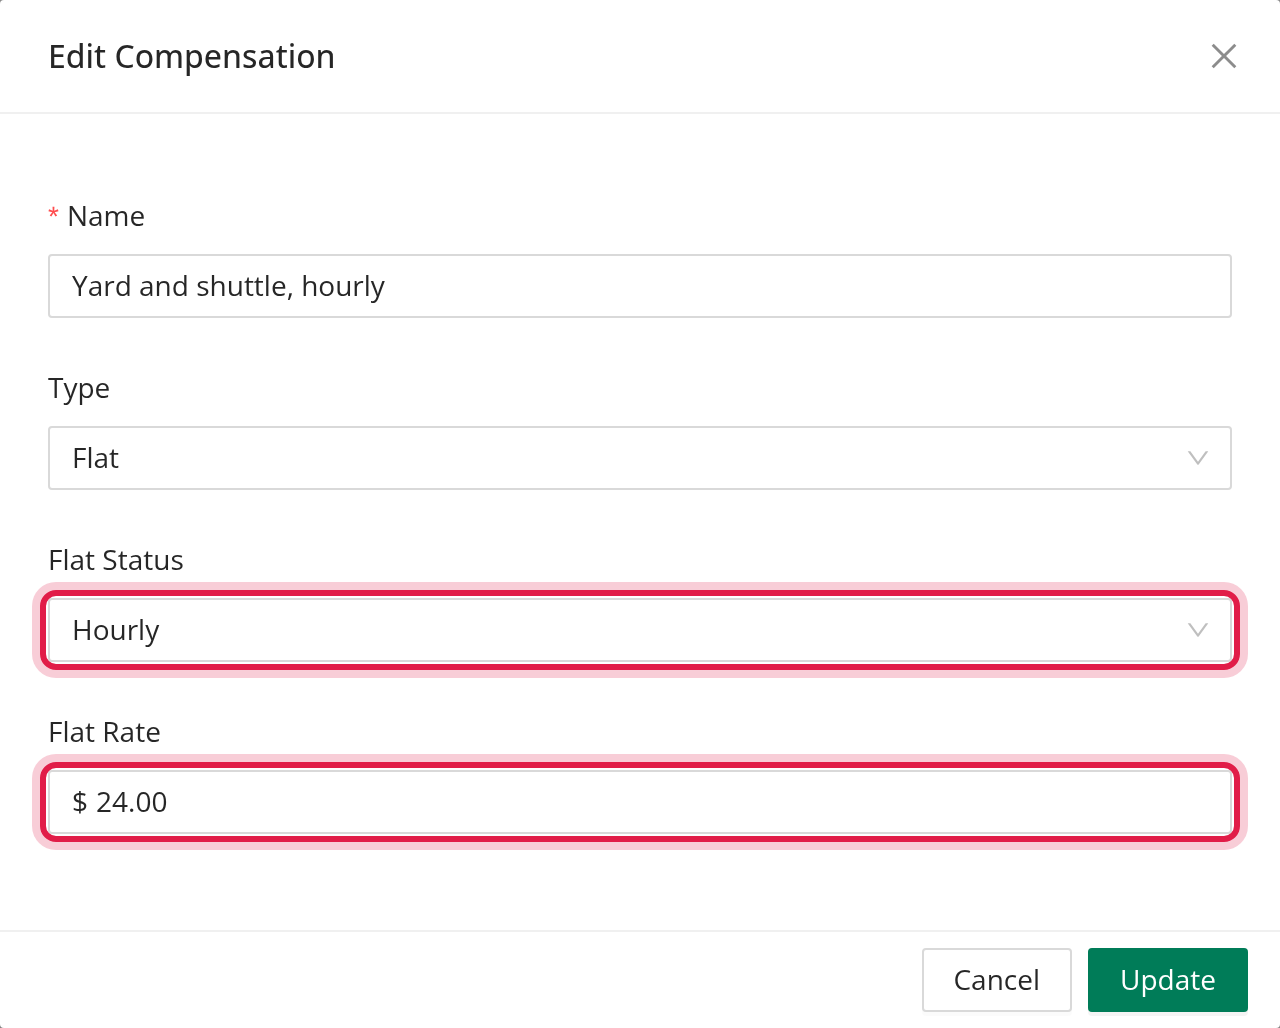
- Flat Status is Hourly, Daily or Weekly.
- Flat Rate is the amount per hour, day or week.
1.3 Assign the pay to each driver
Open the driver profile and go to the Accounting tab.
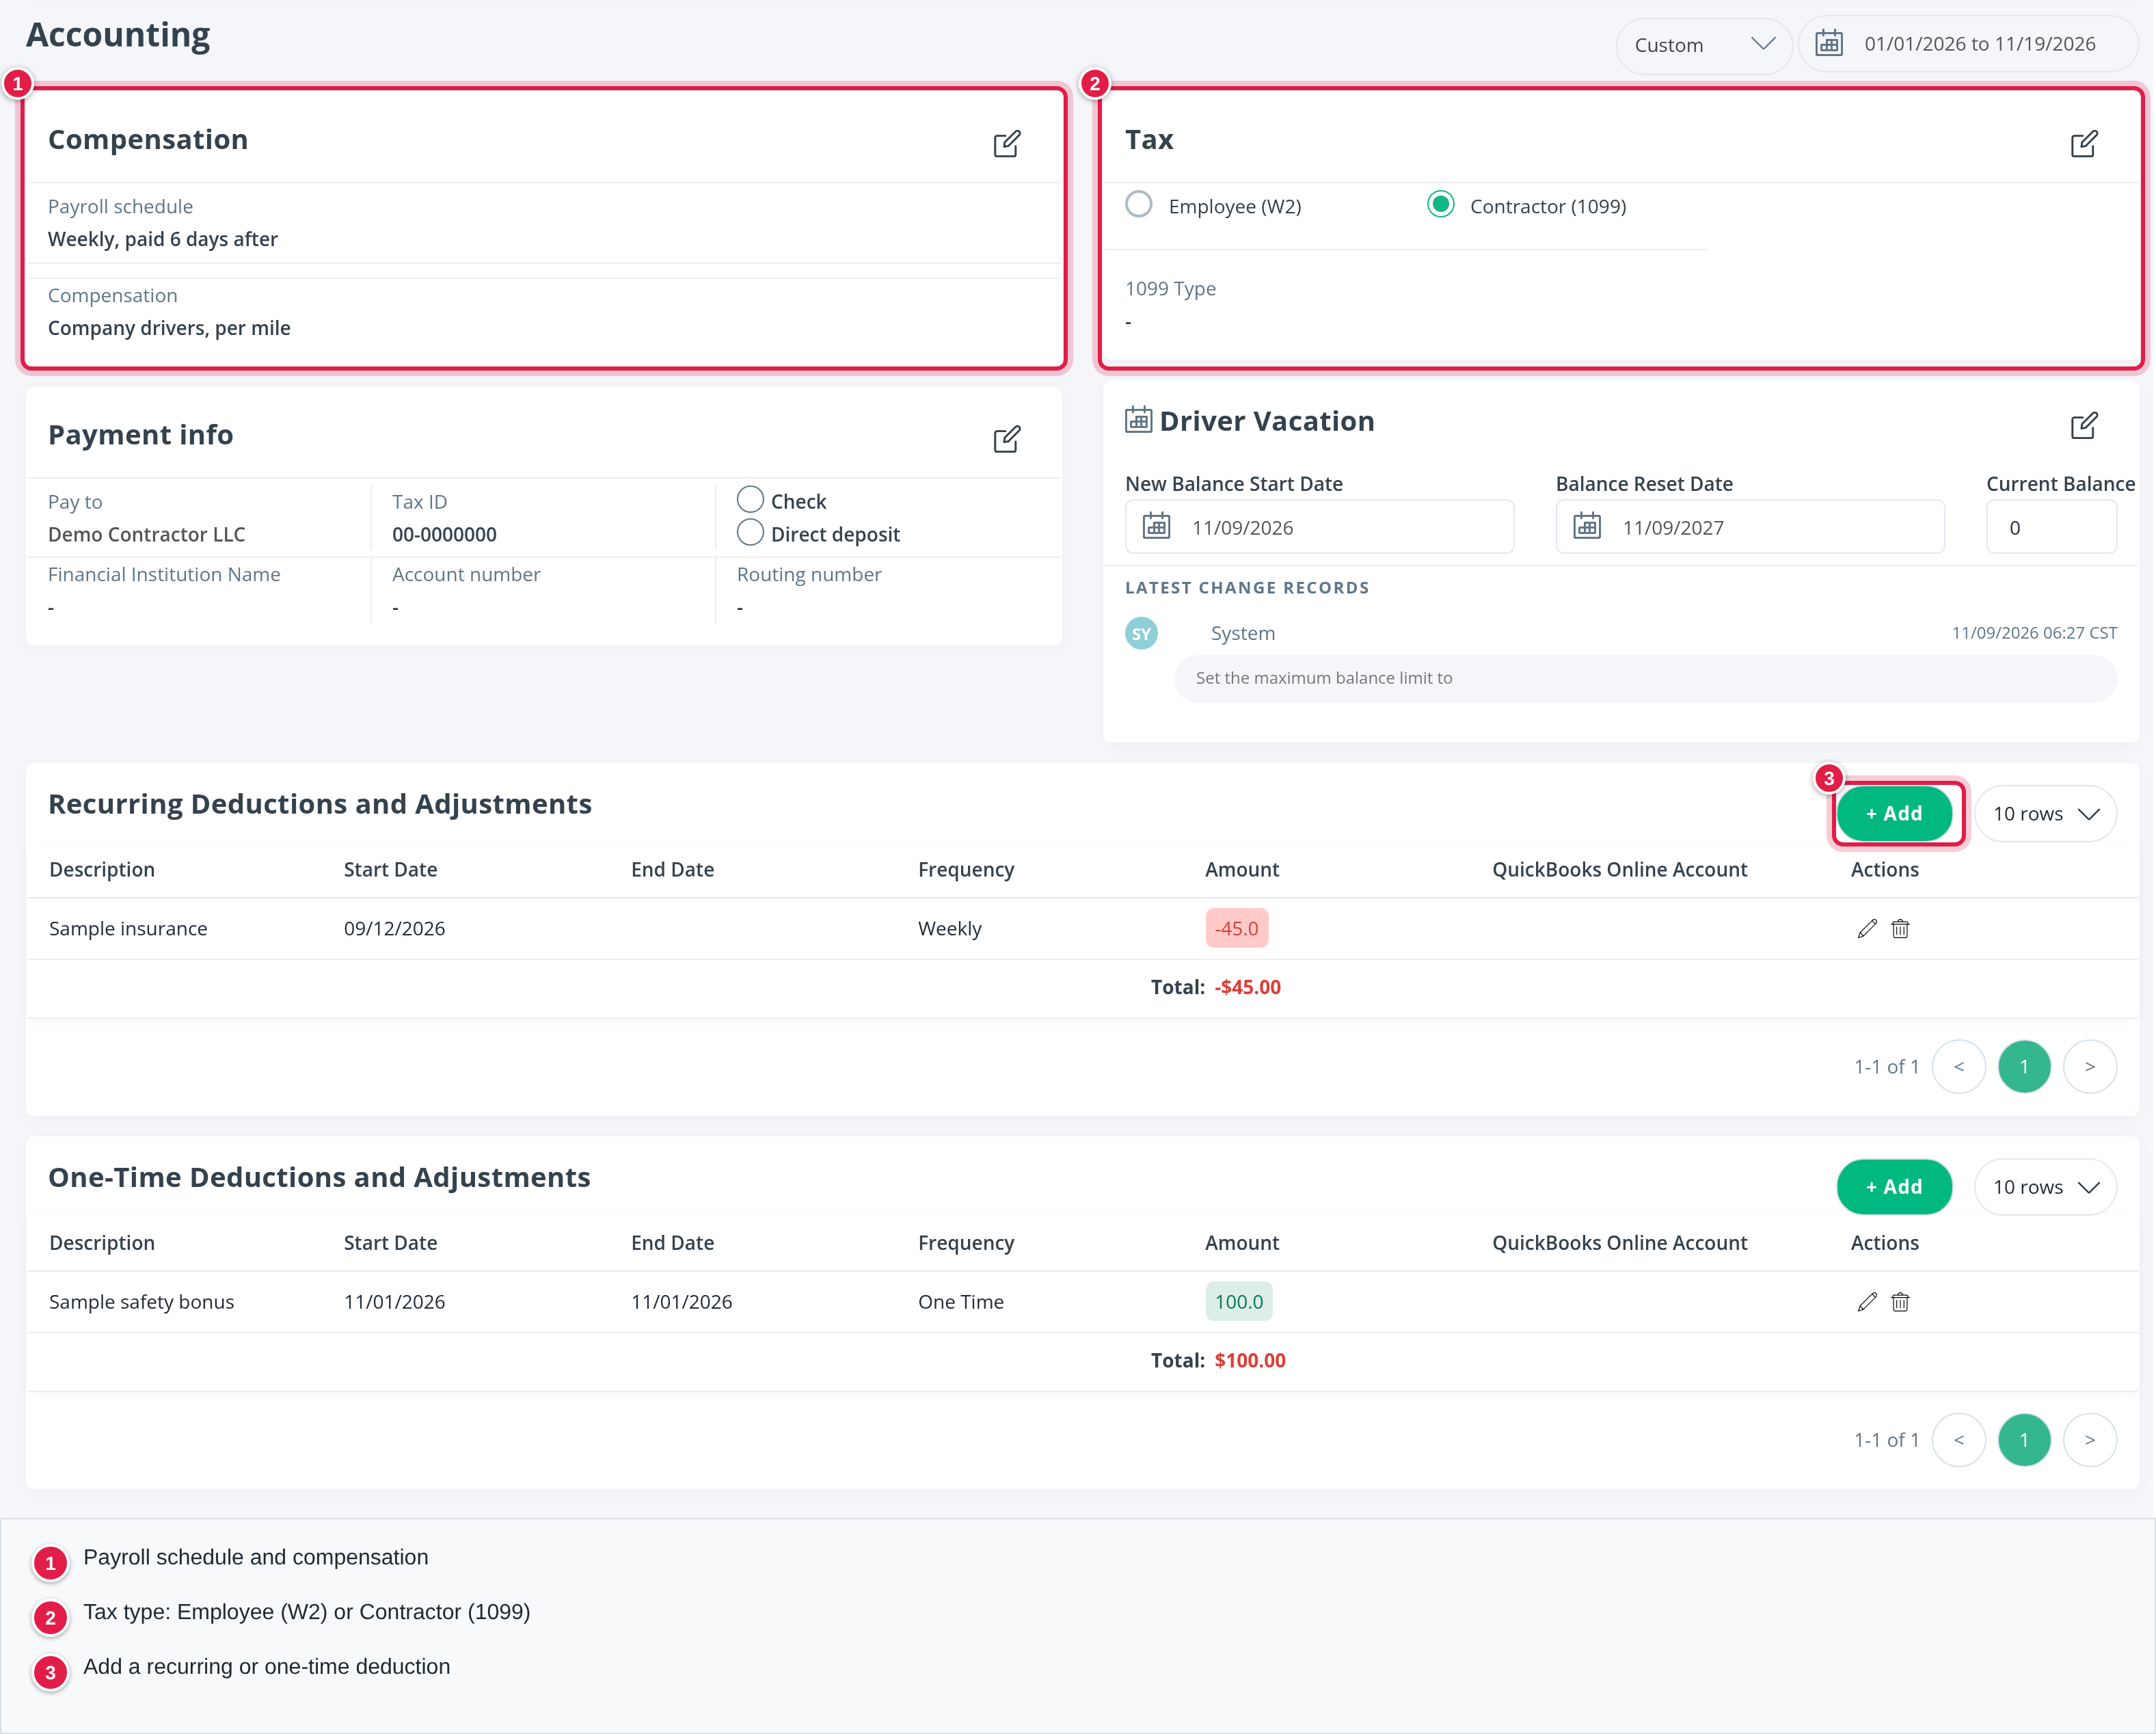
- The Compensation card holds the Payroll schedule and the Compensation of the driver. Click the edit icon of the card to change them. A driver missing either one gets no statement.
- The Tax card holds the tax type, Employee (W2) or Contractor (1099). It decides which tab of the Wages list the driver is on.
- Recurring Deductions and Adjustments and One-Time Deductions and Adjustments (below) hold the deductions of the driver. Click + Add, then enter the description, start date, frequency (weekly, monthly or every 30 days for recurring ones) and amount. A negative amount deducts money; a positive amount adds it. A category tagged Need category is not set yet: edit the line and choose the category your payroll or accounting software uses.
Per diem
Per diem is paid per night away from home. It appears on statements only when the feature is switched on for your account, the driver is a company driver on a Per Mile or Flat compensation, and the driver's per diem setting is on. To set it, open the Tax card of the driver (edit icon), choose Employee (W2) and tick Per diem (below Social Security), then Save. You need permission to change it.
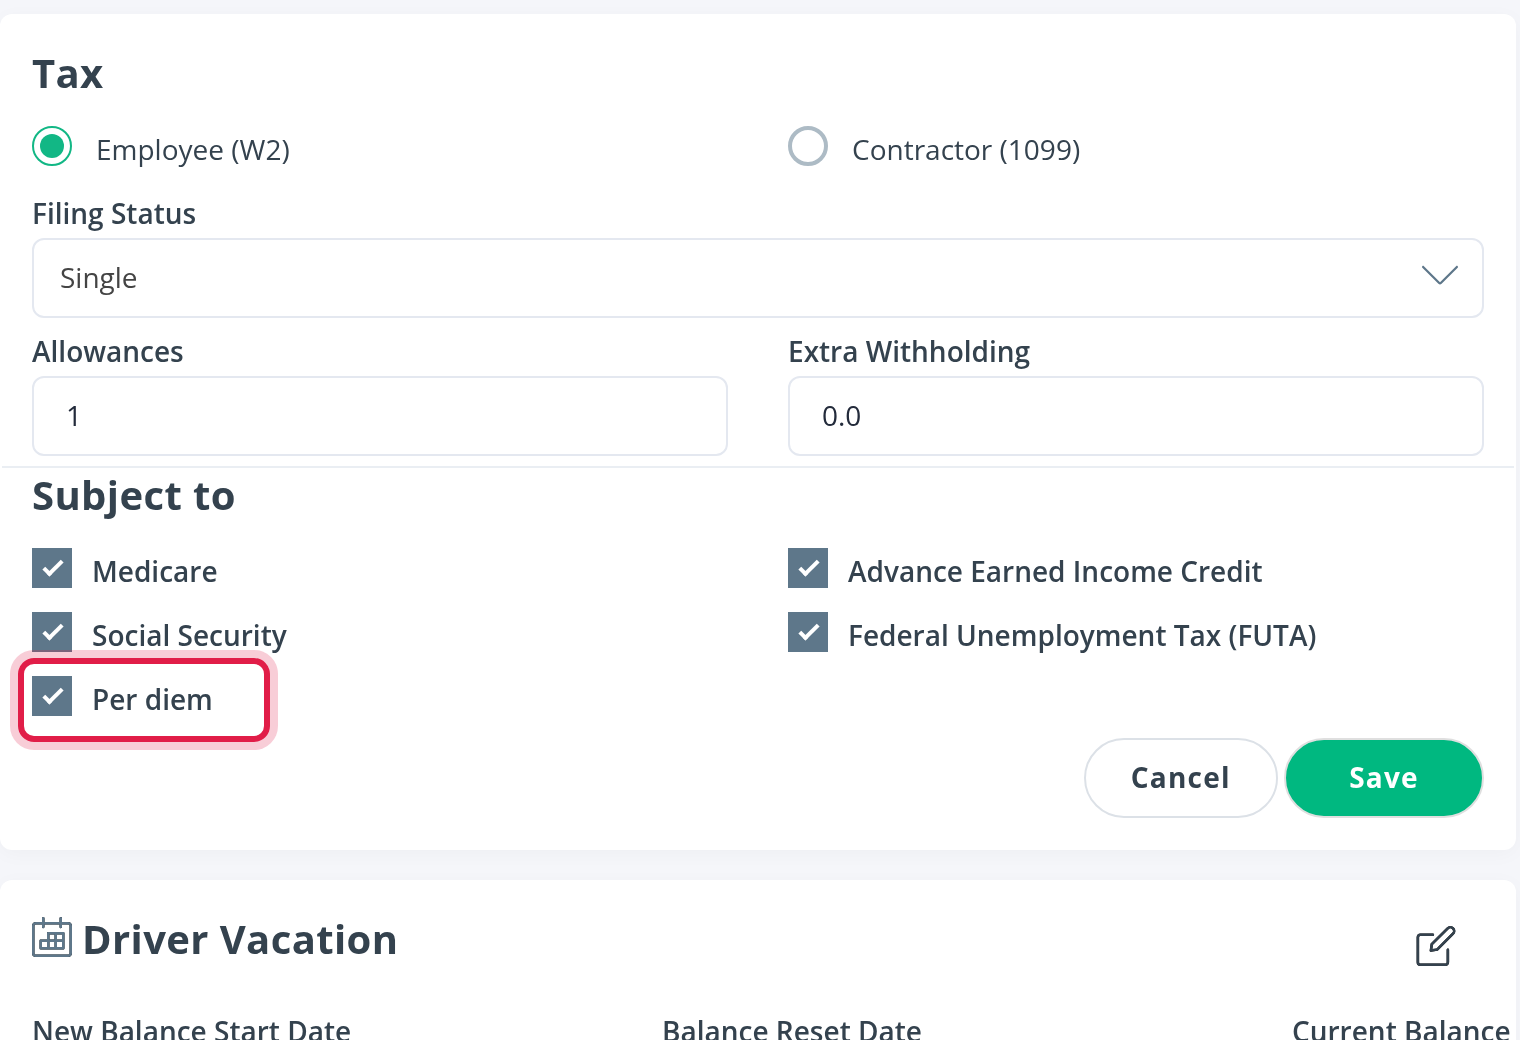
How per diem is counted is described in "Per diem" in Part 4.
1.4 The payroll password
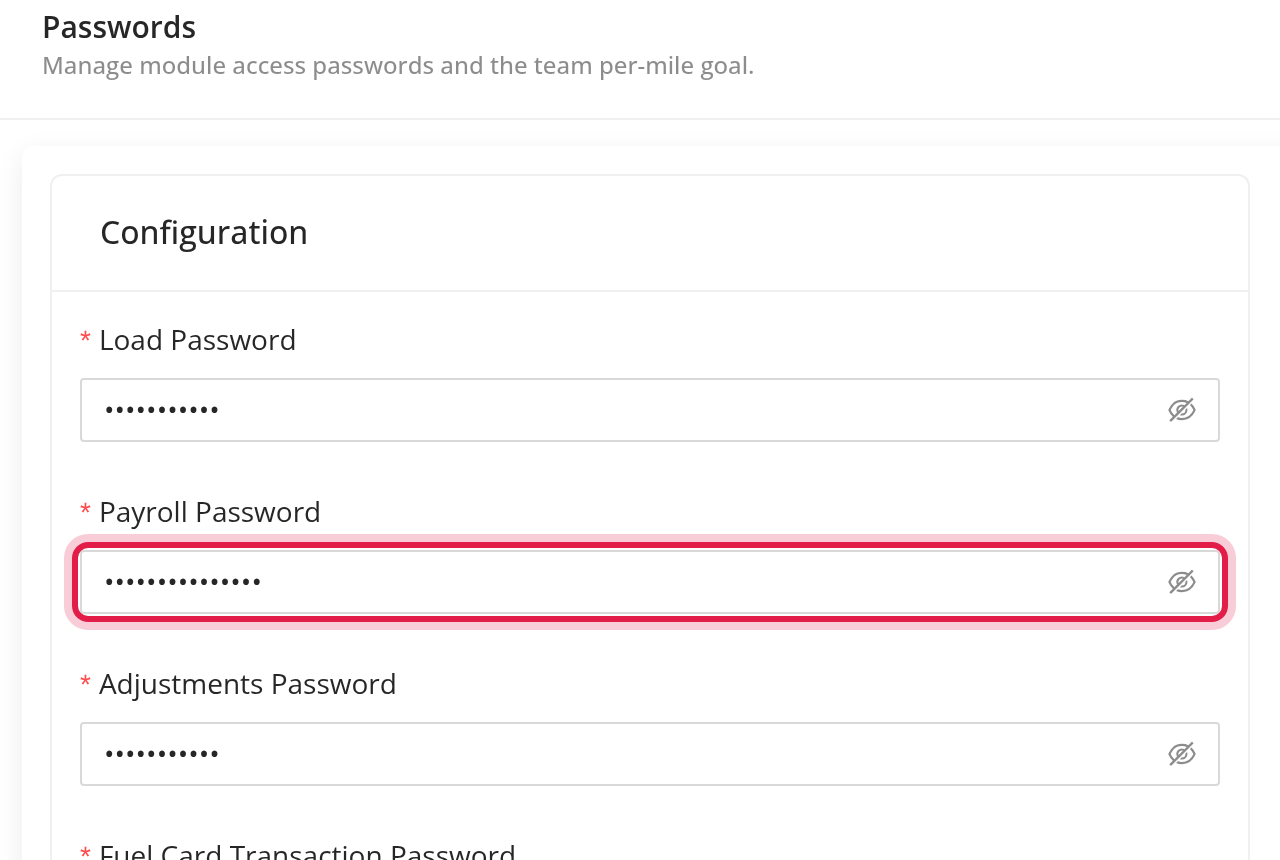
Settings → Account → Passwords → Payroll Password. Locking and unlocking statements asks for this password. Only a Superadmin sets it.
1.5 Statement settings
Settings → Account → Wages decides how statements are built for every driver.
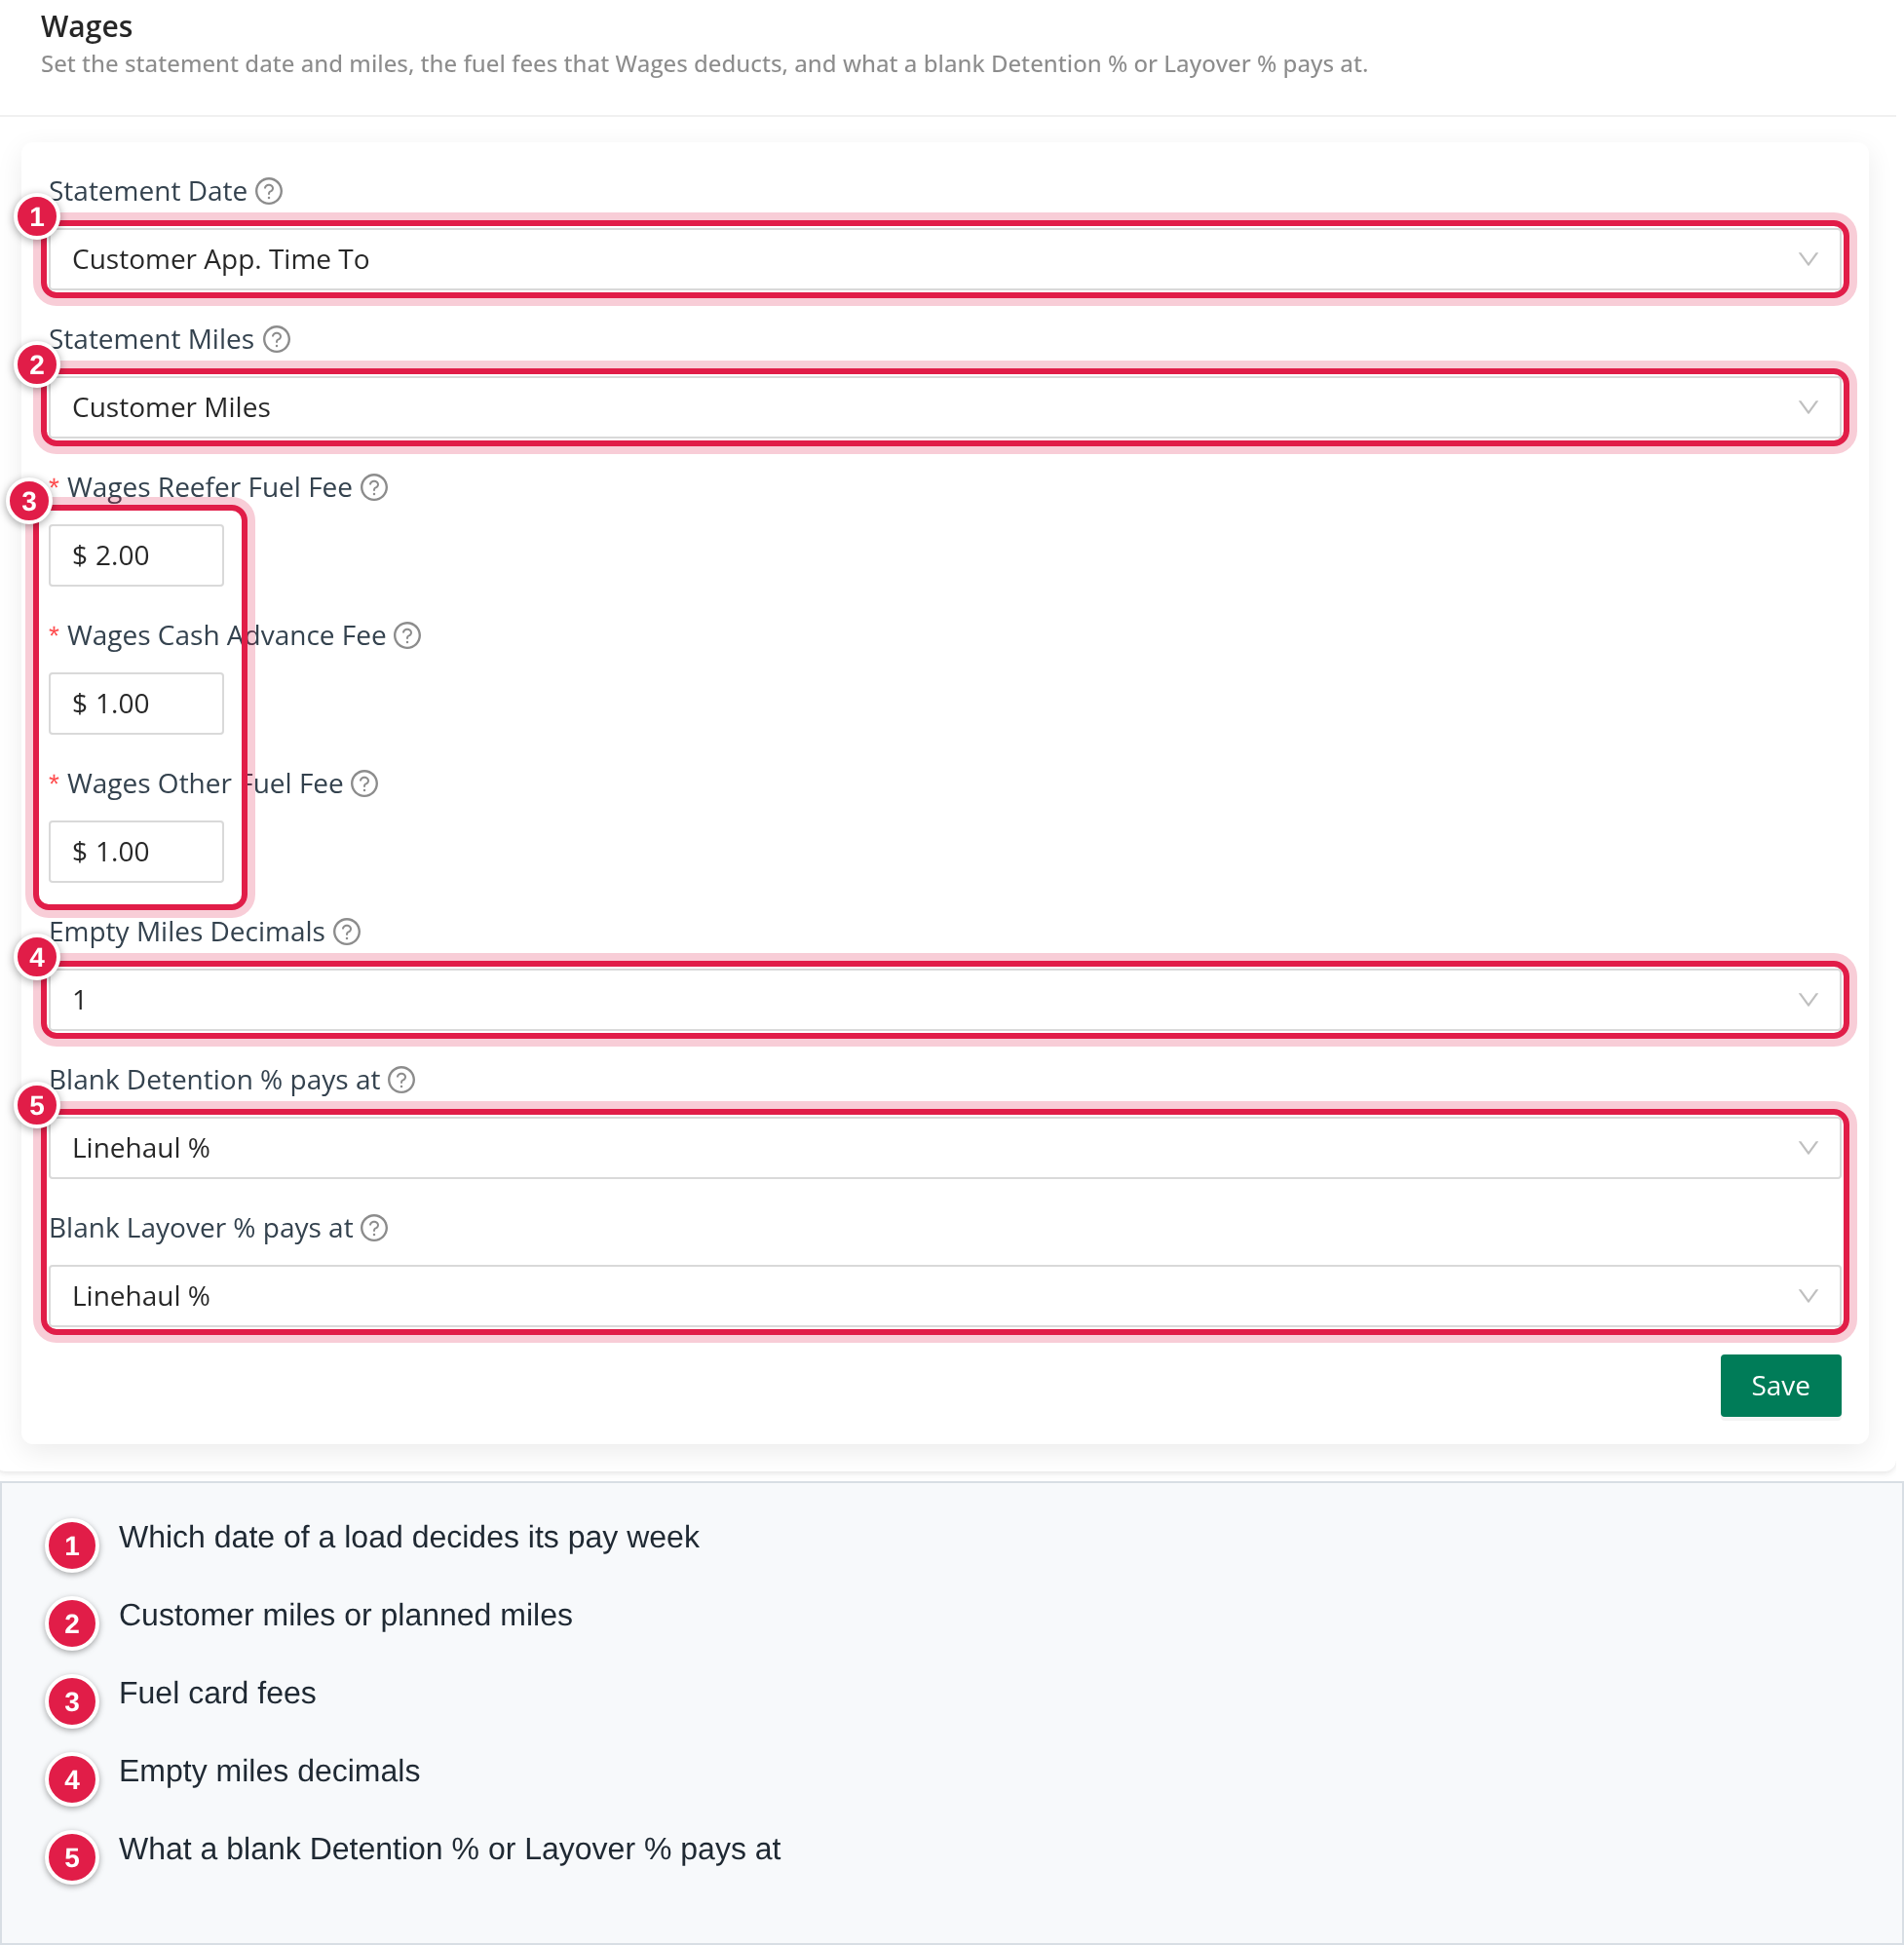
- Statement Date: which date of a load decides its pay week: Customer App Date, Customer App. Time To or Delivery Time Out.
- Statement Miles: the miles used on statements, Customer Miles or Planned Miles. Only a Superadmin can change it.
- Wages Reefer Fuel Fee, Wages Cash Advance Fee and Wages Other Fuel Fee: the fee deducted for each fuel card transaction of a driver on a Percentage compensation. A fee of 0 charges nothing.
- Empty Miles Decimals: 1 or 2 decimals for empty miles.
- Blank Detention % pays at and Blank Layover % pays at: what a Percentage compensation pays when Detention % or Layover % is blank.
A change affects open statements; locked statements keep their amounts, as the page warns. Ask OpenRoad Support if you are unsure.
Part 2: The weekly list
Open Accounting, Wages. The list shows one row per driver for the pay week you choose.
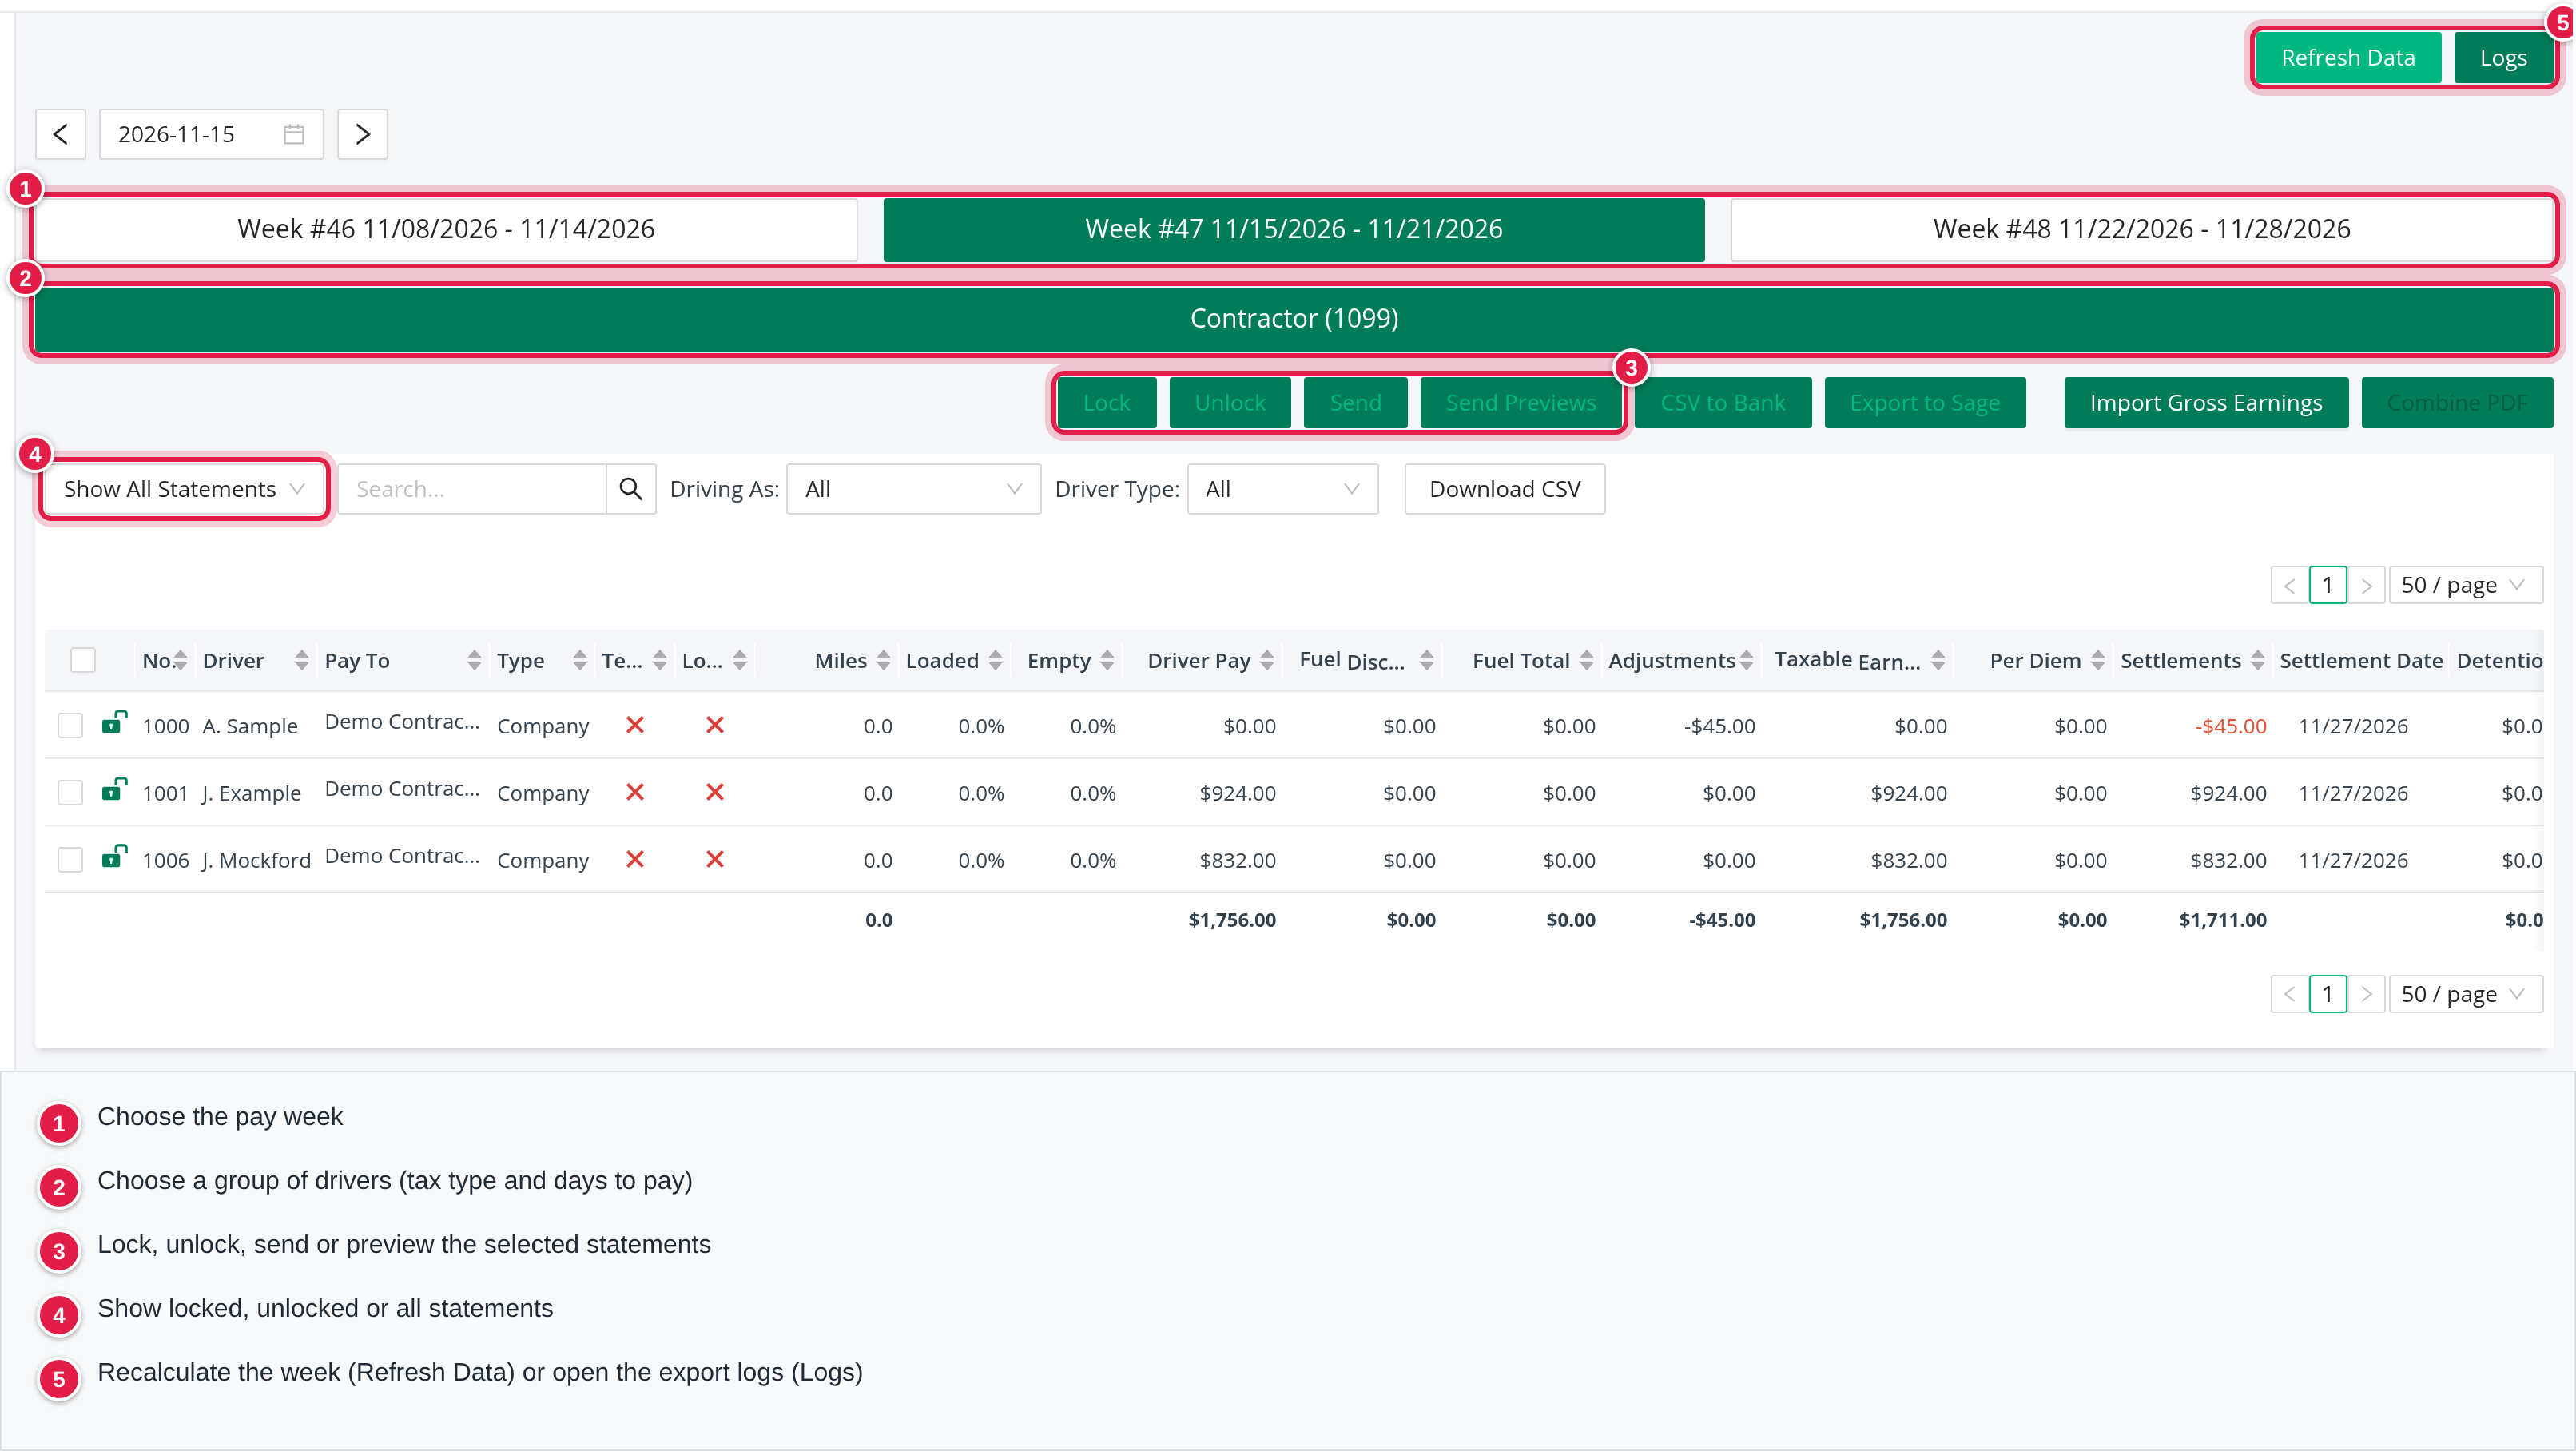
- Choose the week. The buttons read "Week #N" with the dates, for the previous, current and next week. You can also pick a date or use the arrows.
- Choose the group of drivers. Tabs separate drivers by tax type and days to pay, for example Employee (W2) and Contractor (1099), or "Employee (W2, 7 days to pay)". An All tab comes first when there are two or more groups.
- The buttons for the selected statements (see "Lock", "Send" and "Export" below).
- Choose which statements to show. The filter has three options: Show Locked Statements, Show Unlocked Statements and Show All Statements. It starts on Show Locked Statements, so an open week looks empty until you switch it. Other filters: Driver Type (All, W2, NO1099, 1099MS) and Driving As (shown only when the account has two or more companies it drives as). The search box finds a driver. Download CSV saves the rows on screen.
- Refresh Data and Logs. The list is built from stored figures that are good for 120 minutes. Refresh Data recalculates the open statements of the selected week for every driver: use it after you change loads, hours, deductions or rates and before you review the totals. Locked statements are not recalculated. Logs opens the history of your exports. Both are shown only to users who may update wages.
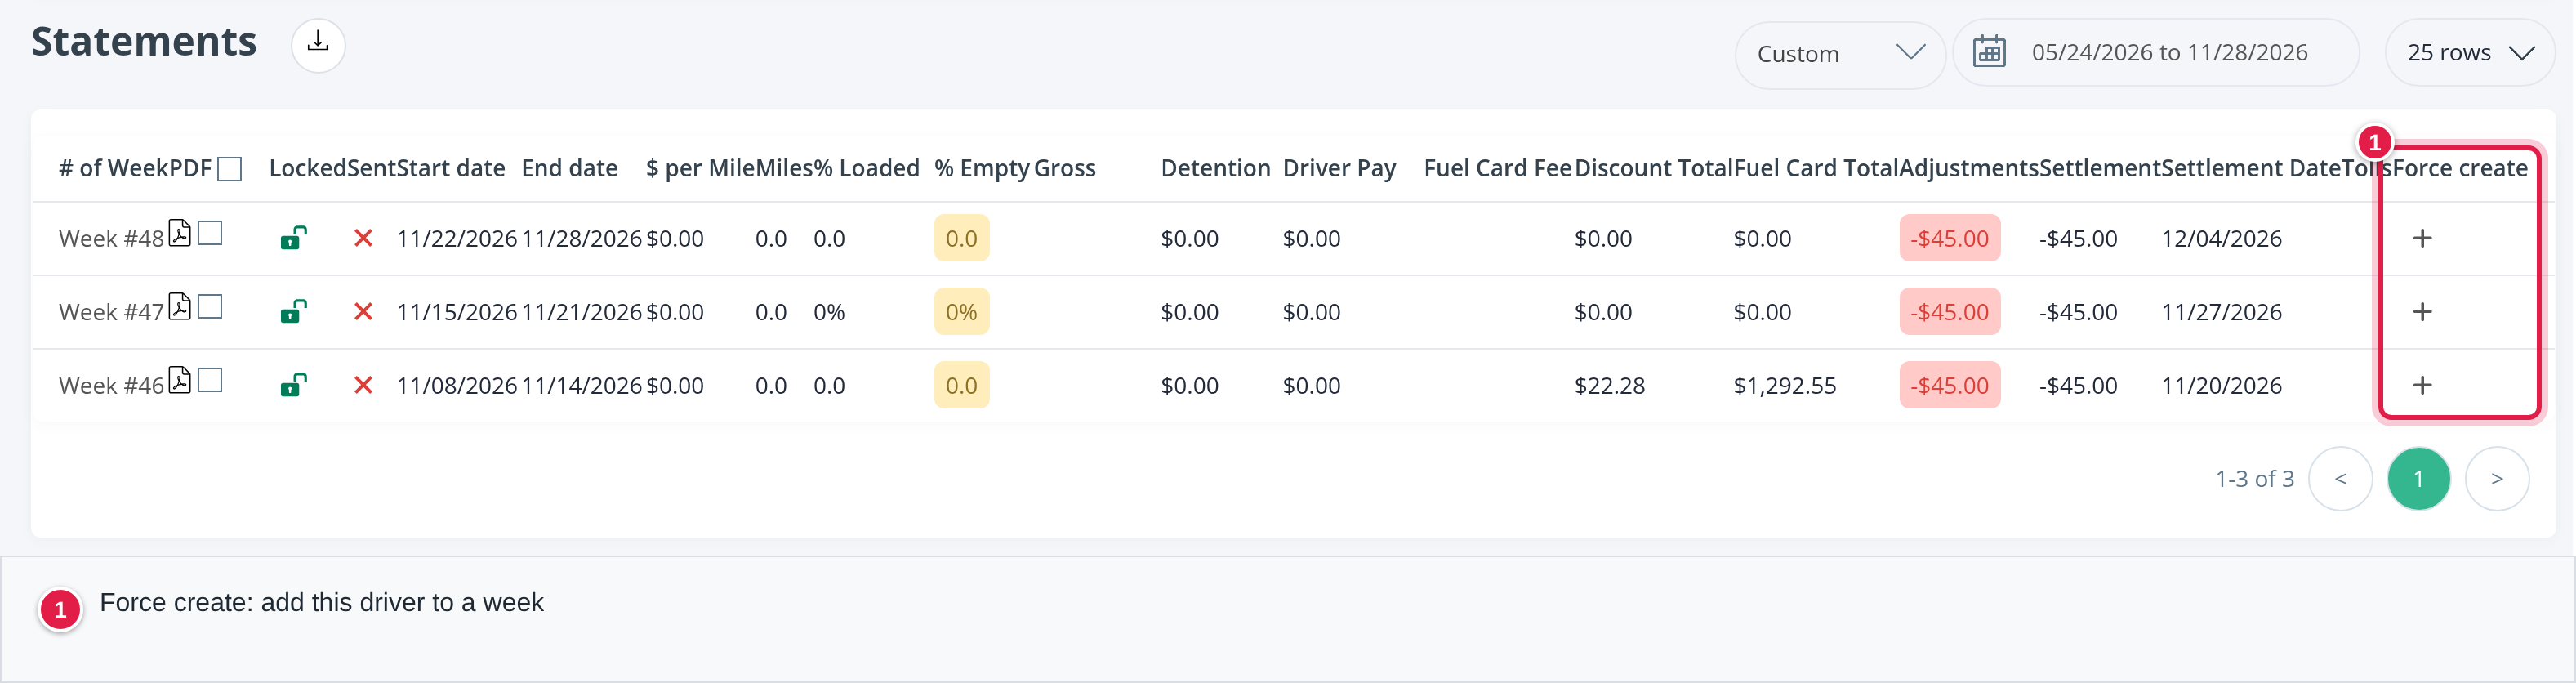
Which drivers are listed. A driver with a payroll schedule and a compensation is listed when they are active, were suspended in the last two weeks, have a locked statement with an amount, or have loads, adjustments or hours in the week. A driver who is missing can be added with Force create on the driver's Statements tab (see Part 8).
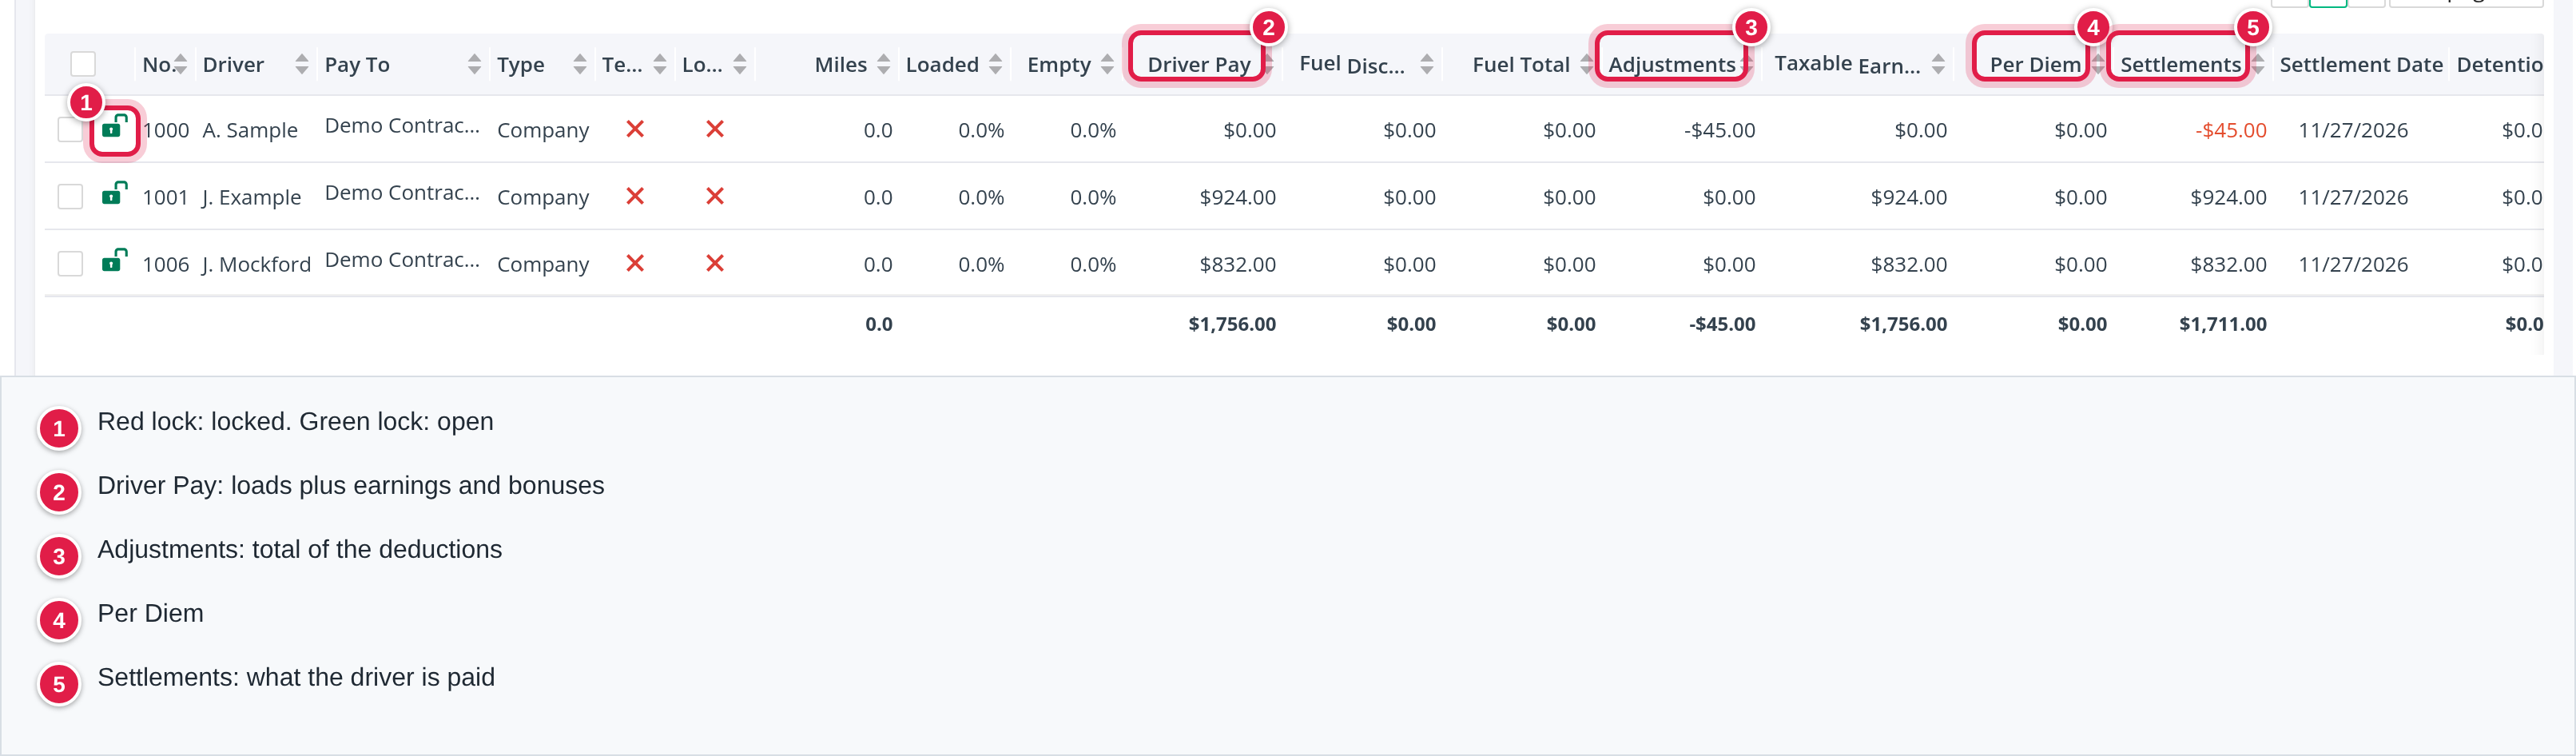
The columns: the lock icon, No., Driver, Pay To, Type, Team driver, Local driver, Miles, Loaded, Empty, Driver Pay, Fuel Discount, Fuel Total, Adjustments, Taxable Earnings, Per Diem, Settlements, Settlement Date, Detentions and Sent.
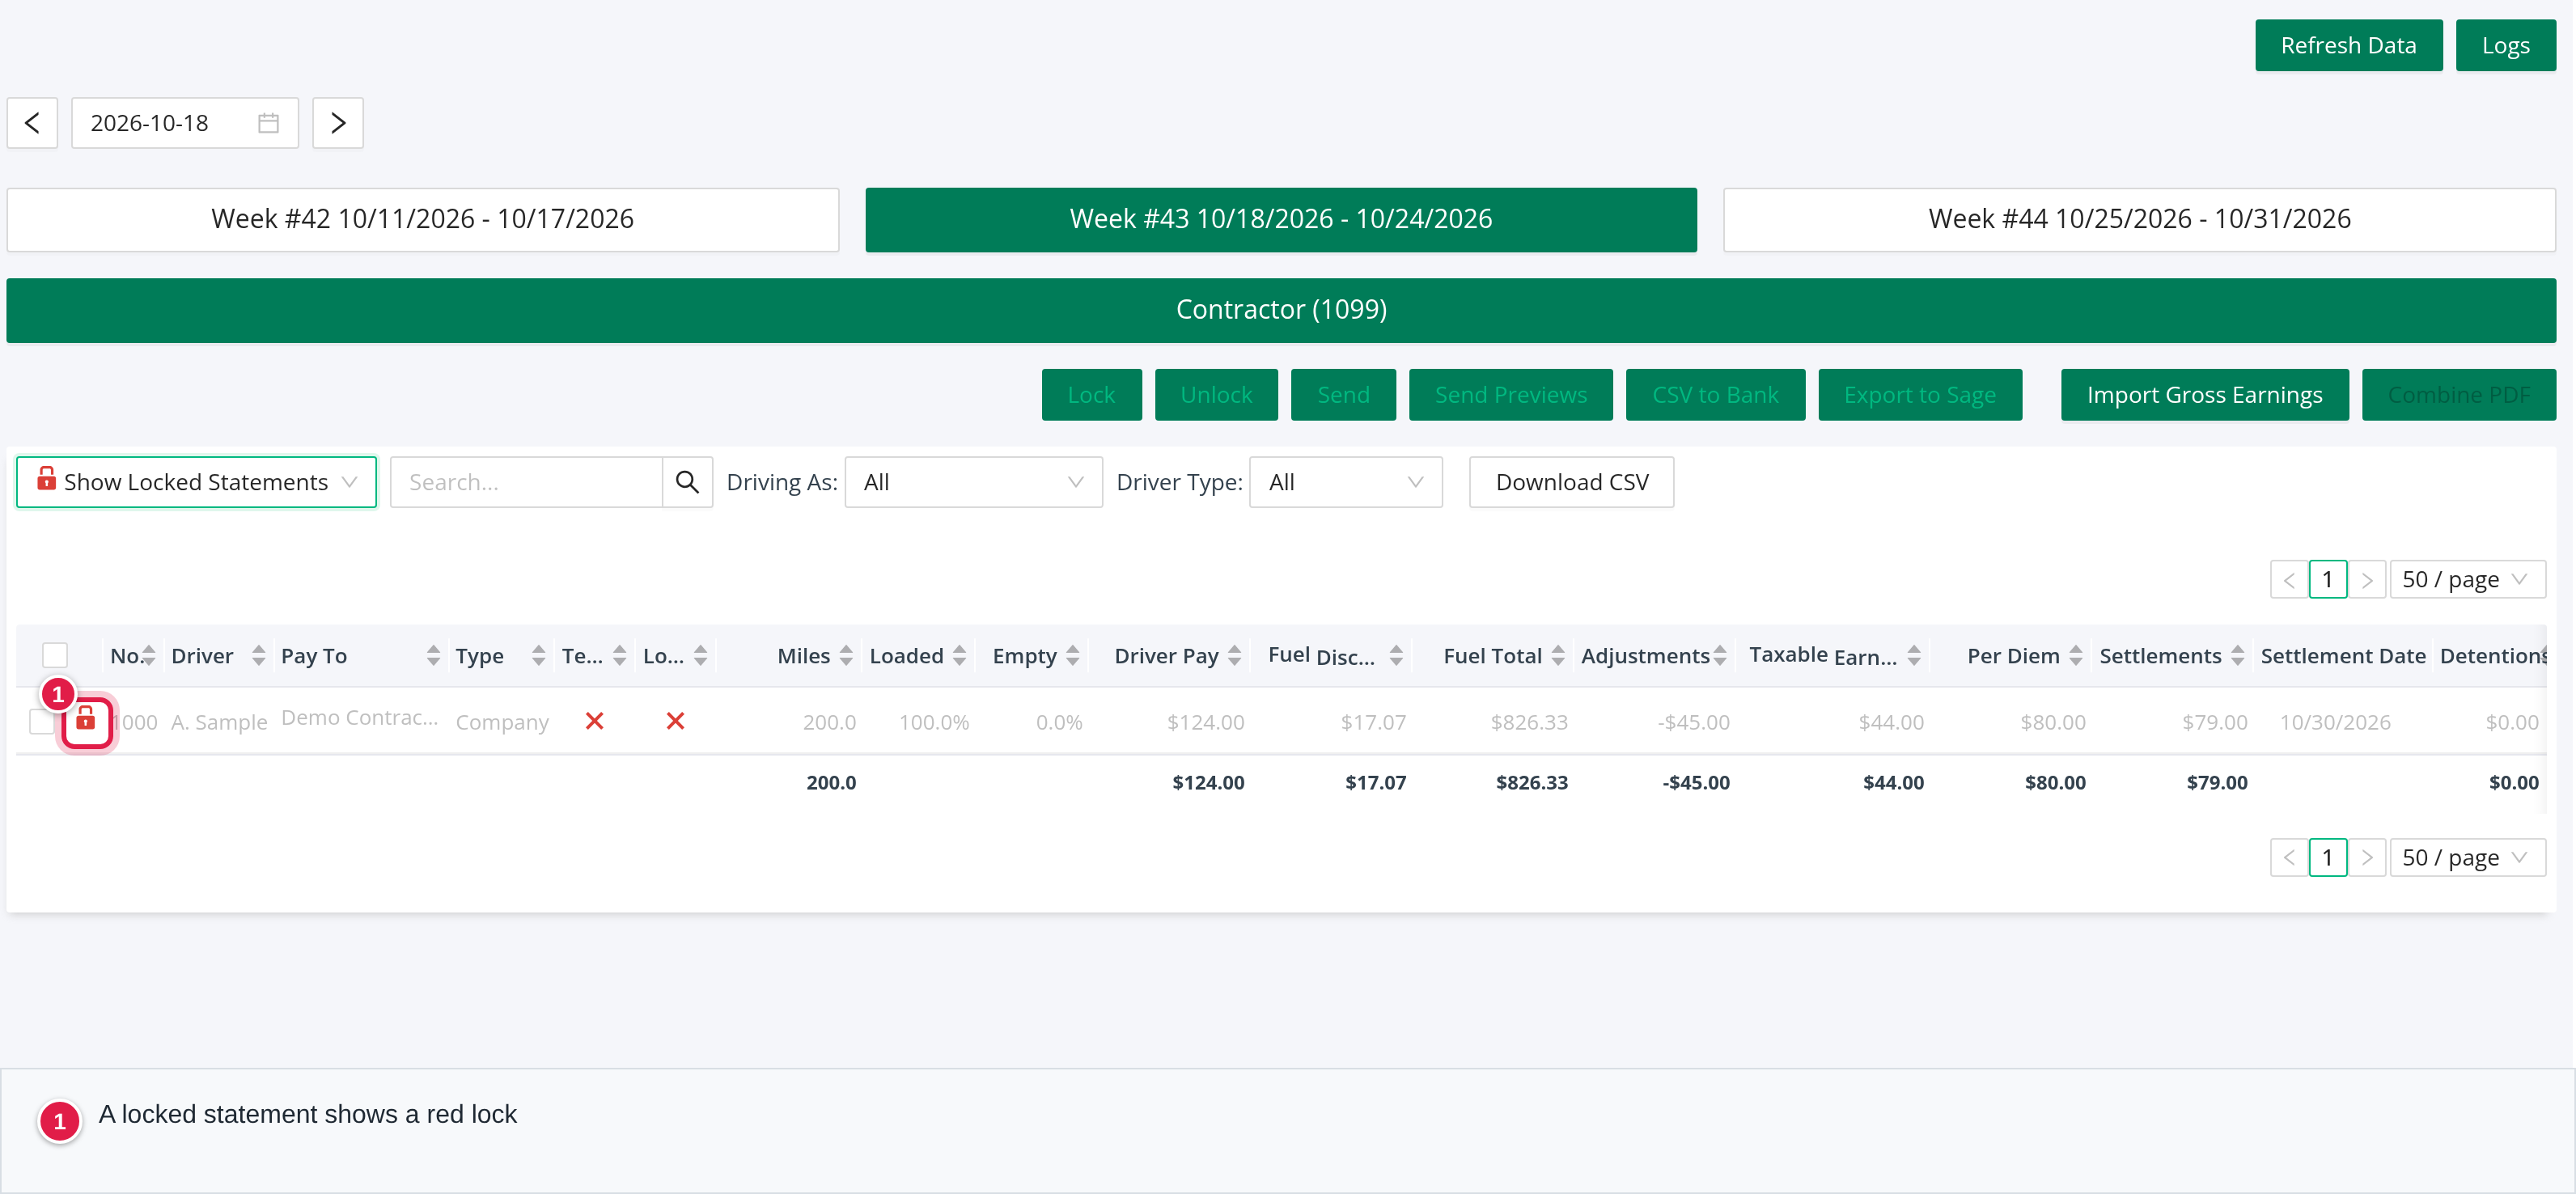
- A red lock means the statement is locked; a green lock means it is open. Click the lock to lock or unlock it.
- Driver Pay includes the other earnings and bonuses you add to a statement.
- Adjustments is the total of the deductions.
- Per Diem is the per diem of the week.
- Settlements is what the driver is paid and Settlement Date is the day.
Sent shows a green check when the statement was emailed and a red cross when not. Click a row to open the driver's statement.
Part 3: A driver's statement
Click a row of the list. The statement is recalculated every time you open it and has no Refresh Data button; changes you make here show at once.
The top of the statement
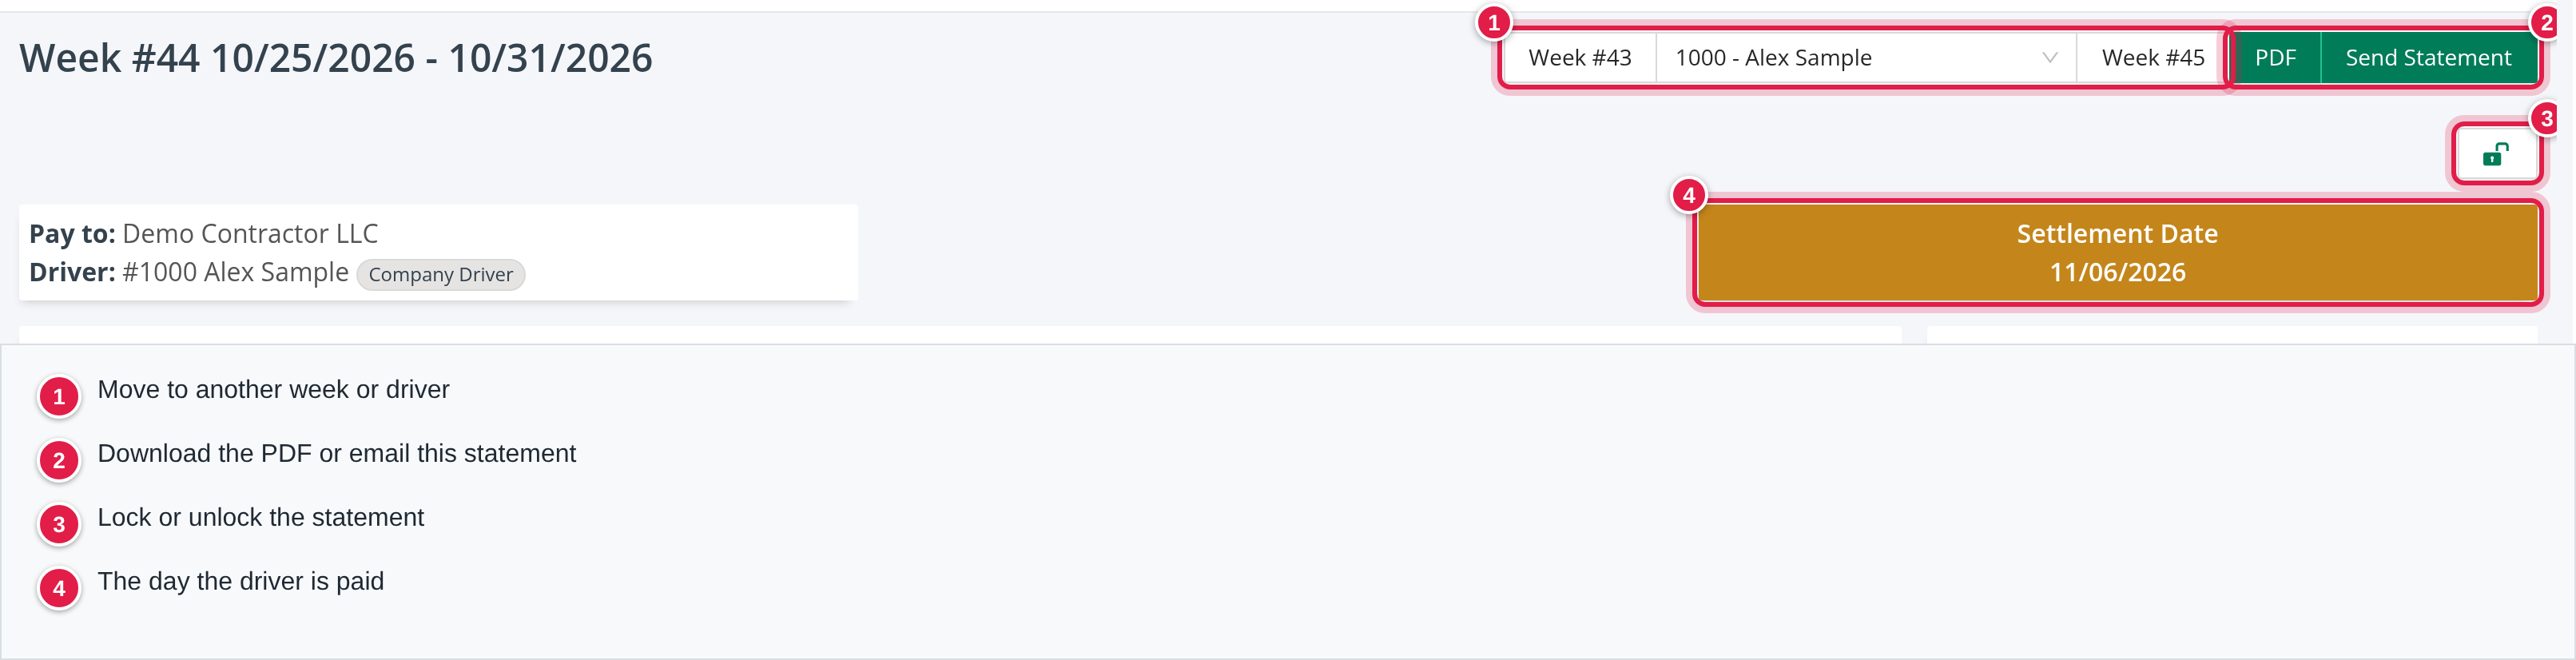
- The Week # buttons and the driver picker move you to another week or driver.
- PDF downloads the statement. Send Statement emails this one statement to the driver (it does not lock it).
- The lock button locks or unlocks the statement.
- Settlement Date is the day the driver is paid.
Loads
The Loads panel lists the loads of the week. A per-mile driver sees Seq, Company Load, Status, PU Date, Origin, DEL Date, Destination, Miles, Rate/Mile and Rate, with the empty miles between loads on their own lines and the totals of loaded miles, empty miles and pay below.
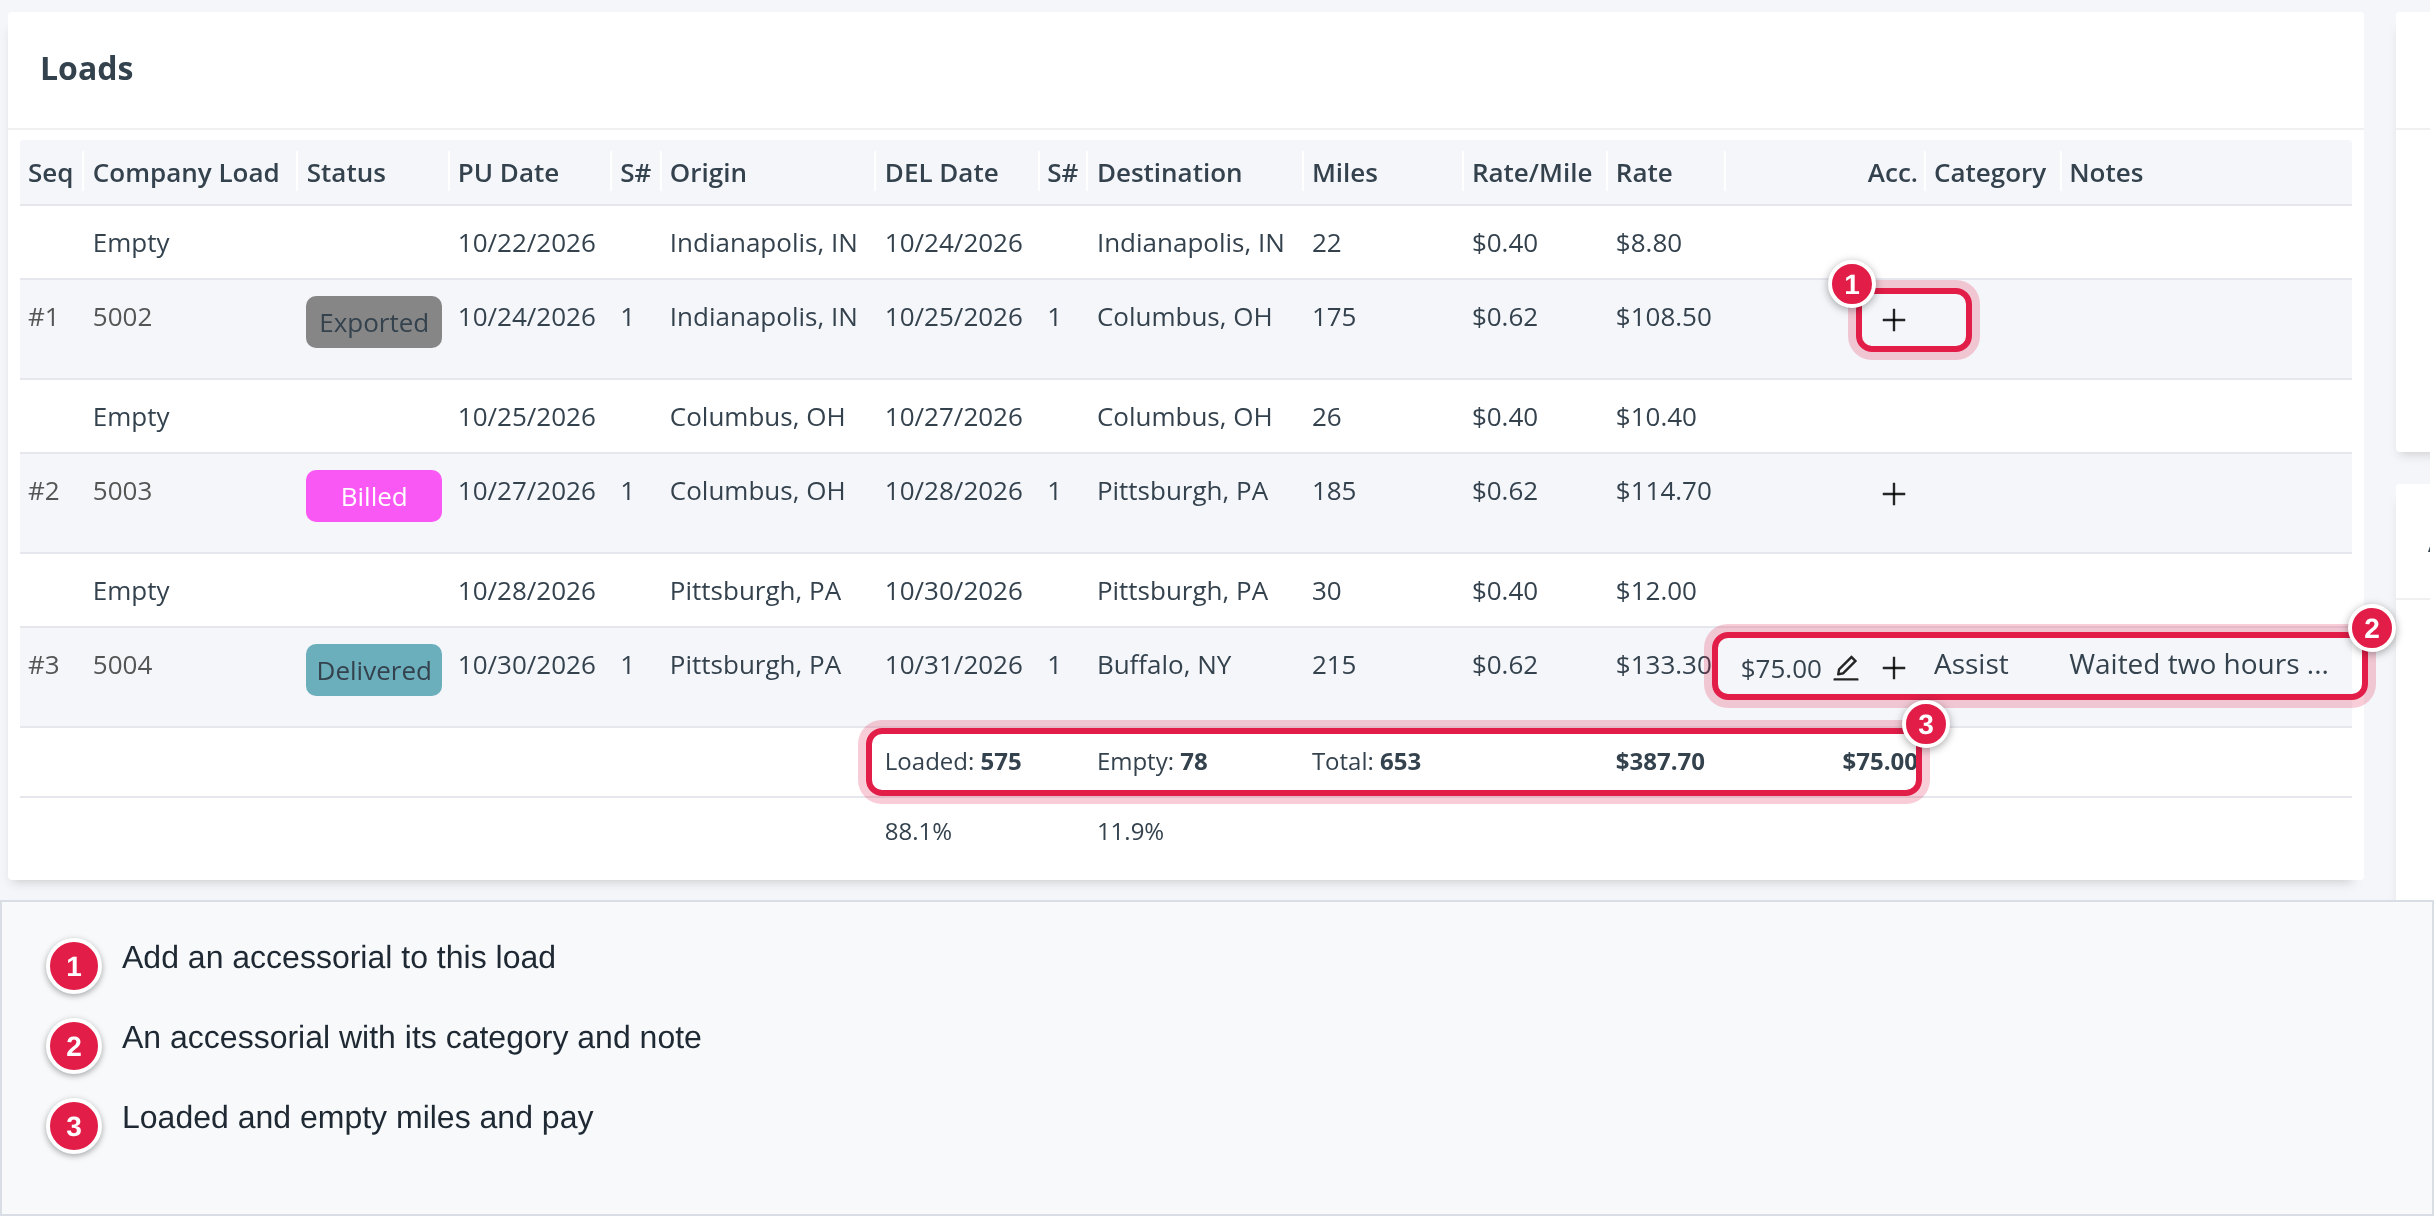
- The + in the Acc. column adds an accessorial to that load (see Part 4).
- An accessorial shows with its amount, Category and Notes.
- The totals show the loaded miles, the empty miles and the pay.
Percentage and flat drivers see tables matching their pay (see Part 4).
Earnings, off-duty events, fuel and deductions
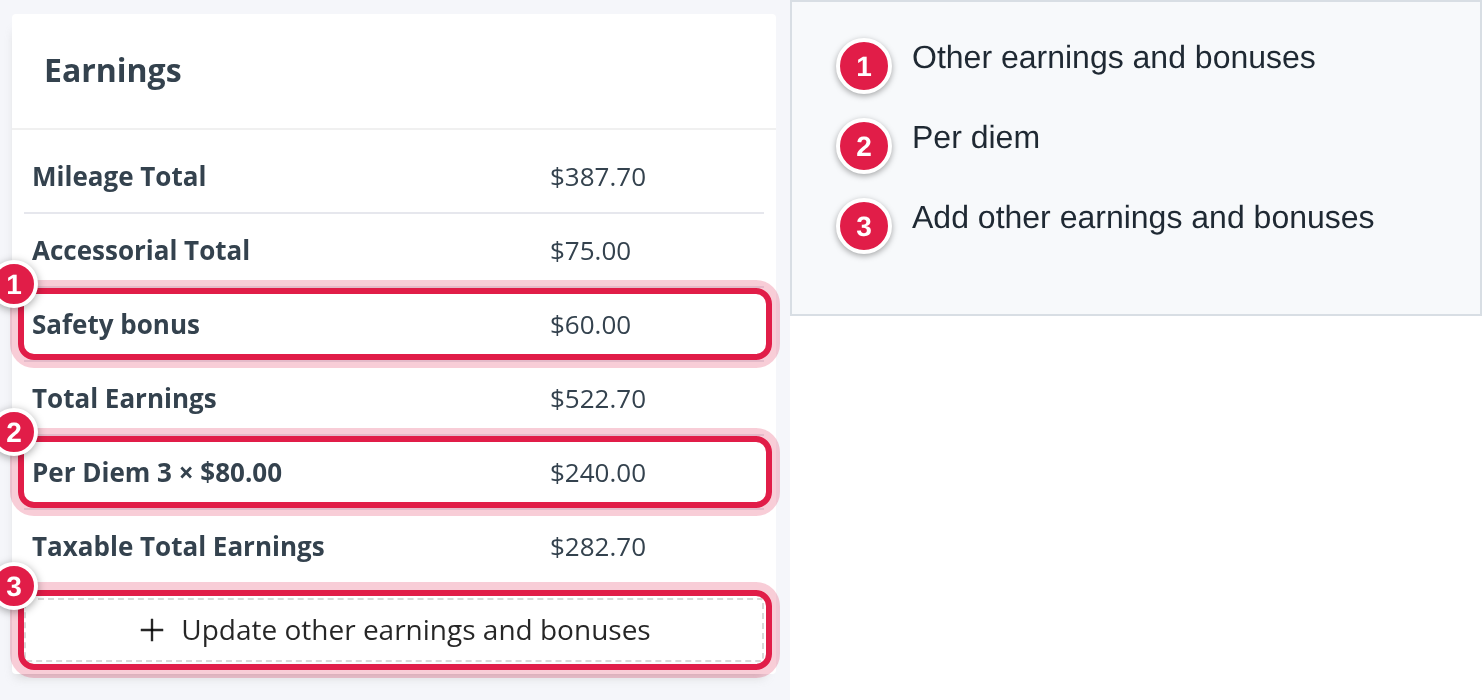
The Earnings panel adds up the pay. For a per-mile driver it shows Mileage Total, Accessorial Total, each other earning or bonus, Total Earnings and, with per diem, Per Diem and Taxable Total Earnings.
- Other earnings and bonuses you added.
- The Per Diem line (see Part 4).
- + Update other earnings and bonuses adds one.
Off-Duty Events lists the driver's off-duty events of the week with Off Duty Reason, Start Date and End Date, for example home time. The panel appears only when the driver had any. These events also change the per diem count.

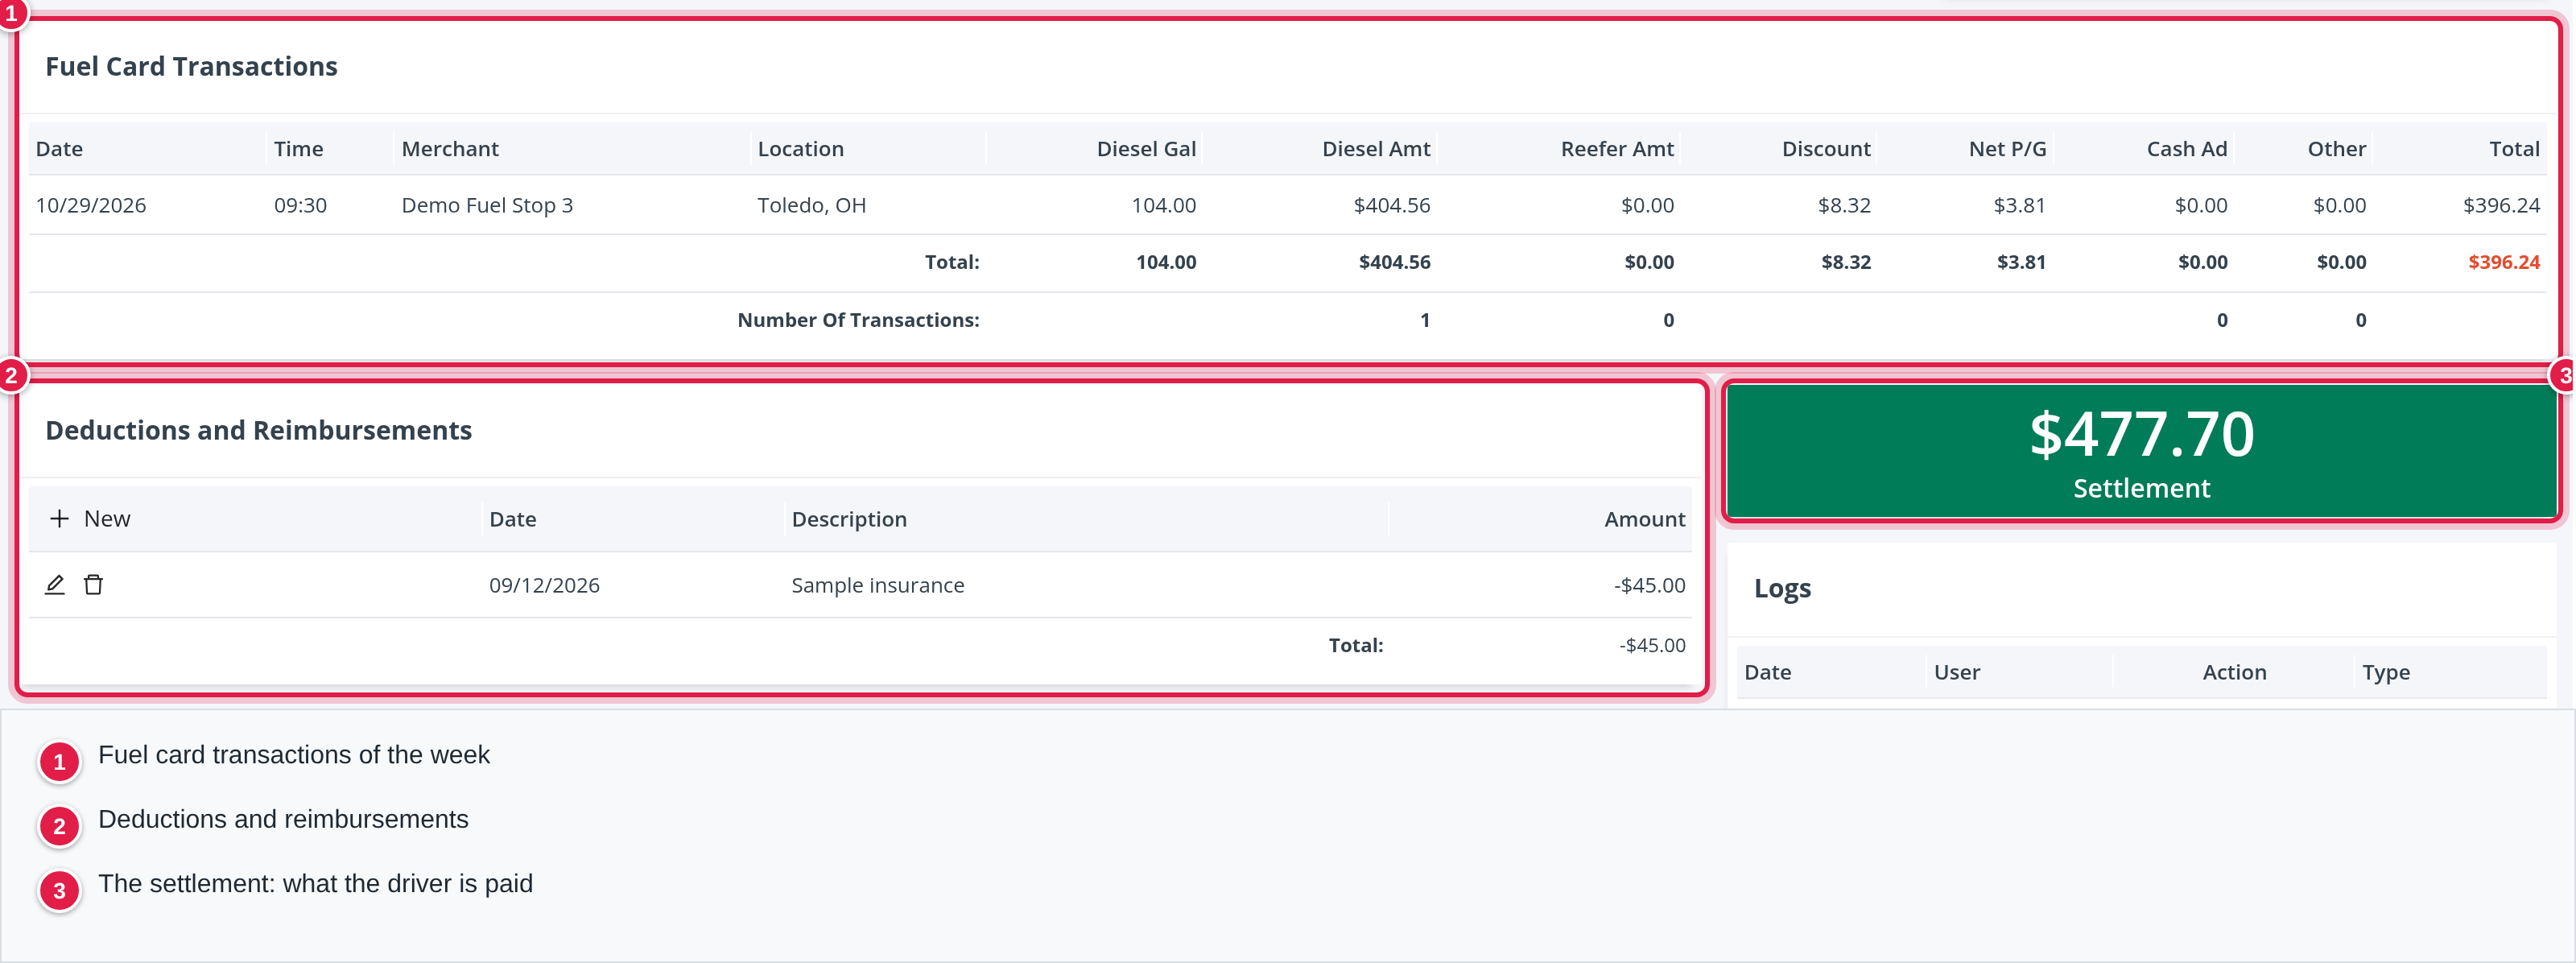
- Fuel Card Transactions lists the fuel and cash advance purchases made with the driver's assigned fuel card. They are added to the statement automatically. A Percentage compensation deducts the fuel total plus the fuel card fees; Per Mile and Flat compensations deduct the cash advances.
- Deductions and Reimbursements lists the deductions and adjustments of the week, the recurring and one-time ones set up on the driver's Accounting tab included. Add one with New (W2 drivers also have Tax).
- The green Settlement is the amount the driver is paid.
Logs at the bottom lists the actions on the statement, such as locking and unlocking.
Part 4: Adjust a statement
Changes are made on the statement while it is open (unlocked). A locked statement refuses changes from anyone but a Superadmin.
Hours, days or weeks for a flat driver
A driver on a Flat compensation needs the time worked each week. In the Earnings panel click + Update Hours Worked (or + Update Days Worked or + Update Weeks Worked, matching the compensation), enter the number with one decimal and click OK. Earnings are the flat rate times that number; without an entry the statement shows 0. Entering time needs its own permission.
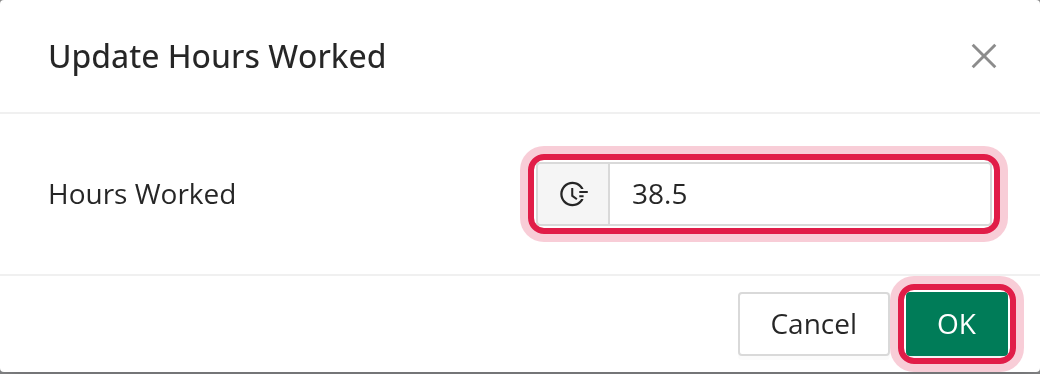
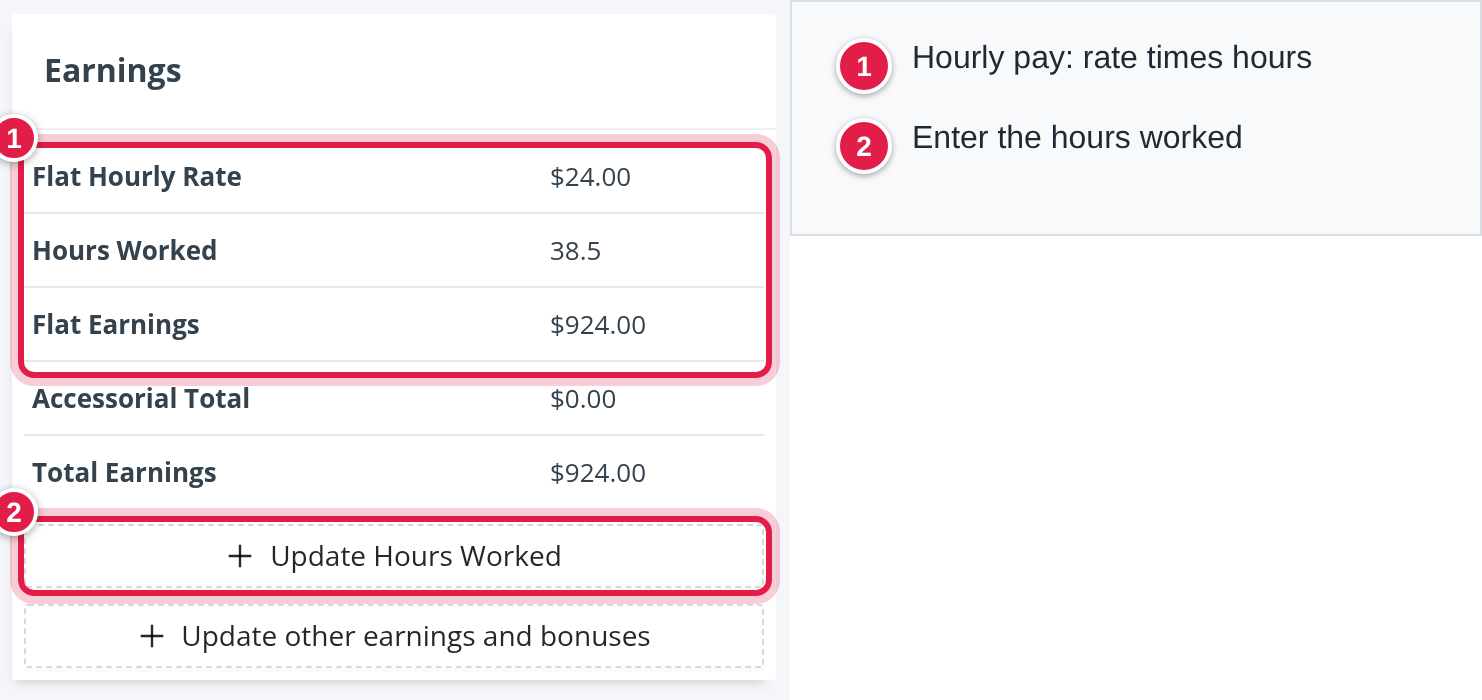
- Flat Hourly Rate, Hours Worked and Flat Earnings: rate times hours.
- + Update Hours Worked.
Other earnings and bonuses
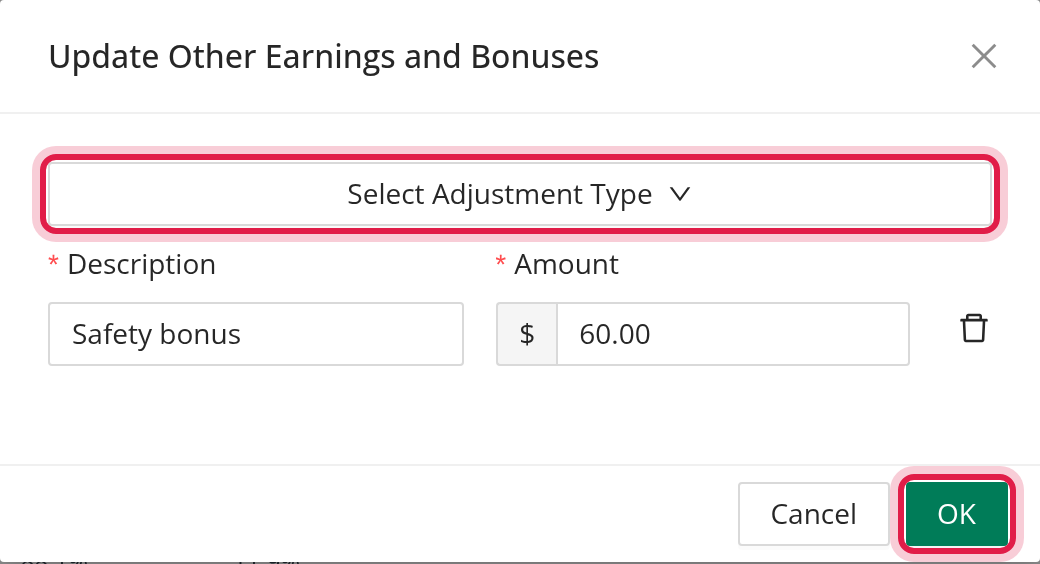
Use + Update other earnings and bonuses for items such as a TONU, a refund, a reimbursement or a bonus. In the window Update Other Earnings and Bonuses, choose Select Adjustment Type, Add other earnings and bonuses, enter a Description and an Amount from -10,000 to 10,000, and click OK. The trash icon removes a line. Accounts that use ADP or Dynamics GP also get a category list so the amount exports to the right place. The monthly ELITE Bonus can be added from the same list, and vacation and bereavement events create their own lines. Other earnings count in Driver Pay.
Accessorials
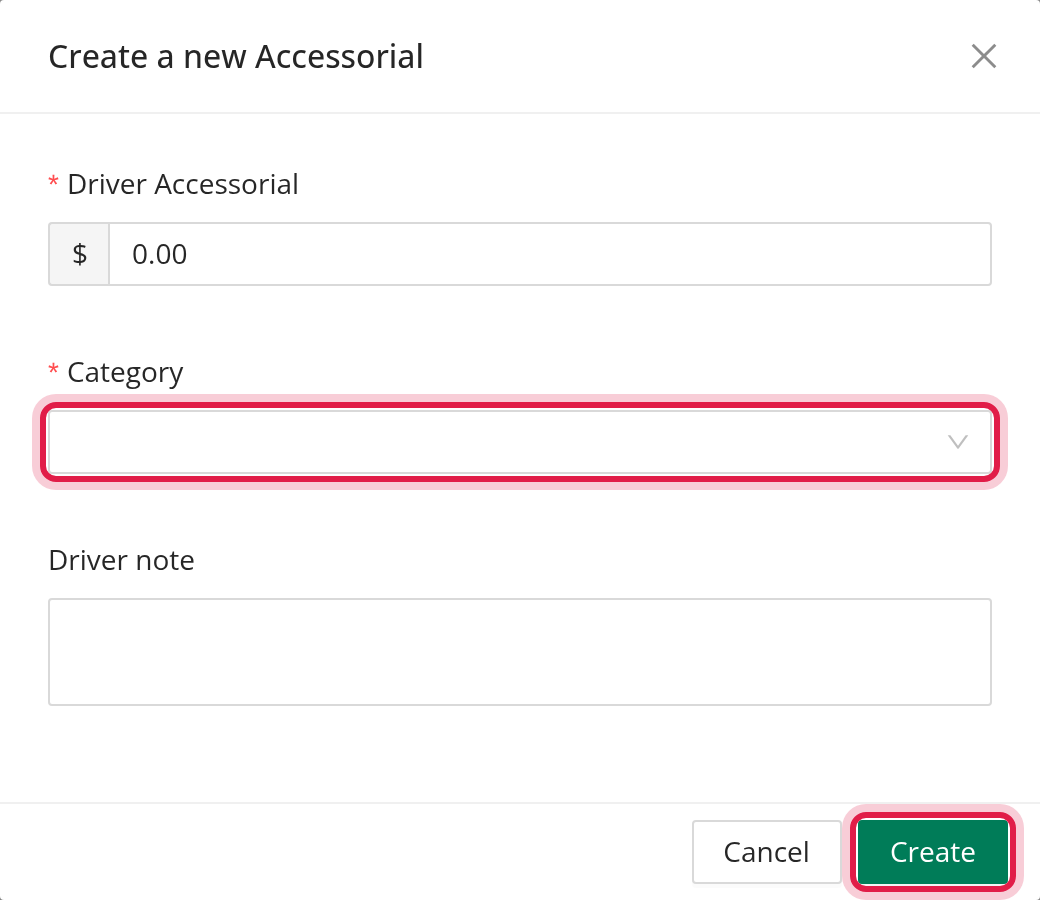
Click the + in the Acc. column of a load to add an accessorial: enter the Driver Accessorial amount, choose the Category, add a Driver note and click Create. The accessorial is added to the driver's pay (as a plain amount for a per-mile driver, or at the percentage of its pay type for a percentage driver). A category can have a preset amount and the roles allowed to use it, under Settings → Preferences → Loads → Accessorial Categories. An accessorial added late is included only while the week is open.
Percentage drivers
A driver on a Percentage compensation sees Gross, Detention, FS (fuel surcharge) and Total (w/o FS) for each load, the percentage paid on each, and the total pay of the load. The Earnings panel then holds only what you add (other earnings and bonuses).
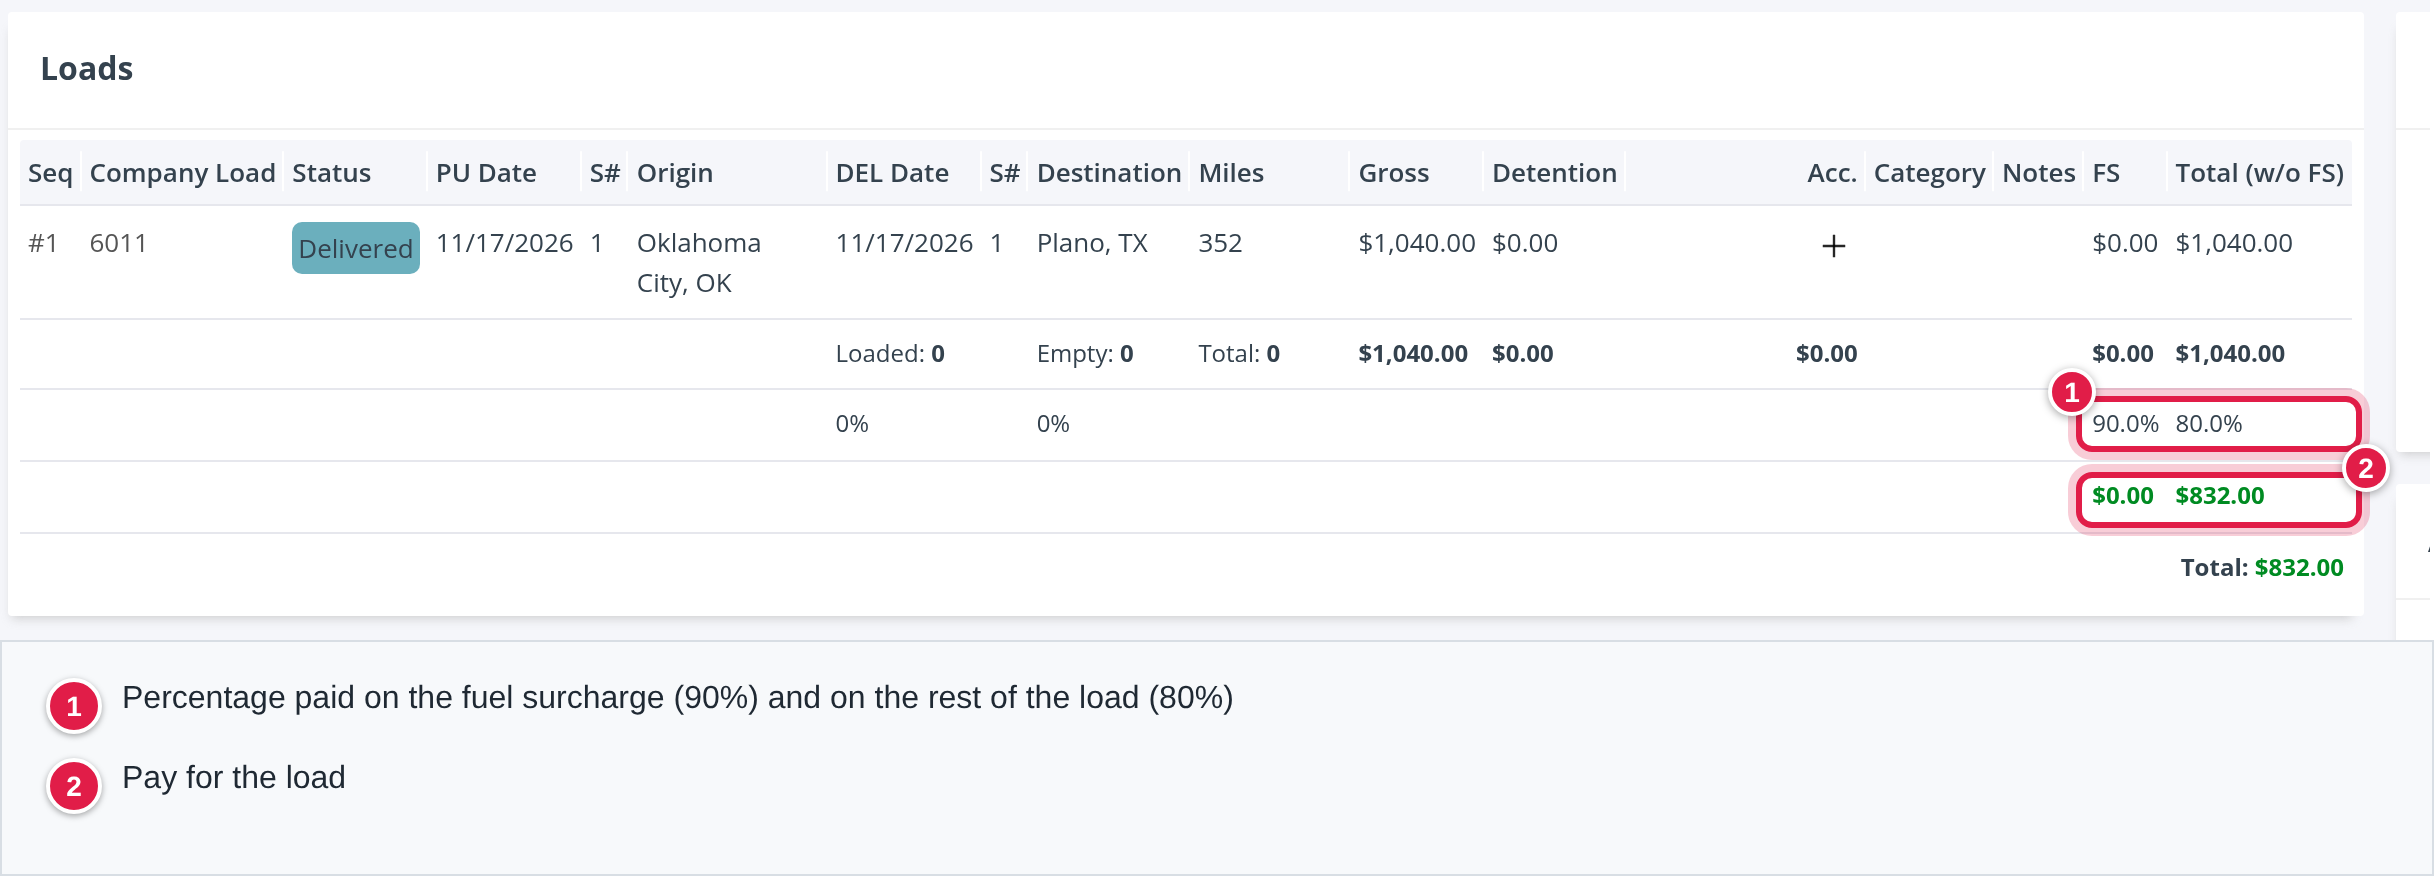
- The percentages paid on the load, from the compensation.
- The pay for the load.
Per diem
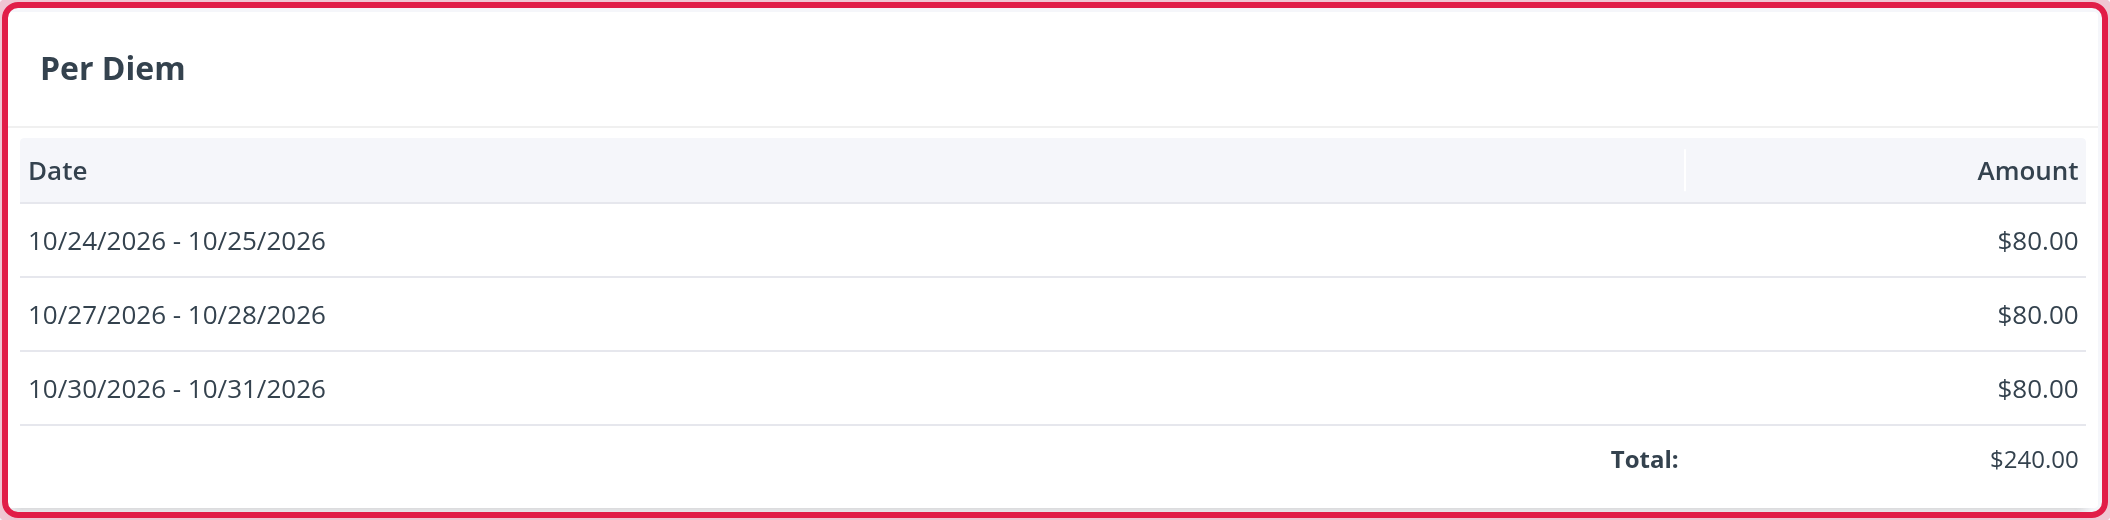
The Per Diem panel lists the nights counted, with the dates and the amount of each night, and a total. Per diem needs the feature on your account and the driver's per diem setting (see 1.3). The nights come from the dates of the stop appointments of the week, and off-duty events change the count: for example home time, vacation and medical events cancel a night. The most paid per night is $80 and the total is capped by the driver's earnings. The Earnings panel shows "Per Diem N × $X" and Taxable Total Earnings.
Before you lock
- An open week is calculated with the driver's current compensation. Lock every week that must keep the old rate before you change a driver's compensation.
- An accessorial added late is included only while the week is open. Add it to its load, click Refresh Data and check the statement.
- The seniority bonus, the fuel fees and the rounding follow the compensation and settings above. Each load is rounded.
Part 5: Lock the week
Locking freezes the statements: later changes to loads, rates or accessorials no longer change them.
- Click Refresh Data so the statements are current.
- Tick the statements (the top box ticks them all) and click Lock.
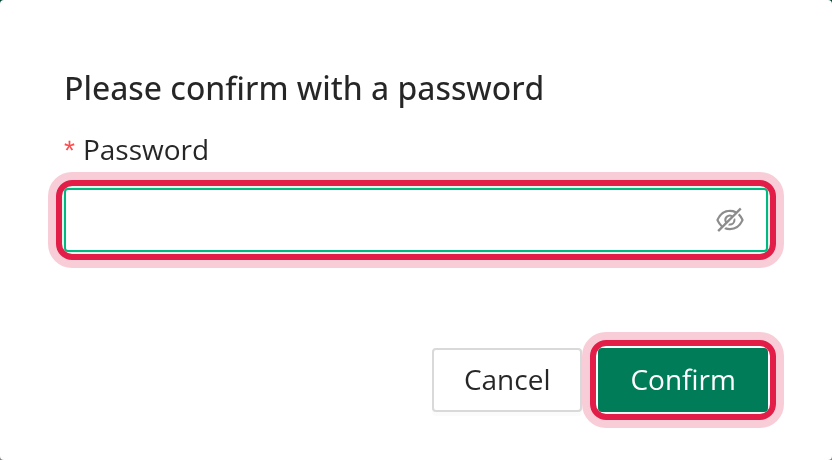
- Enter the payroll password in "Please confirm with a password" and click Confirm.
A locked statement shows a red lock and its row is greyed. Use Show Locked Statements to check that every statement you need is locked.
To change a locked statement, select it and click Unlock (password needed; unlocking needs its own permission). It becomes live again and is recalculated from current data.
Part 6: Send the statements
- Send Statement (on the statement) or Send (in the list) emails the statement, with the PDF attached and the subject "Settlement <start> to <end>", to the driver's pay-to company e-mail. Send asks "Are you sure you want to send?" and also locks the statement.
- Send Previews emails a preview without locking.
- Sent in the list shows which statements went out.
- Combine PDF merges the selected statements into one file to download.
Part 7: Export and check the logs
The buttons at the top of the list depend on your permissions and on the features of your account.

- CSV to Bank: a file without a header row with one row for each company that receives a direct deposit.
- Export to Sage: runs in the background. A statement with a deduction that has no Sage category is invalid. It locks the valid statements itself.
- Export to ADP: appears on the Employee (W2) tabs for accounts with ADP. It needs statements that are already locked and the Company ADP ID, and it stops until every statement is valid (the reasons you may see are "Statement is not locked" and "Company ADP ID is blank").
- Export to Dynamics GP: appears on the Contractor (1099) tabs for accounts with Dynamics GP. It needs locked statements and the company Pay To ID #, skips invalid statements ("Missing Pay To ID on company") and creates a zip with the two files for payables. Neither the ADP nor the Dynamics GP button appears on All.
- Import Gross Earnings: imports earnings from an Excel file; download the template first. Rows of locked weeks are refused and duplicates are skipped. The settings Imported Earnings ADP Category and Imported Earnings Dynamics GP Mapping under Settings → Account → Wages place them in the right category.
Logs opens the history of your exports in a new tab, with a tab for each export, such as CCD, Sage Export, ADP Export and Dynamics GP Export. They show the date, the user and the counts of valid and invalid statements; open a row to see each statement's Errors and Status. Fix invalid statements on the driver's profile and export again.

Part 8: The driver's Statements tab
The Statements tab of the driver profile lists the weekly statements of that driver with # of Week, a PDF link, Locked, Sent, the dates, the miles and pay columns, Settlement, Settlement Date and Force create. Click + in Force create to make a statement appear for a week in which the driver would otherwise not be listed.
Frequently asked questions
Was this article helpful?
That’s Great!
Thank you for your feedback
Sorry! We couldn't be helpful
Thank you for your feedback
Feedback sent
We appreciate your effort and will try to fix the article