The load form is where you enter a load: its customer, rates, flags and every stop. The same form is used to create a new load, to copy an existing one and to edit a load. This article shows each field and what is checked when you save. The page you see after saving is described in Load profile: status, uploads, charges, stops, notes and Load Logs.
Who can do this: your role must allow creating or editing loads. Copy needs both the copy and create permissions. Your administrator can hide or lock individual fields for some users, so you may not see everything described here.
Before you begin
- Add the customer first, or use the green + next to Customer on the form to add one.
- To fill rates, flags and stops in one step, set up a template. See Load Templates: create, edit and use templates.
- To create loads from a PDF rate confirmation instead of typing, see the section Create a load automatically from a PDF below and Automatic Load Entry (EXTRA FEATURE): create loads from PDF rate confirmations.
Create a load automatically from a PDF
You do not have to type a load by hand. OpenRoad offers Automatic Load Entry, which reads a PDF rate confirmation and fills in the load for you.
Automatic Load Entry is an extra feature. It is switched on per account. If you do not see Start Automatic Load Entry on the new load form, contact help@openroadtms.com to have it enabled.
- Select Add Load.
- At the top of the form, above Rate Confirmation, select Start Automatic Load Entry. The text next to it says "Please upload Rate Confirmation PDF document and system will prefill Load details".
- Upload the PDF rate confirmation.
- Check every value, then select Save. A load made this way shows the warning "This load was generated by an automated OCR process. Double-check the values against the Rate Confirmation!"
Automatic Load Entry can also read load emails from a mailbox you connect, and each customer can have its own default values. Everything about it is in Automatic Load Entry (EXTRA FEATURE): create loads from PDF rate confirmations.
Create a load
- Select Add Load. It is the green button on the loads pages (All Loads page (Loads > All Loads): find loads, filters, columns, status and Export) and on a load's own page.
- The form opens with two stops already added: a Pick up and a Delivery. Equipment starts as Van (or Dry Van) if your account has that trailer type.
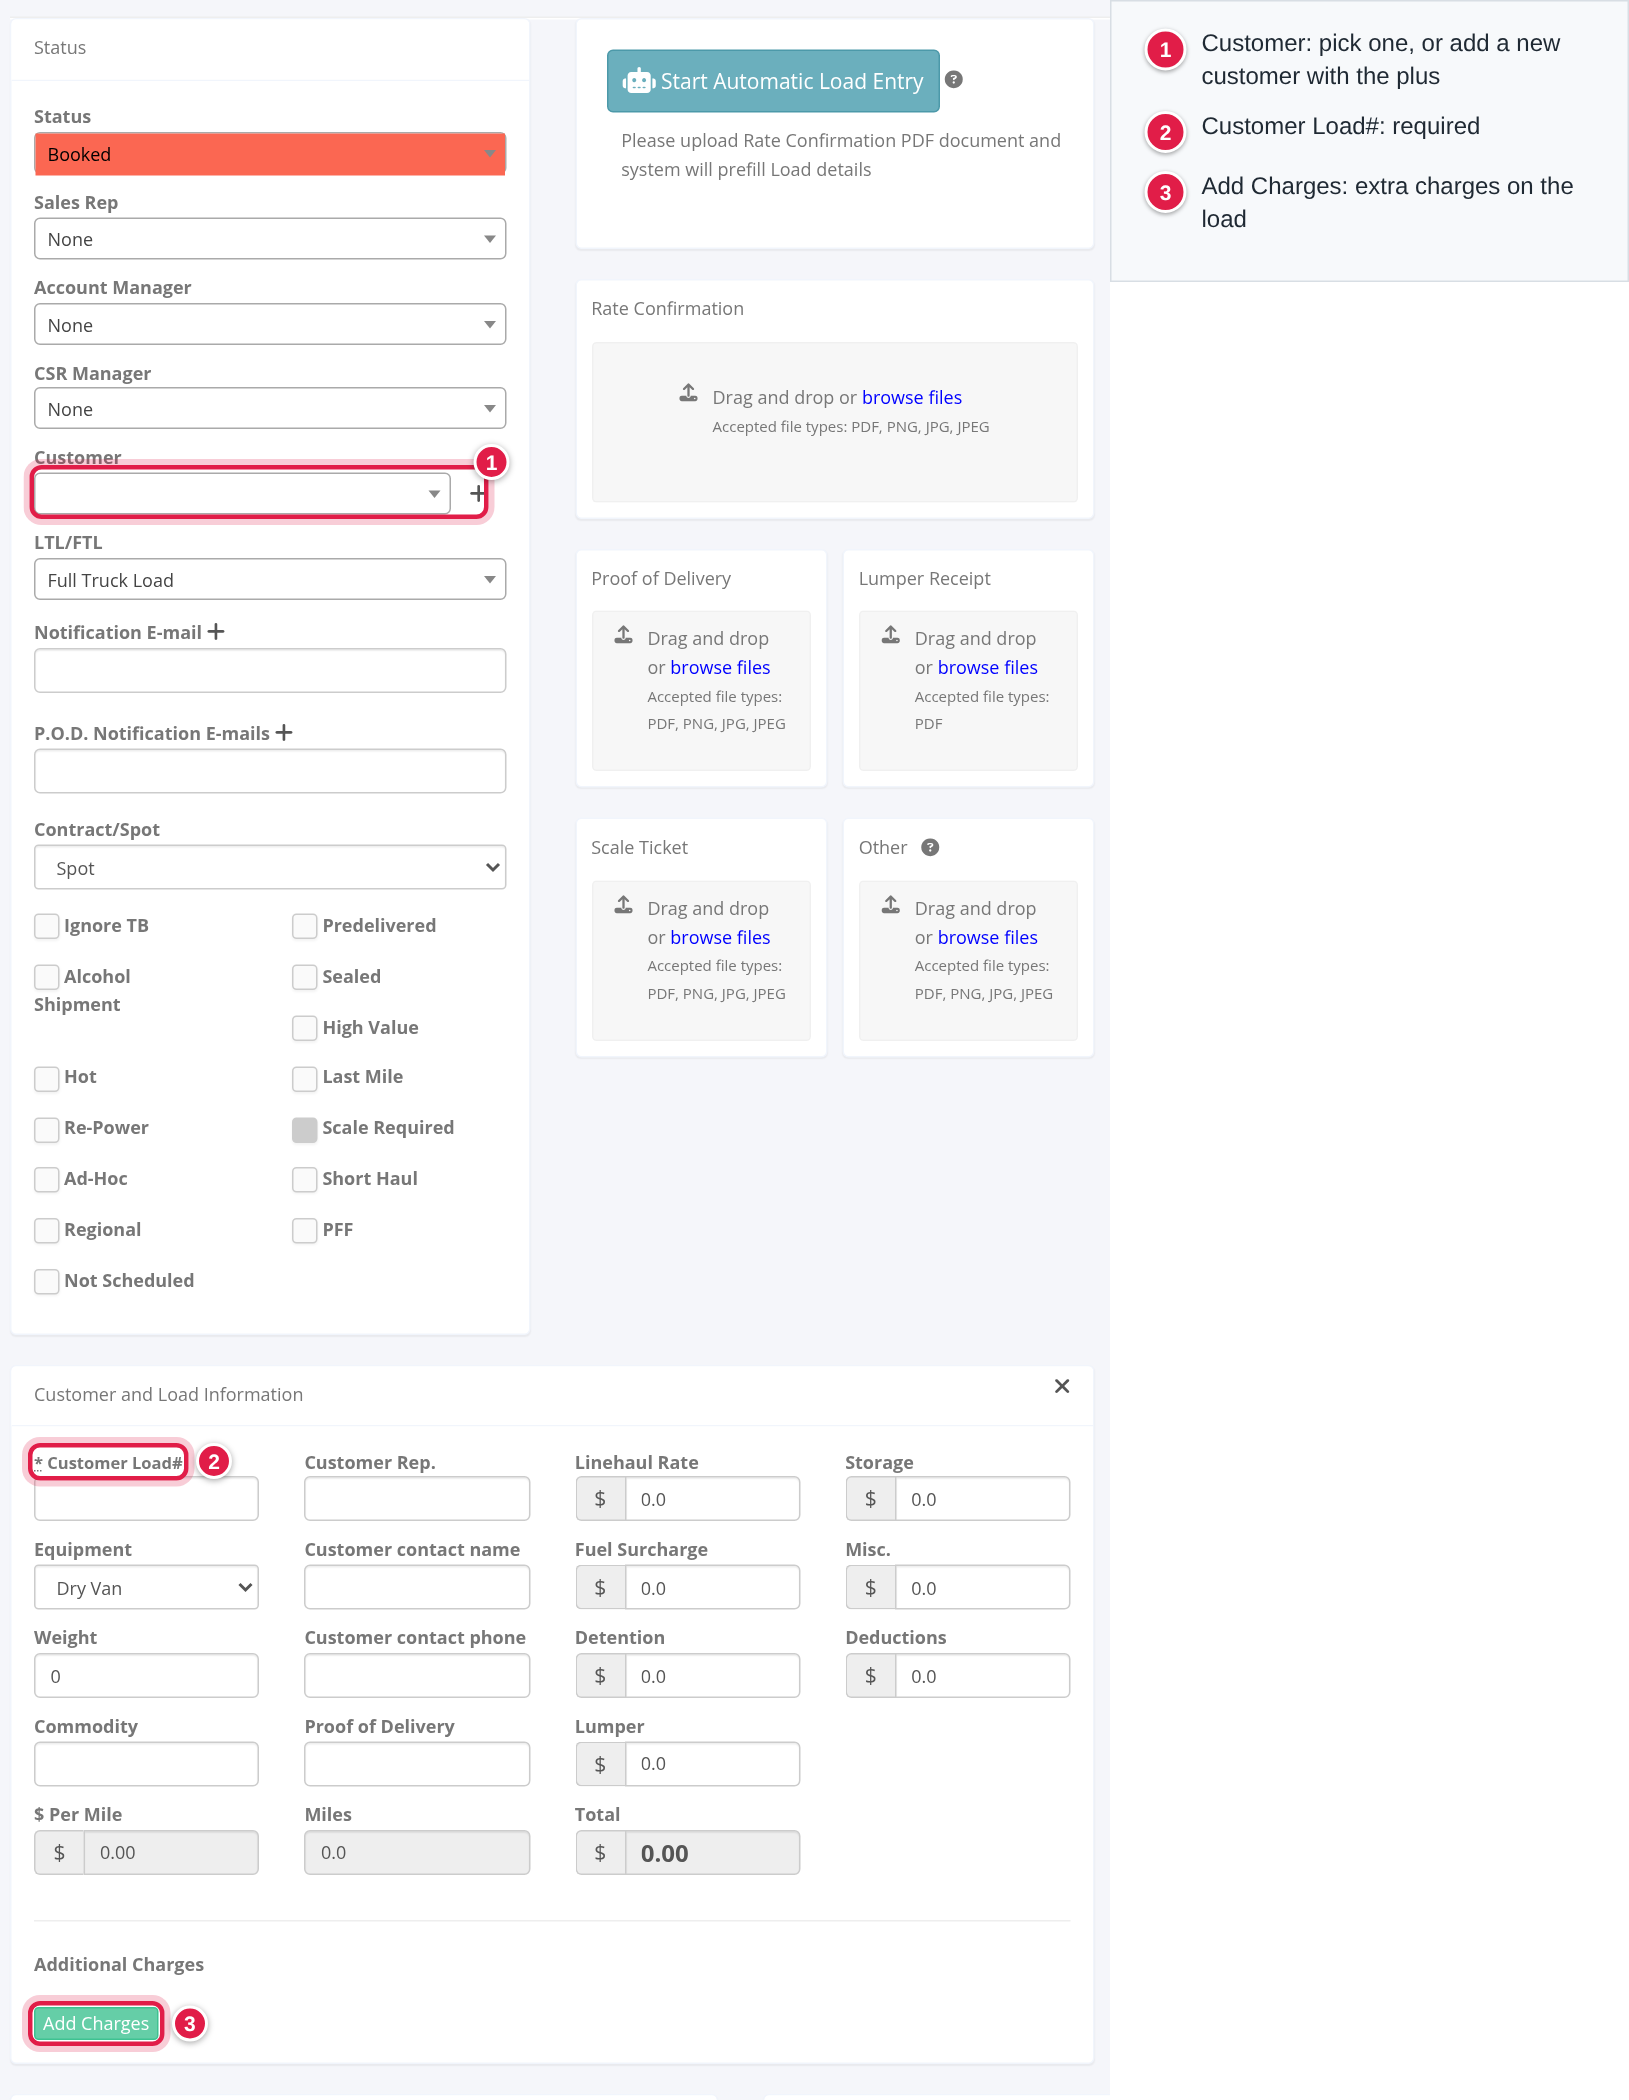
- Fill in the fields below. The required ones are Customer Load# and, for each stop, the company, the address, the zip code and the two customer appointment times.
- Select Save. You go to the load's page and see "Record saved successfully."
If the form is not valid, it opens again with the errors and "Sorry. Errors saving record."
Copy a load
Open the load and select Copy. A new load form opens with the details of the old one, except:
- Status is Booked.
- Customer Load# is a new six-digit number made from the time, so change it.
- Flags such as Alcohol Shipment, Sealed, High Value, Hot, Last Mile, Re-Power, Ad-Hoc, Short Haul, Regional, Flatbed and PFF are cleared.
- Drivers and the times on the stops are cleared.
Edit a load
Open the load and select the pencil in the Status panel. Change what you need and select Save. If the load's status is locked in your account, non-admin users are asked for a password first. If your account locks financial fields, the rate boxes stay read-only when you edit.
The Status panel
- Status: see the list in the profile article.
- Sales Rep, Account Manager, CSR Manager: choose a person. None is allowed.
- Customer: search for a customer. The green + adds a new one.
- Load Template (optional): appears after you pick a customer that has templates. See below.
- LTL/FTL: Full Truck Load or Less than Truckload.
- Notification E-mail and P.O.D. Notification E-mails: add one or more addresses with the +. They must be valid and not repeated.
- Contract/Spot: Spot, Contract, Dedicated or Internal.
- Option boxes: Ignore TB, Predelivered, Alcohol Shipment, Sealed, High Value, Hot, Last Mile, Re-Power, Ad-Hoc, Not Scheduled. Scale Required is ticked by the system, not by you.
Customer and Load Information
| Field | Notes |
|---|---|
| Customer Load# | Required. Must be different from the other loads of the same customer. |
| Equipment | Your account's trailer types. |
| Weight | Must not be more than the maximum: the customer's limit, otherwise your account's, otherwise 46,000 lbs. Error: "Weight must be no more than N lbs". |
| Commodity, Customer Rep., contact name and phone, Bill of lading, Temperature | Text. Temperature is hidden for van and dry van. |
| $ Per Mile, Miles, Total | Calculated. You cannot type in them. |
| Linehaul Rate, Fuel Surcharge, Detention, Lumper, Storage, Misc., Deductions | Amounts in dollars. |
| CAD | Tick when the amounts are Canadian dollars. |
| Invoice Notes | Up to 1,000 characters. |
Additional Charges: select Add Charges, pick the charge name, enter the amount, and a description if the charge asks for one. This section needs permission to manage additional charges. A charge that belongs to a total, such as Detention, must add up to that total. Otherwise you see "Invalid additional charge sum for …" and have to correct the stop or the total.
Stops
The Stops panel holds the pickups and deliveries in order.
- Select the green + at the bottom to add a stop. Drag a stop to reorder it. Remove a stop with the remove link and Are you sure?
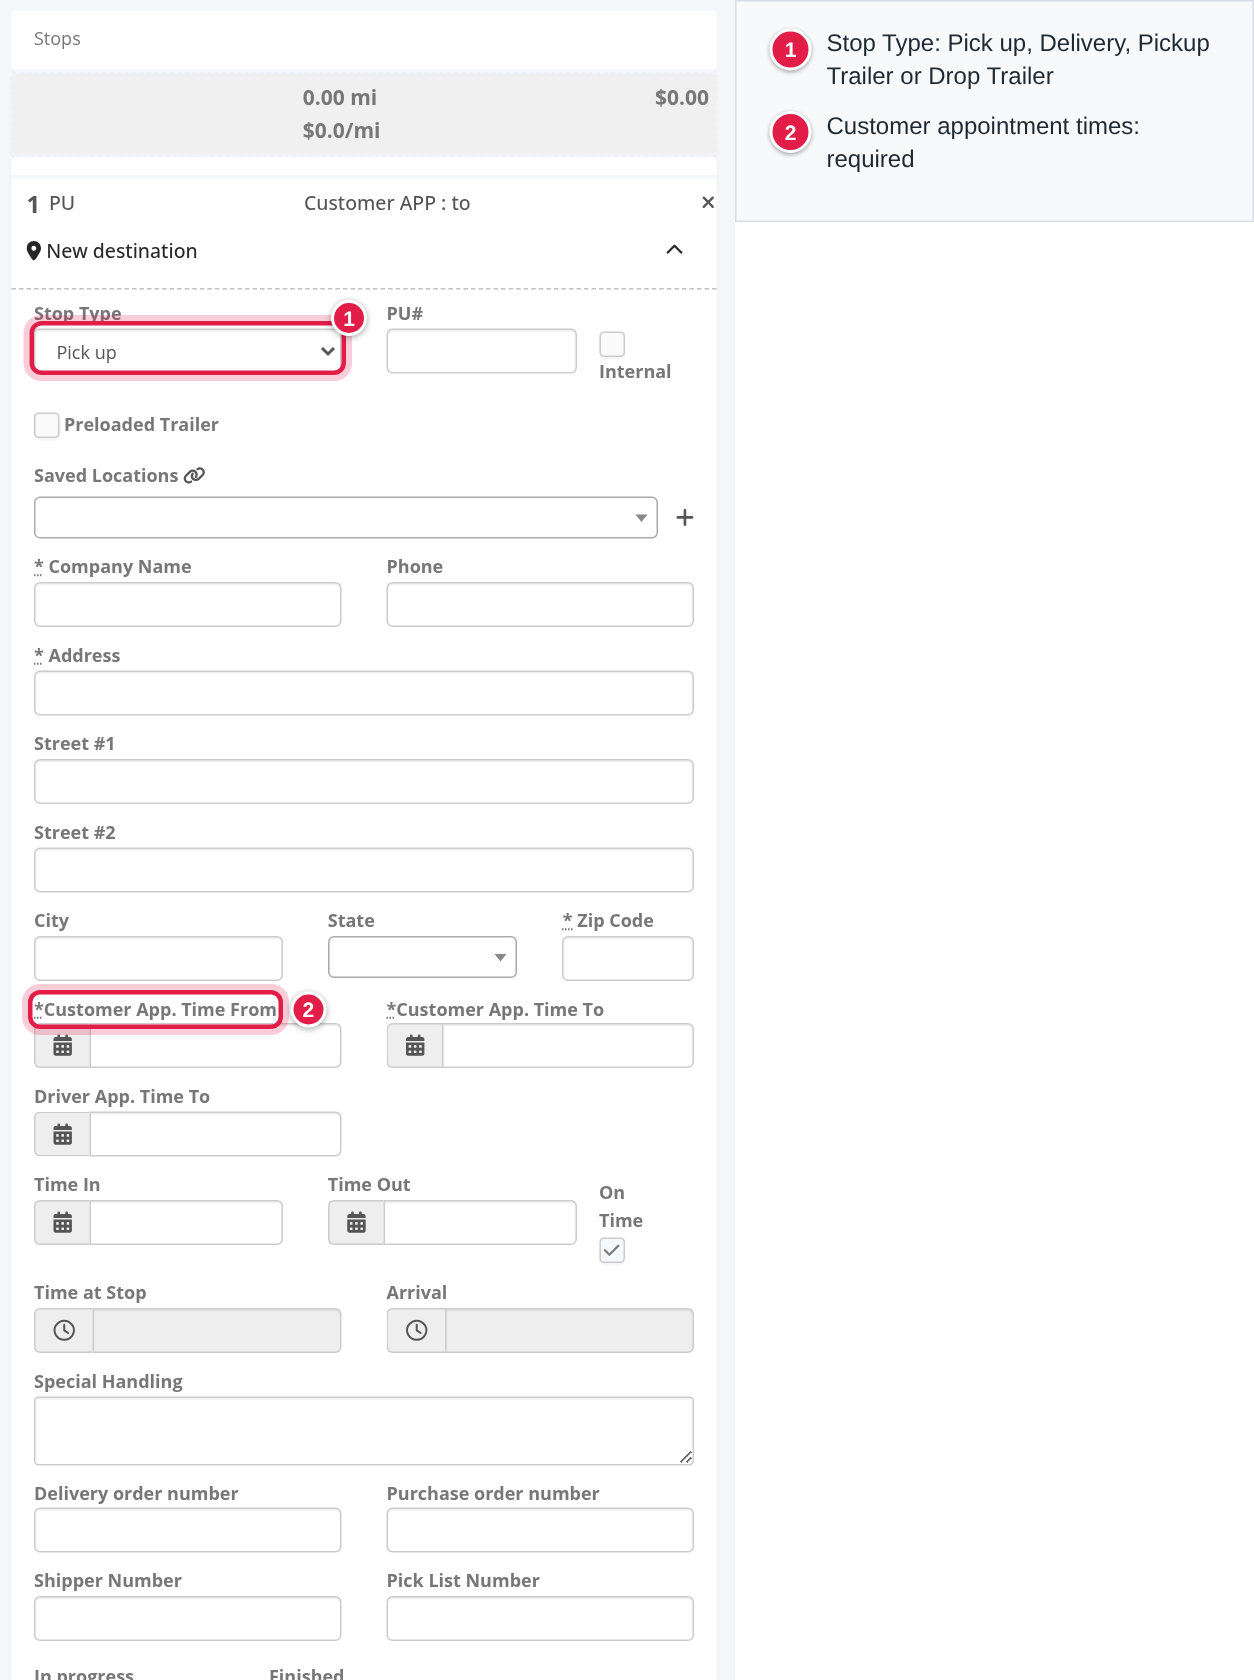
- Stop Type: Pick up, Delivery, Pickup Trailer or Drop Trailer.
- PU# or DEL#: the reference number. Internal and Drop And Hook are tick boxes.
- Company Name, Address, Zip Code: required. Also Phone, City, State, street lines. If your account uses Places or Saved Locations, you can pick one instead of typing.
- Customer App. Time From and To: required. They cannot be more than a year ahead.
- Driver App. Time To: optional.
- Time In and Time Out: cannot be in the future. After some time they can no longer be edited.
- Special Handling, Delivery order number, Purchase order number, Shipper Number and Pick List Number. The last two must be unique when filled.
What is checked when you save
- The load needs at least one pickup and one delivery: "Load is invalid. It must have at least one pickup and one delivery."
- Positions of the stops must follow in order, and each driver's appointment times must follow the order of the stops.
- If your account requires a customer on every load, you must choose one.
- A new load for a customer with credit hold is refused: "Selected Customer has Credit Hold enabled. New loads will not be entered." This applies when your account has that setting on.
Use a template
Templates are saved on the customer, in the Load Templates tab. To create or change one, see Load Templates: create, edit and use templates (Customers > Load Templates).
- On a new load or a copy, choose the Customer.
- The Load Template (optional) list appears if the customer has templates. Pick one.
- The rates, equipment, LTL/FTL, commodity, weight, Contract/Spot, the flags, the three people and the stops are filled in.
- Choose — Select a template — again to clear what the template filled.
A template never fills Customer Load#, notes, appointment times, status, drivers or additional charges. You still fill those in.
FAQ
Was this article helpful?
That’s Great!
Thank you for your feedback
Sorry! We couldn't be helpful
Thank you for your feedback
Feedback sent
We appreciate your effort and will try to fix the article