A driver statement (settlement) shows everything a driver earned and owes for a payroll week: their loads, miles, pay, fuel transactions, adjustments and deductions. This article explains how to generate the statement, review it, add adjustments, send it to the driver and lock it before payroll.
Before You Begin
Make sure you have the following ready:
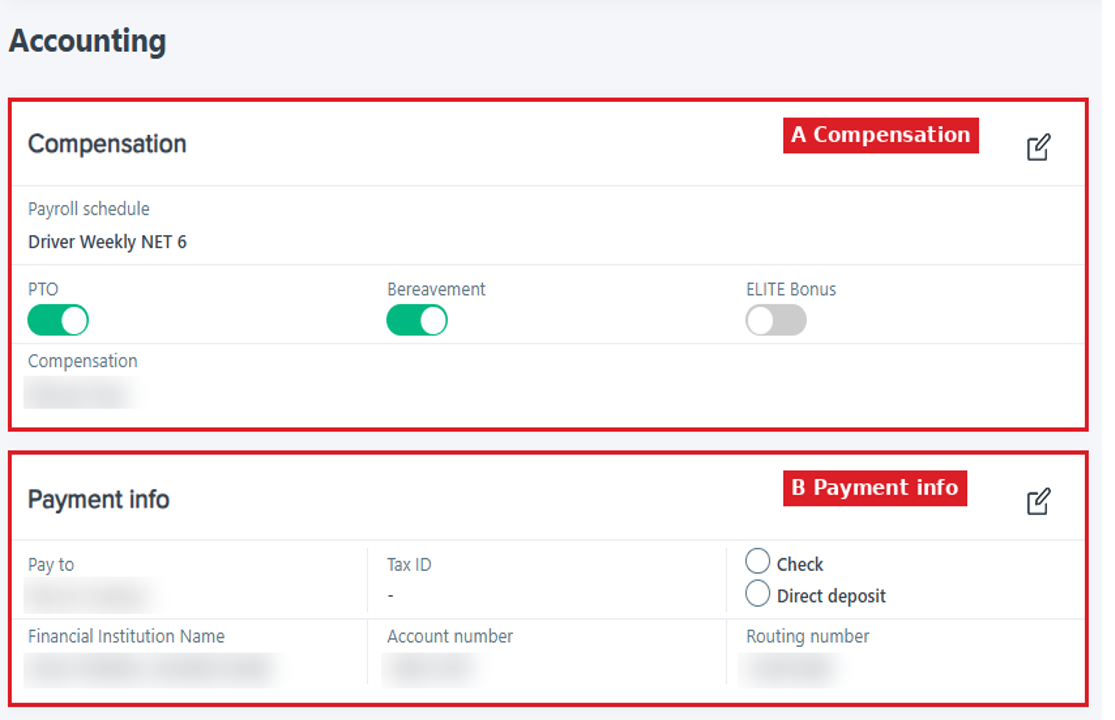
- The driver's compensation and payroll schedule. Open the driver's profile and go to the Accounting tab. The Compensation card (A) shows the driver's payroll schedule and how they are paid (Per Mile, Percentage or Flat, with Hourly, Daily and Weekly options). Compensation models and payroll schedules are created in Settings → Account → Compensations and Payroll Schedules.
- The driver's payment info. The Payment info card (B) shows who the statement is paid to (Pay to).
- The week's loads entered. Statements are built from the driver's loads, so dispatch must have entered all the loads for the week.
- Fuel cards assigned to drivers (if you use fuel cards). Fuel purchases and cash advances only appear on a statement when the card is assigned to that driver in Fuel → Fuel Cards.
- A lock password. Locking and unlocking statements asks for a password. You can set it in Settings → Passwords.
Part 1: Find the Driver's Weekly Statement
OpenRoad calculates statements automatically from the driver's loads, miles, accessorials, fuel transactions and deductions, and recalculates them when that data changes.
- From the left menu, go to Drivers and open the driver's profile.
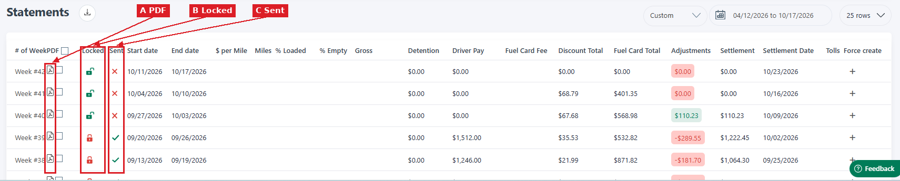
- Open the Statements tab. It lists the driver's statements by week. For each week you can see the PDF (A), whether the statement is locked (B), whether it was sent (C), and its totals: driver pay, fuel card total, adjustments, settlement and settlement date.
- To see older weeks, change the date range at the top right of the list.
- Click a week to open its statement.
Note: Fuel purchases and cash advances made with the driver's assigned fuel card are added to the statement automatically. You do not need to enter them.
Tip: To rebuild a week manually, use Regenerate Payroll on the driver's Statements tab and enter the start and end dates of that payroll week.
Important: Only enter the exact dates of a scheduled payroll week. Any other dates create a second statement with the same loads, and the driver could be paid twice.
Part 2: Review the Statement
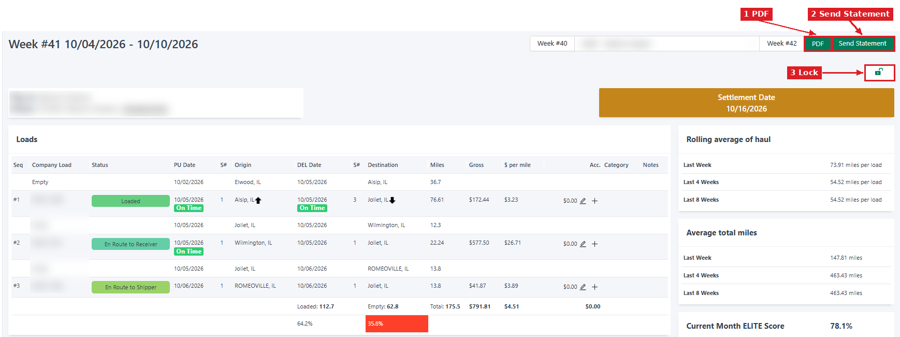
The statement opens with the week at the top. Use the Week buttons and the driver list next to them to move to another week or another driver. The Settlement Date shows when the driver is paid.
- Check the loads listed for that week.
- Check the miles. The statement shows each load's miles, the empty miles between loads, and the loaded and empty totals for the week. Depending on your account settings, OpenRoad uses Customer Miles or Planned Miles.
- Check the pay on each load (Gross and $ per mile). The statement layout follows the driver's compensation type: per mile, percentage or flat rate.
- Check the Fuel Card Transactions section, if the driver uses a fuel card.
- Review the Deductions and Reimbursements section and the final Settlement amount at the bottom (see Part 3).
If something is wrong on a load, open the load and correct it.
Tip: On Accounting → Payroll, sort the statements by amount to spot totals that look too high or too low before you send them.
Note: OpenRoad does not block negative totals. If a driver's deductions are higher than their earnings, the statement total is negative. To carry the balance to the next week, add a one-time adjustment on the next statement.
Part 3: Add Adjustments and Deductions
Use adjustments to add money to a statement (for example, a reimbursement) or to take money out (for example, an escrow payment or a repayment). Adjustments are managed in the driver's Accounting tab, in two tables:
- Recurring Deductions and Adjustments: adjustments that repeat (weekly, monthly or every 30 days).
- One-Time Deductions and Adjustments: adjustments that apply to one statement only.
You can also add a deduction or reimbursement for one specific week from inside that week's statement: scroll to the Deductions and Reimbursements section and click + New (1). The Settlement box (2) next to it shows the final amount the driver is paid.

Each adjustment is added to the statement of the week that matches its dates and appears in the Adjustments column of the Statements tab.

To add an adjustment:
- Click + Add on the table.
- Fill in the New Adjustment form:
- Description: what the adjustment is for. It appears on the statement.
- Amount: a positive amount adds money to the driver's pay. A negative amount (with a minus sign, for example -45) deducts money.
- Interval: One Time, Weekly, Monthly or Every 30 Days. A One Time adjustment applies only on the statement of the week that contains its start date.
- Category fields: the fields for your accounting or payroll integration (for example, a Paylocity or Sage category). They only appear when that integration is set up on your account.
- Start Date: required.
- Click Save.
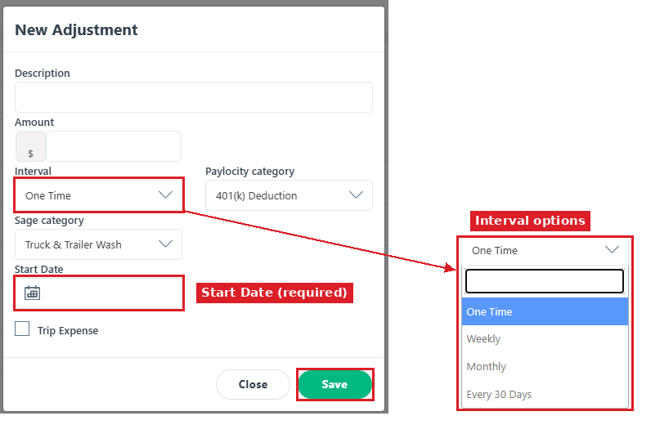
Important: Always enter a start date. Without it, the adjustment is not saved.
Note: Amounts are fixed dollar amounts. A percentage of the driver's earnings cannot be entered.
For recurring intervals, the form also has an End Date. The adjustment keeps applying until that date. If the end date is empty, it applies with no end. To change or remove an adjustment, use the pencil or trash icon in the Actions column.
Part 4: Send a Preview to the Driver (Optional)
A preview lets drivers review their statement before it is final. It does not lock the statement, so you can still make changes.
- From the left menu, go to Accounting → Payroll.
- Under Dates, click the week you want to work on (1). Check the due date shown under the week.
- Make sure the Drivers tab is selected.
- Select the statements you want to preview using the checkboxes.
- Click Send Previews (2). OpenRoad emails each driver a PDF of their statement.
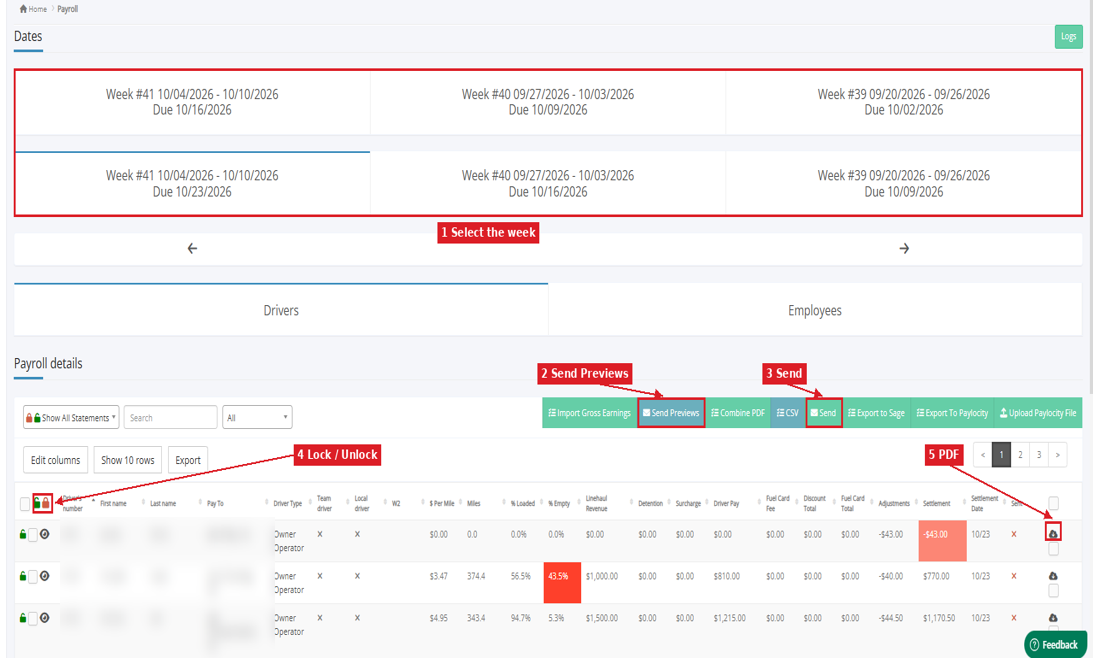
To see the PDF yourself, click the cloud icon (5) on the driver's row, or the green PDF button at the top right of the statement.
Tip: Give drivers time to review before payroll. For example, if you pay drivers on Friday: send previews by Wednesday, give drivers Thursday to report missing detention, miles or loads, correct the statements, then lock and send them on Friday (Part 5).
Note: For owner operators, statements are emailed to the address on their PayTo company (vendor) record, not the email on the driver's profile. You can check who the statement is paid to in the driver's Accounting tab under Payment info.
Part 5: Lock and Send the Final Statements
Lock each statement once it is final. When a statement is locked, neither the statement nor the loads on it can be changed. The lock icon on each row shows its status: green and open means unlocked, red and closed means locked.
- Go to Accounting → Payroll and select the week (1).
- Optional: click the eye icon on a row to open that driver's statement.
- Select the statements using the checkboxes, then choose one option:
- Lock only: click the lock icon in the table header (4) and enter your password. The header has one icon to lock and one to unlock.
- Lock and email: click Send (3). OpenRoad locks the selected statements and emails them to the drivers.
- To send one driver's final statement, open the statement and click Send Statement at the top right. You can also lock or unlock that statement with the lock icon below it.
Important: Send and Send Statement email the final statement to the driver right away. Review the statements before you click them.
Note: To make a change after locking, unlock the statement and enter your password. Unlocking recalculates the whole statement from the current data, so if a load changed since you locked it, the total changes too.
After the statements are locked, use the checkbox under the cloud icon on the far right of each row to mark the ones ready to be exported. The export buttons in the toolbar depend on the accounting or payroll software set up on your account.
Frequently Asked Questions
How do I reimburse a driver? Add a positive adjustment to the statement (see Part 3).
How do I set up a deduction that repeats every week? In the driver's Accounting tab, add a row to the Recurring Deductions and Adjustments table with a negative amount, Weekly interval and a start date. Leave the end date empty to deduct every week, or set one to stop it automatically.
Can I deduct a percentage of the driver's earnings? No. Adjustments and deductions only accept fixed dollar amounts.
My adjustment was not saved. Why? The start date is missing. Enter a start date and save again.
Do I need to add fuel purchases or cash advances to the statement? No. If the driver used a fuel card assigned to them in OpenRoad, those transactions appear on the statement automatically.
What is the difference between Send Previews and Send? Send Previews emails a draft and does not lock the statement. Send locks the statement and emails the final version.
An owner operator did not receive their statement. Check the email on their PayTo company (vendor) record in the driver's Accounting tab under Payment info. Statements go to that address.
Can I change a statement after locking it? Yes. Unlock it with your password, make the change and lock it again. The statement is recalculated from the current data when you unlock it.
A statement total is negative. What do I do? OpenRoad allows negative totals. To carry the balance forward, add a one-time adjustment on the driver's next statement.
Was this article helpful?
That’s Great!
Thank you for your feedback
Sorry! We couldn't be helpful
Thank you for your feedback
Feedback sent
We appreciate your effort and will try to fix the article