Load Map shows the loads of a date range as markers on a map: a green P for each load's pickup and a red D for each load's delivery. Narrow the map by date, weekday, customer, state, price per mile and miles, select a marker to read the load's details and open it, and draw the route of one load or a whole group of loads. A Loads panel at the right lists the places on the map and the loads you chose to look at.
Who can do this: you need permission to open Load Map. By default that is Dispatcher, Capacity and Accounting users, and Superadmin always. Only a Superadmin can give or remove the permission in Settings → Access, area Load Map.
Before you begin
- The map starts empty. It shows loads only after you choose dates (see "Choose dates and search").
- A load is on the map because of its pickup and delivery stops and their appointment dates, so the stop dates and addresses on the load must be filled in. See Load profile.
- Canceled loads and deleted stops never appear.
- The map is a Google map, so it needs an internet connection to load.
Open Load Map
In the left menu, select Operations, then Load Map. The page has the filters at the top, the map on the left and the Loads panel on the right. The map starts centred on the United States. Use Map or Satellite (top left of the map) to change the look, and + and - to zoom.
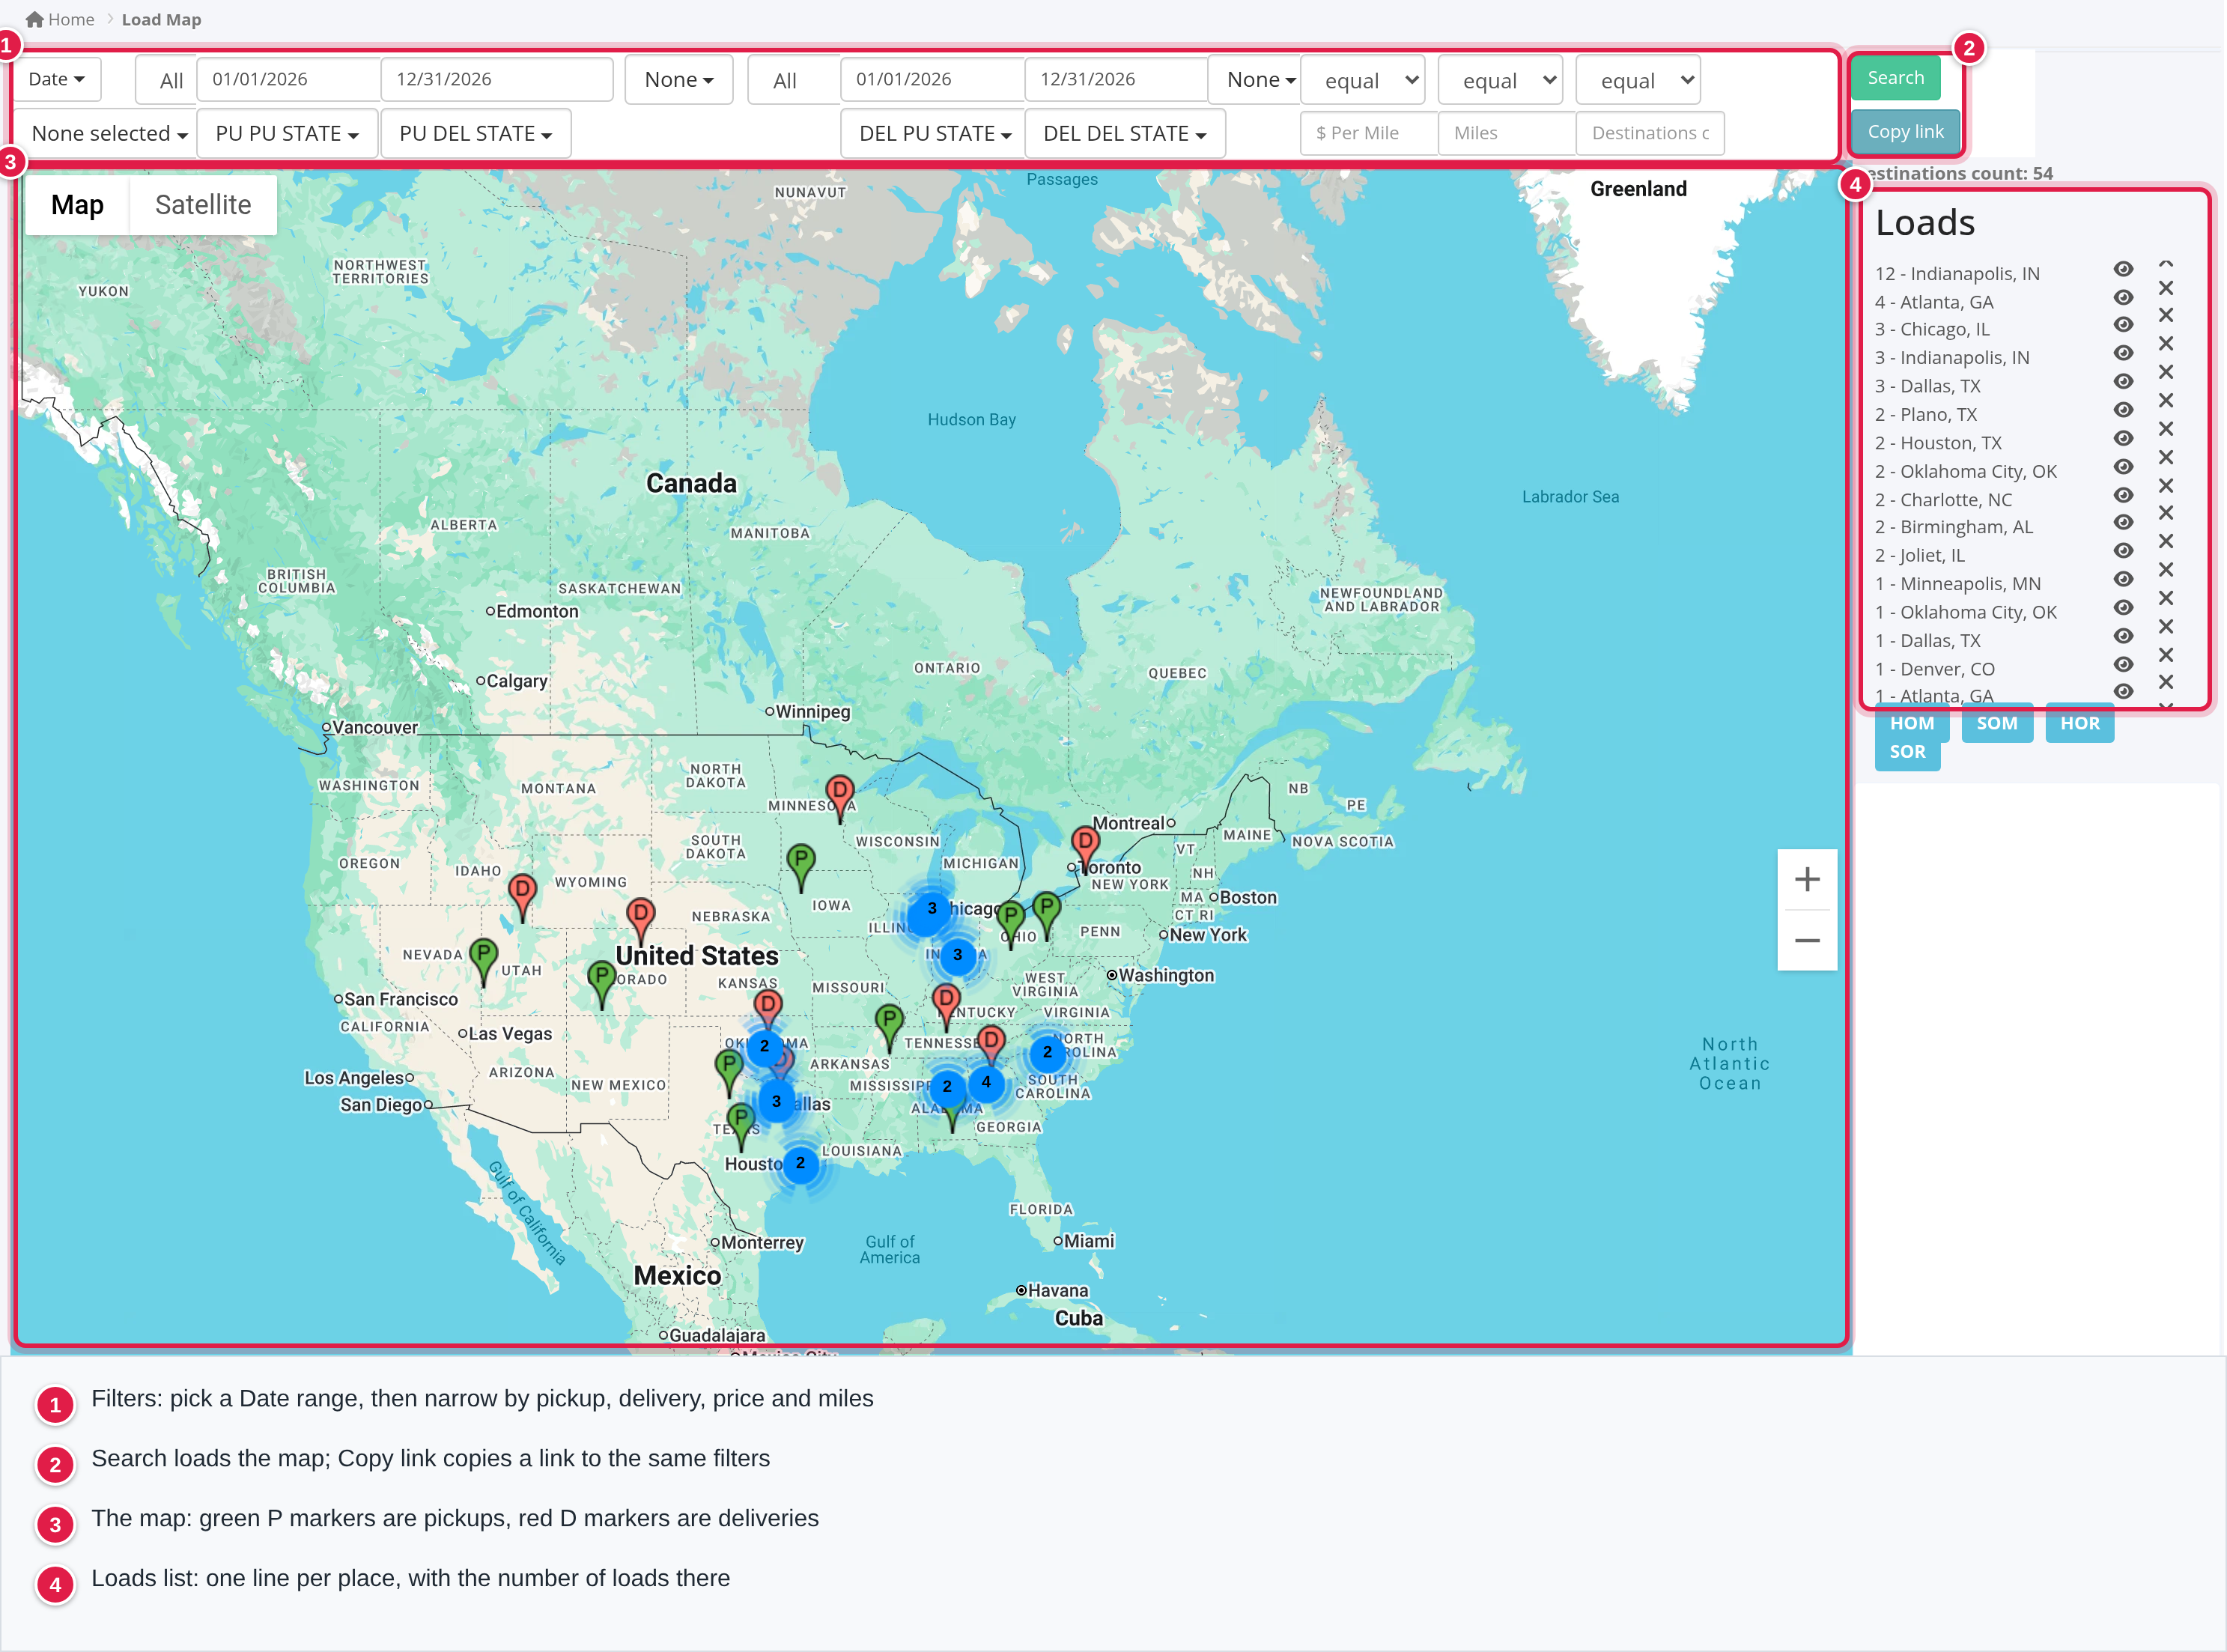
Choose dates and search
- Select Date and pick a quick range: Today, This Week, This Month, This Quarter, This Year, Yesterday, Last Week, Last Week to Date, Last Month, Last Quarter or Last Year. The range fills the PU from and PU till boxes (pickup) and the DEL from and DEL till boxes (delivery). You can also type or pick the dates in those boxes yourself.
- Select Search. The markers appear and the top right of the page shows Destinations count, the number of markers on the map.
Which markers you get depends on which date boxes are filled:
| Date boxes filled | What the map shows |
|---|---|
| Only the PU boxes | One green P for each load, at the load's first pickup, whose pickup date is in the range |
| Only the DEL boxes | One red D for each load, at the load's last delivery, whose delivery date is in the range |
| Both | Both sets of markers |
| None | Nothing |
You can fill one box of a pair, for example only PU from: the range then has no end date. Dates must be typed in a recognised date format, otherwise the box is ignored.
the Date quick ranges fill both pairs. To see only pickups, clear the DEL from and DEL till boxes before you select Search.
Narrow the map with filters
The filters are in two groups, one for the pickup markers and one for the delivery markers, plus three that apply to both. Select Search after changing them.
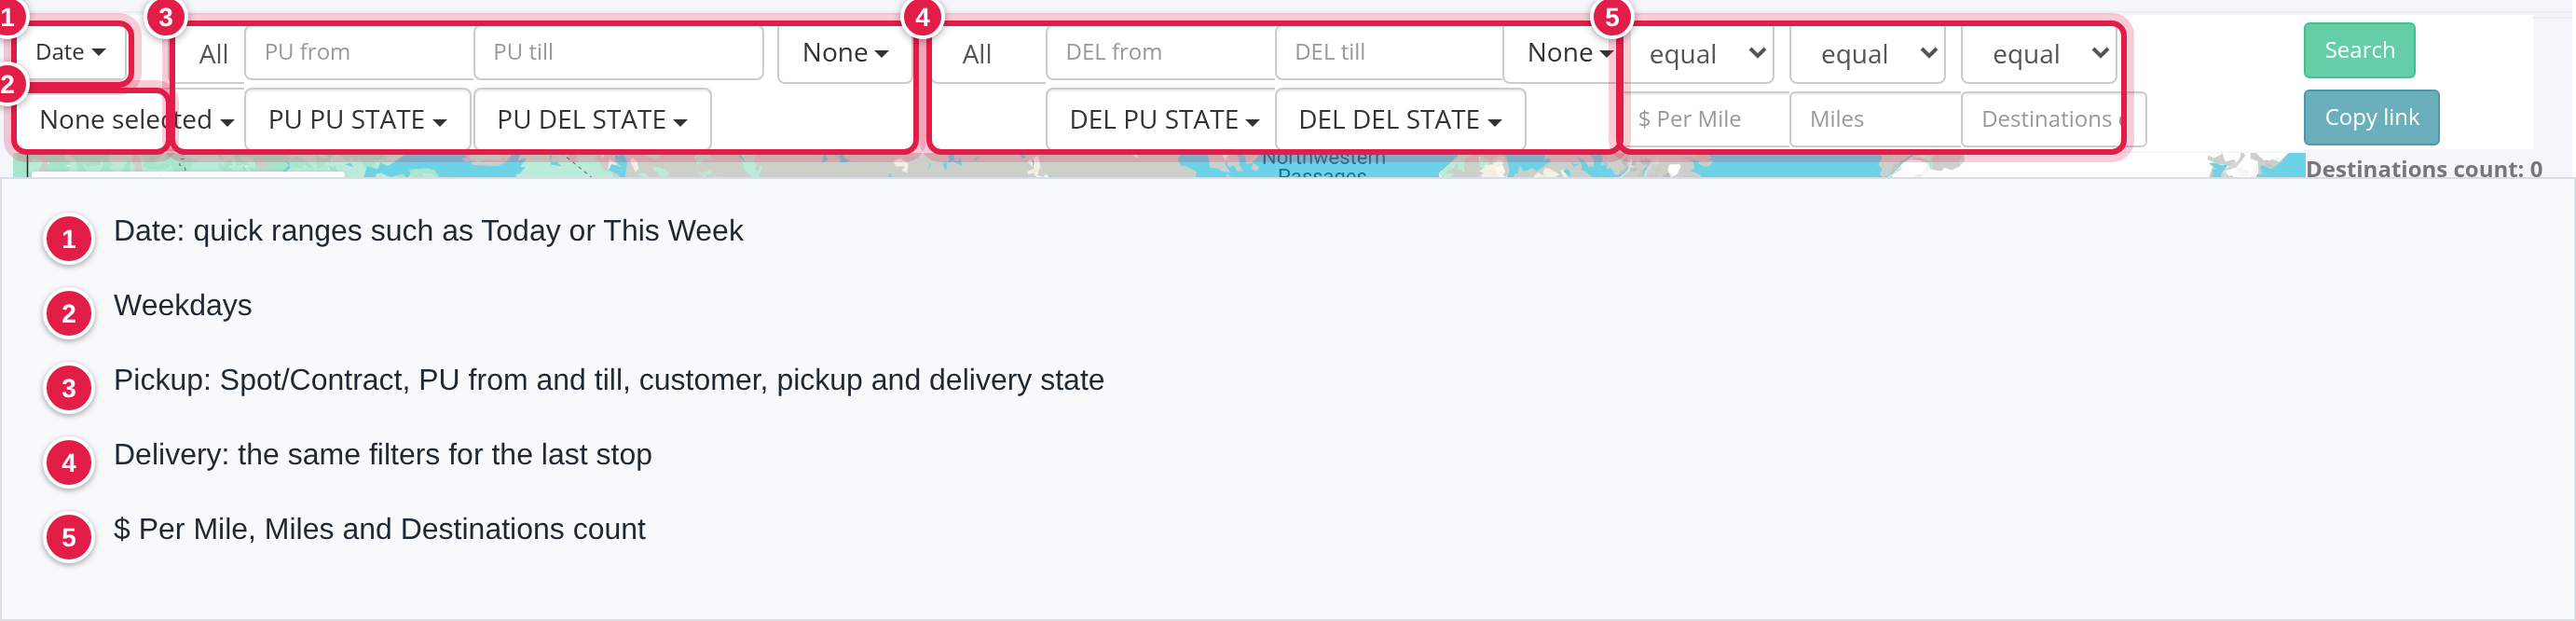
| Filter | What it does |
|---|---|
| Weekdays (below Date) | Keeps stops whose date falls on the weekdays you tick, for both pickups and deliveries |
| Pickup: Spot/Contract (All) | Keeps loads of one type for the pickup markers: Spot, Contract, Dedicated or Internal |
| Pickup: customer (None) | Keeps loads of the customers you choose for the pickup markers. You can search the list and choose several |
| PU PU STATE | Keeps pickup markers whose first pickup is in the states you choose |
| PU DEL STATE | Keeps pickup markers whose load's last delivery is in the states you choose |
| Delivery: Spot/Contract (All) | The same load type filter for the delivery markers |
| Delivery: customer (None) | The same customer filter for the delivery markers |
| DEL PU STATE | Keeps delivery markers whose load's first pickup is in the states you choose |
| DEL DEL STATE | Keeps delivery markers whose last delivery is in the states you choose |
| $ Per Mile | Keeps loads by price per mile, for both pickups and deliveries (see below) |
| Miles | Keeps loads by miles, for both pickups and deliveries (see below) |
| Destinations count | Limits how many markers are shown (see below) |
$ Per Mile and Miles. Pick a comparison in the box above the field, then type the number. equal means exactly that number, gt means that number or more, lt means that number or less. range needs two numbers separated by a space, for example 2 3, and keeps loads between them.
Destinations count. equal shows only the first number of markers you type. range needs two numbers separated by a space and shows the markers from the first number up to the second, counting from 0 (for example 10 20 shows the markers in places 10 to 19).
Copy link
Select Copy link to copy a web address that contains the filters you filled in. A Link copied successfully! message confirms it. Opening the address shows the Load Map with those filters filled in and loads the map right away, so you can send a view to a colleague. The Destinations count is not part of the link.
Read the map
- Green P is a pickup marker and red D is a delivery marker.
- Markers that are very close to each other are grouped into one blue circle with a number: the number is how many markers it holds. Zoom in on the map far enough and the circles disappear and every marker shows on its own.
- A load has one marker per set of dates you chose: its first pickup for the pickup markers and its last delivery for the delivery markers.
Select a marker to see the load
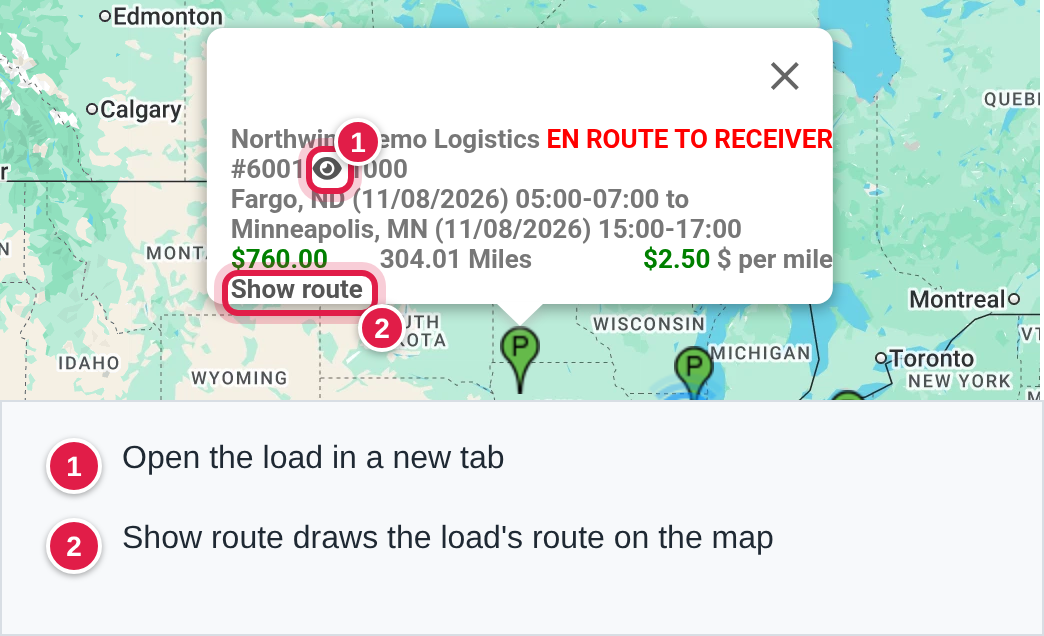
Select a P or D marker to open a card with the load's details:
- the customer name and, in red capital letters, the load's status;
- the load number with an eye icon that opens the load in a new tab;
- the numbers of the drivers on the load, or (No Driver Assigned) in red when there are none;
- the first pickup and the last delivery, each with city, state, date and the time window;
- the linehaul plus fuel surcharge in green, the miles and the price per mile;
- Show route (see below).
Select a blue circle to see the group
Select a blue circle to open a small window with three buttons:
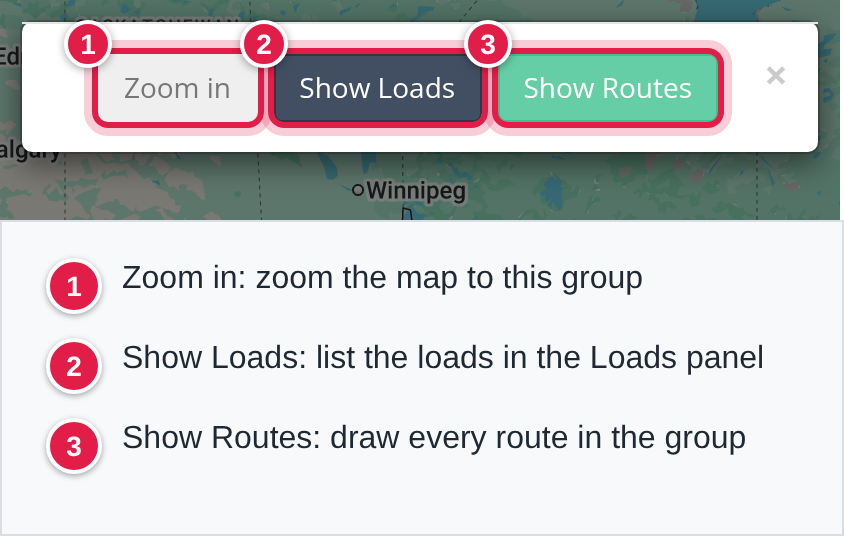
- Zoom in zooms the map to the group.
- Show Loads adds a card for each load of the group to the Loads panel.
- Show Routes draws the route of every load of the group (see "Draw routes").
The Loads panel
The panel at the right is headed Loads. At the top it lists the places on the map, the largest group first, as number of markers - city, state, for example 6 - Springfield, IL.
- Select a line to centre the map on that place.
- Select the eye icon to open the same window as when you select that marker or circle on the map.
- Select the X to remove that place's load cards from the panel.
The load cards you added with Show Loads (or by selecting a single marker's eye icon and Show Loads) appear below the buttons. Each card has the same details as the marker card and an X that removes it from the panel. Select the text of a card to centre the map on that stop and zoom in.
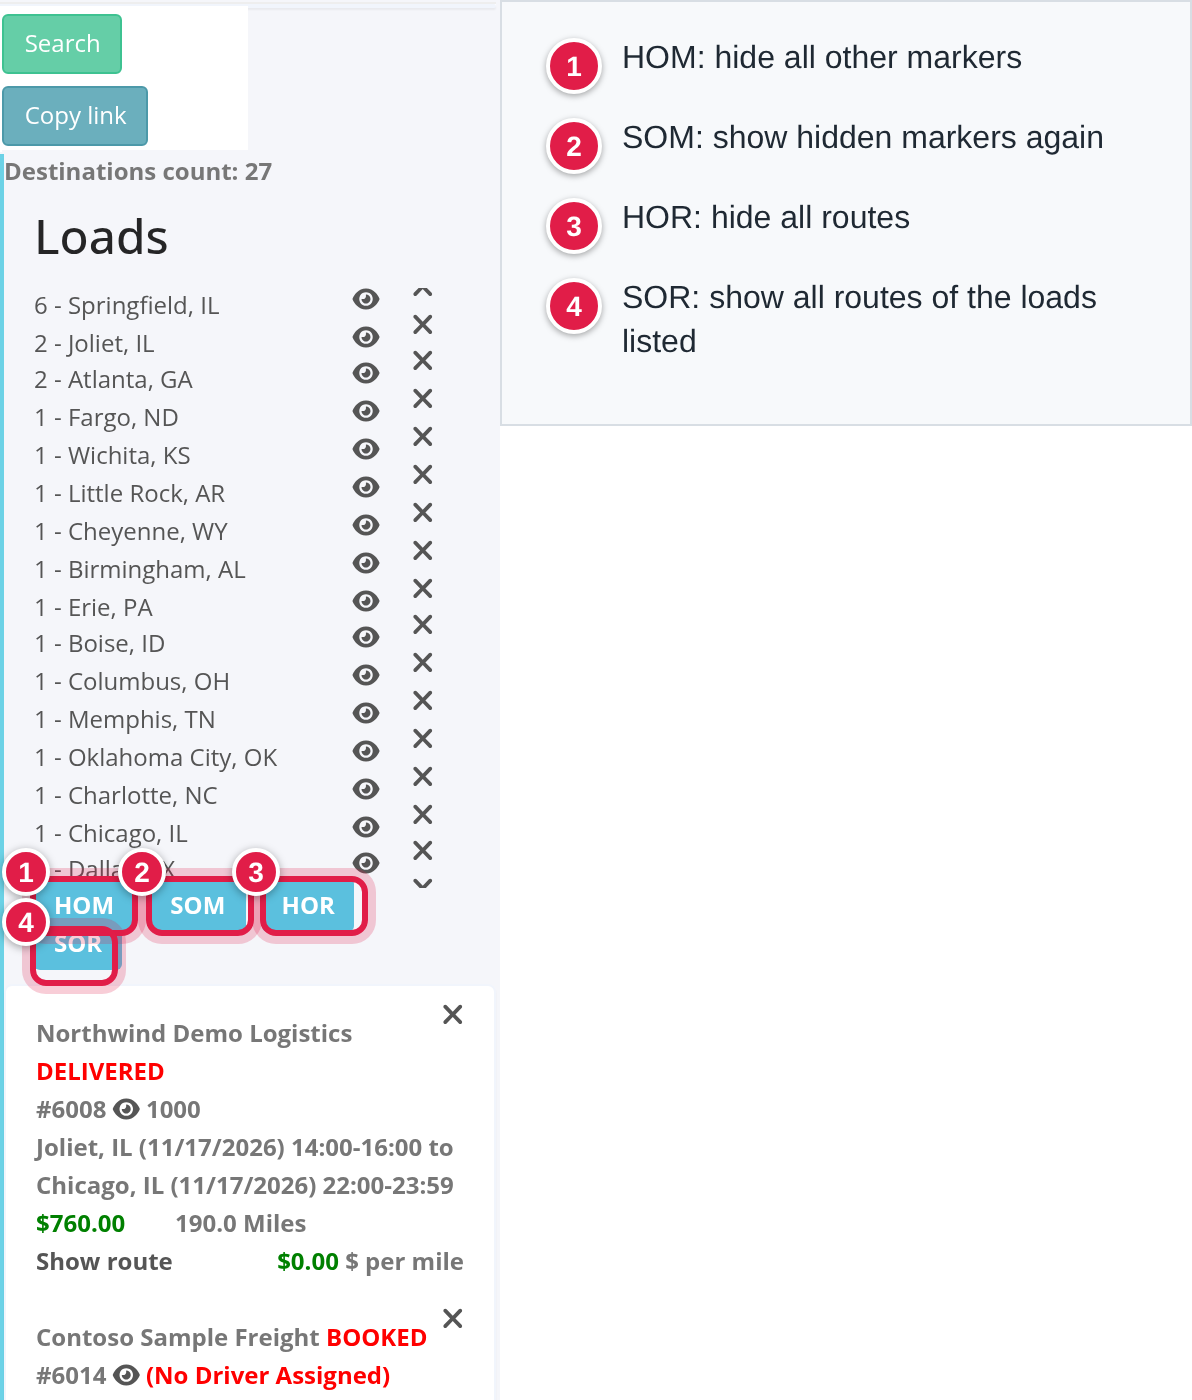
Four buttons work on the loads whose cards are in the panel. Hover over a button to see its explanation:
- HOM hides all markers except those of the loads listed below.
- SOM shows again all markers that were hidden.
- HOR hides all routes that are shown.
- SOR shows the routes of all the loads listed below.
to concentrate on a few loads, add their cards with Show Loads, remove the cards you do not need with X, then select HOM.
Draw routes
Select Show route on a load's card, or Show Routes on a group, or SOR in the panel. Each route is drawn as a driving route from the load's first pickup to its last delivery through all of its other stops, avoiding ferries, in its own colour. Each stop gets a lettered marker (A, B, C and so on); select one to see the load number (a link to the load), the company name, the address and the date and time window of that stop. Moving the mouse over a route makes it thicker. If a route cannot be found, nothing is drawn for that load. Drawn routes stay available: Show route again shows a route you hid, and HOR hides them all.
FAQ

Was this article helpful?
That’s Great!
Thank you for your feedback
Sorry! We couldn't be helpful
Thank you for your feedback
Feedback sent
We appreciate your effort and will try to fix the article