The Verification Robot reads the documents your drivers send from the OpenRoad Driver app, compares them with the load, and either confirms them for you or leaves them for your accounting team to review. Documents that pass never need a manual click, and the ones that fail come with a written reason. This article explains how to set the robot up, what it does with each document and where to follow its work.
Unconfirmed Uploads Verification is an extra feature. It is switched on per account, and its settings are for Superadmin users. If you do not see Unconfirmed Uploads Verification under Settings → AI, contact OpenRoad Support at help@openroadtms.com.
Before you begin
- Drivers must send their documents with Scan in the OpenRoad Driver app, and each document must be attached to a load. See Unconfirmed Uploads: review, confirm or reject the documents your drivers send from the app.
- The robot checks these document types, and only these:
| Robot document type | Upload type in Unconfirmed Uploads |
|---|---|
| POD (Proof of Delivery) | Proof of Delivery and Proof of Delivery (alt. version) |
| Scale Ticket | Scale Ticket and Scale Ticket (alt. version) |
| Lumper Ticket | Lumper Receipt |
| Miscellaneous | Miscellaneous |
Bill of Lading uploads, and the types Other and Safety, are never checked by the robot.
- Add the e-mail addresses that should receive the daily report (see "The daily report").
Part 1: Switch the robot on
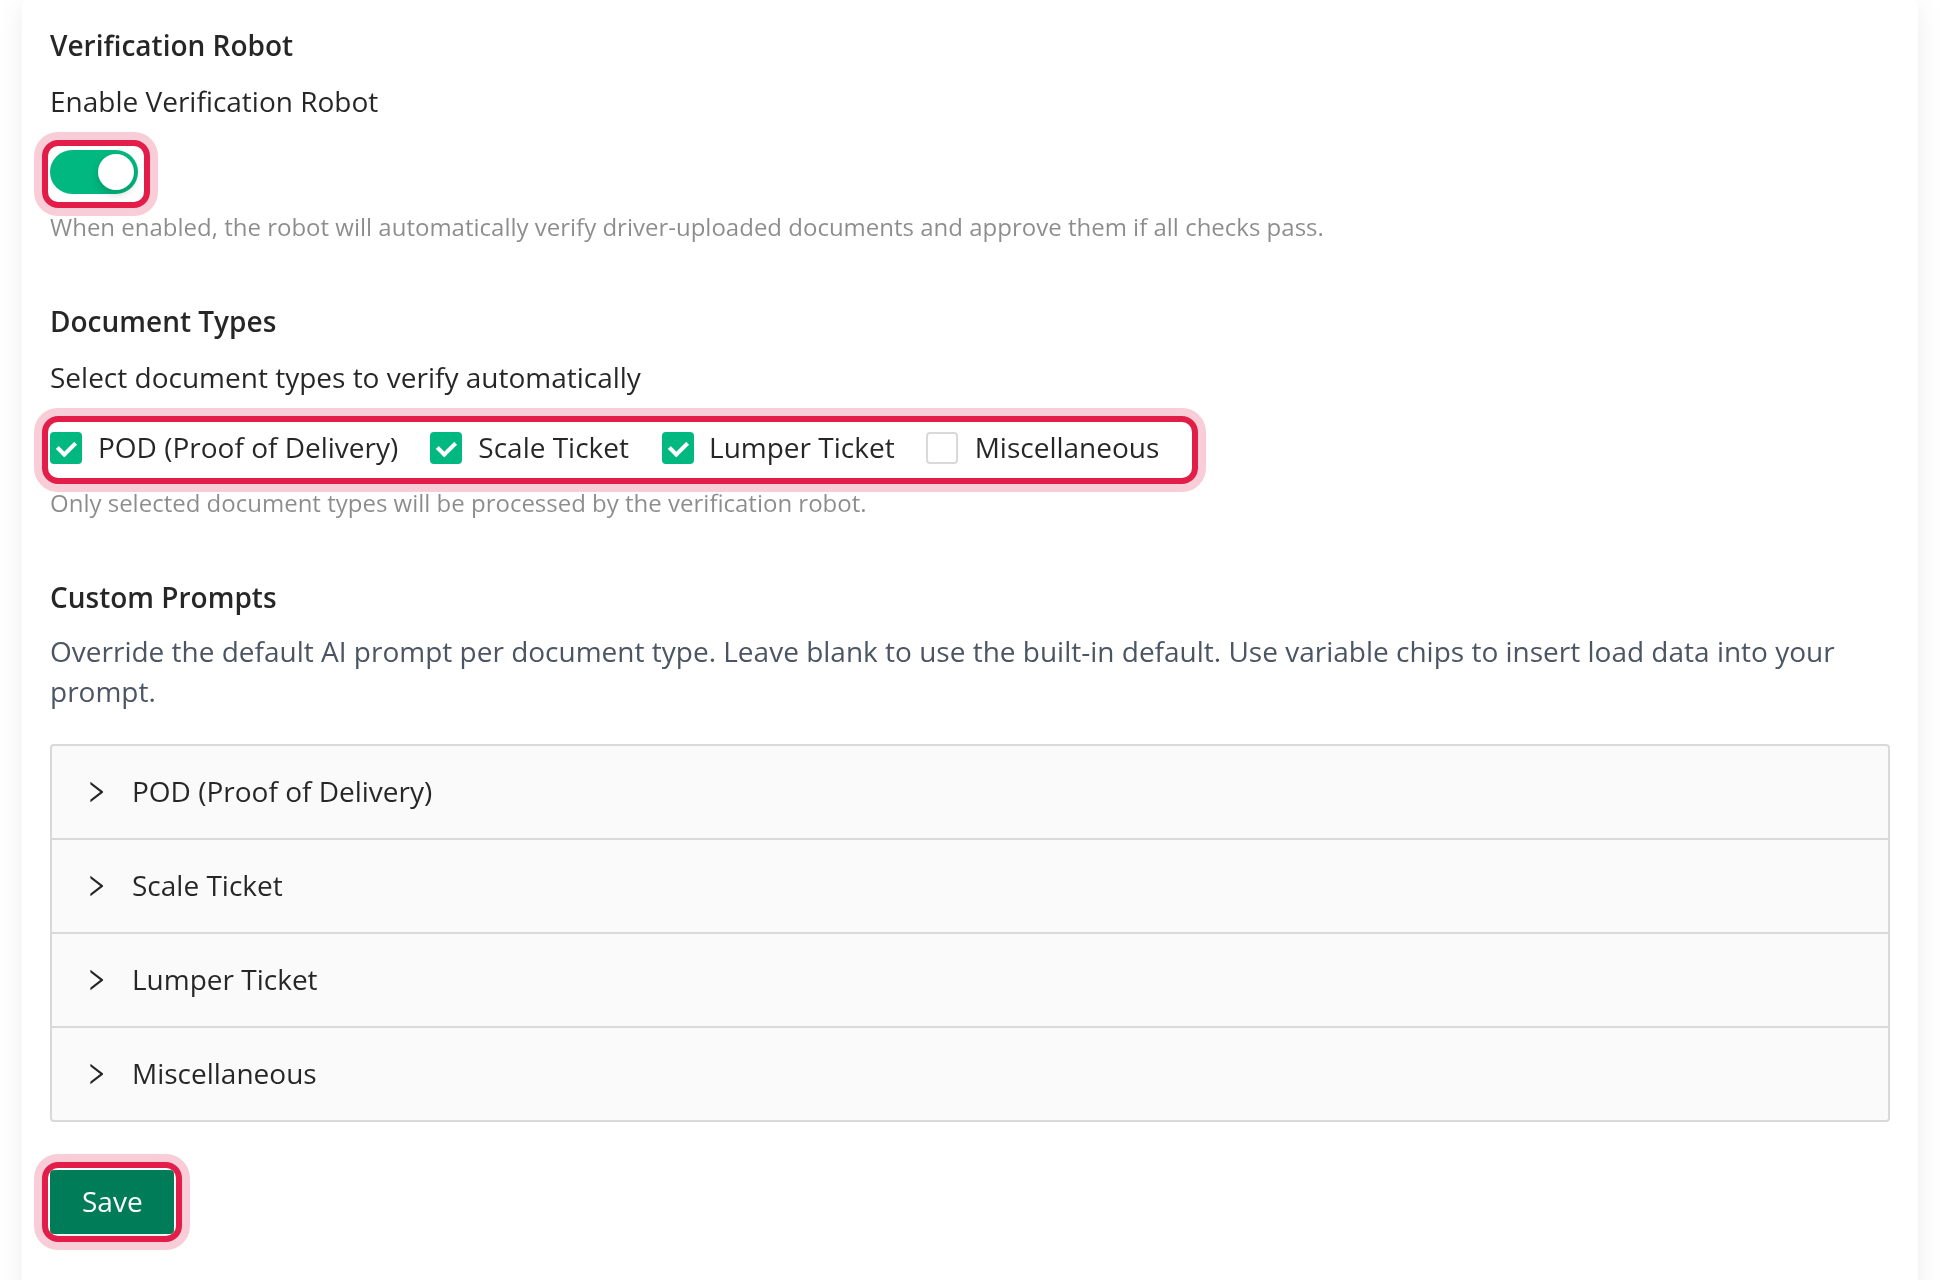
- Go to Settings → AI → Unconfirmed Uploads Verification.
- Under Verification Robot, switch on Enable Verification Robot. The page explains: "When enabled, the robot will automatically verify driver-uploaded documents and approve them if all checks pass."
- Under Document Types, tick the documents the robot should handle ("Select document types to verify automatically"). Only the selected types are processed.
- Click Save. OpenRoad asks you to confirm.
From now on, every document a driver sends of a selected type is checked right after the upload is saved.
Part 2: Tell the robot what you expect (optional)
Custom Prompts
The robot uses a built-in set of instructions for every document type. Under Custom Prompts you can replace them with your own wording, separately for POD (Proof of Delivery), Scale Ticket, Lumper Ticket and Miscellaneous.
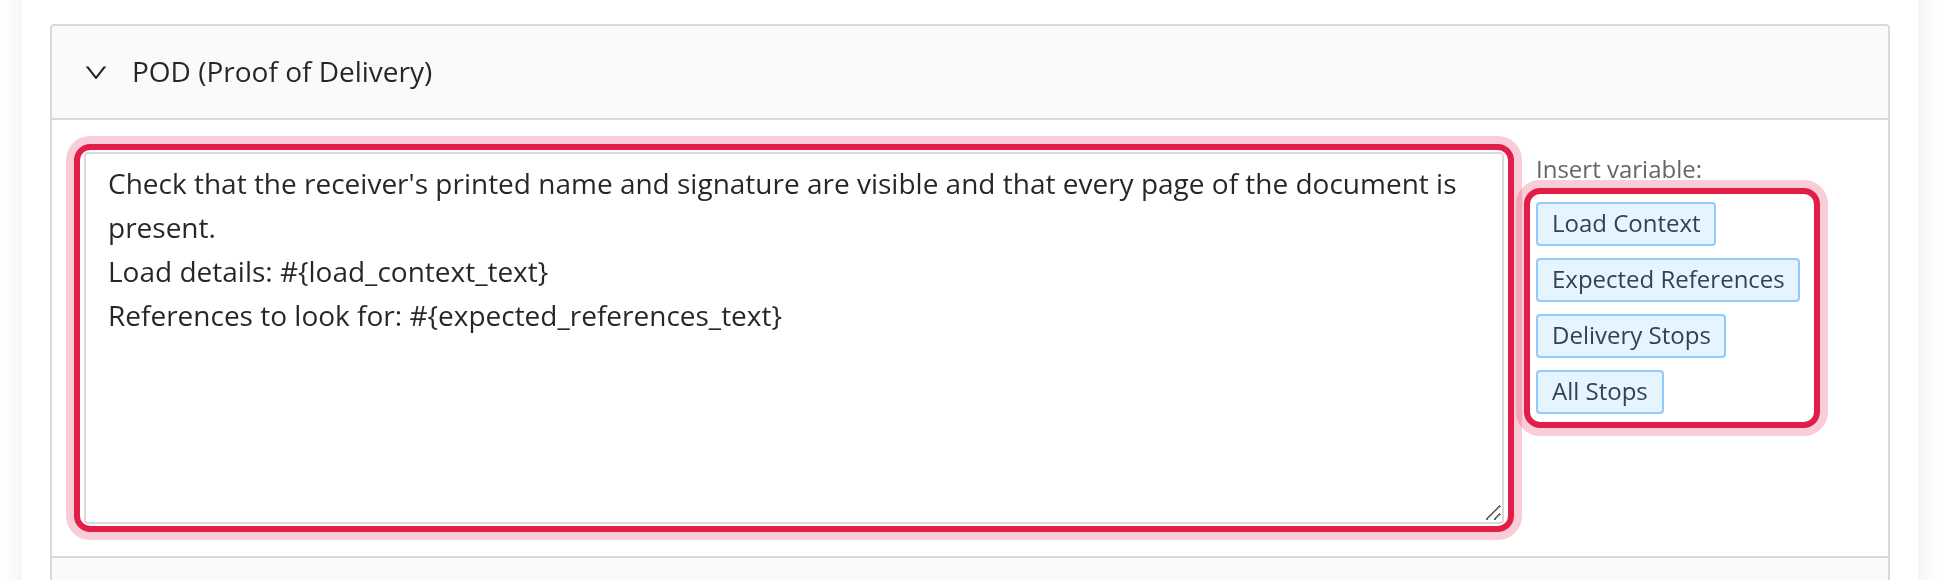
- Open the panel of a document type and write your instructions in the box. Leave it blank to use the built-in instructions.
- Use the Insert variable: chips to add load details to your text. A chip inserts a placeholder such as
#{load_context_text}where your cursor is; the robot fills it in with the load's information when it checks a document. The variables available are:
- POD (Proof of Delivery): Load Context, Expected References, Delivery Stops, All Stops. - Scale Ticket: Load Context, Expected Identifiers. - Lumper Ticket and Miscellaneous: Load Context, Expected Identifiers, All Stops.
- A placeholder that does not belong to that document type is flagged in red: "Unknown variables: ...". Fix it before you save.
- Save stores all prompts together with the settings. To go back to the built-in instructions, clear the box and save.
Account-Wide Consignee Rules
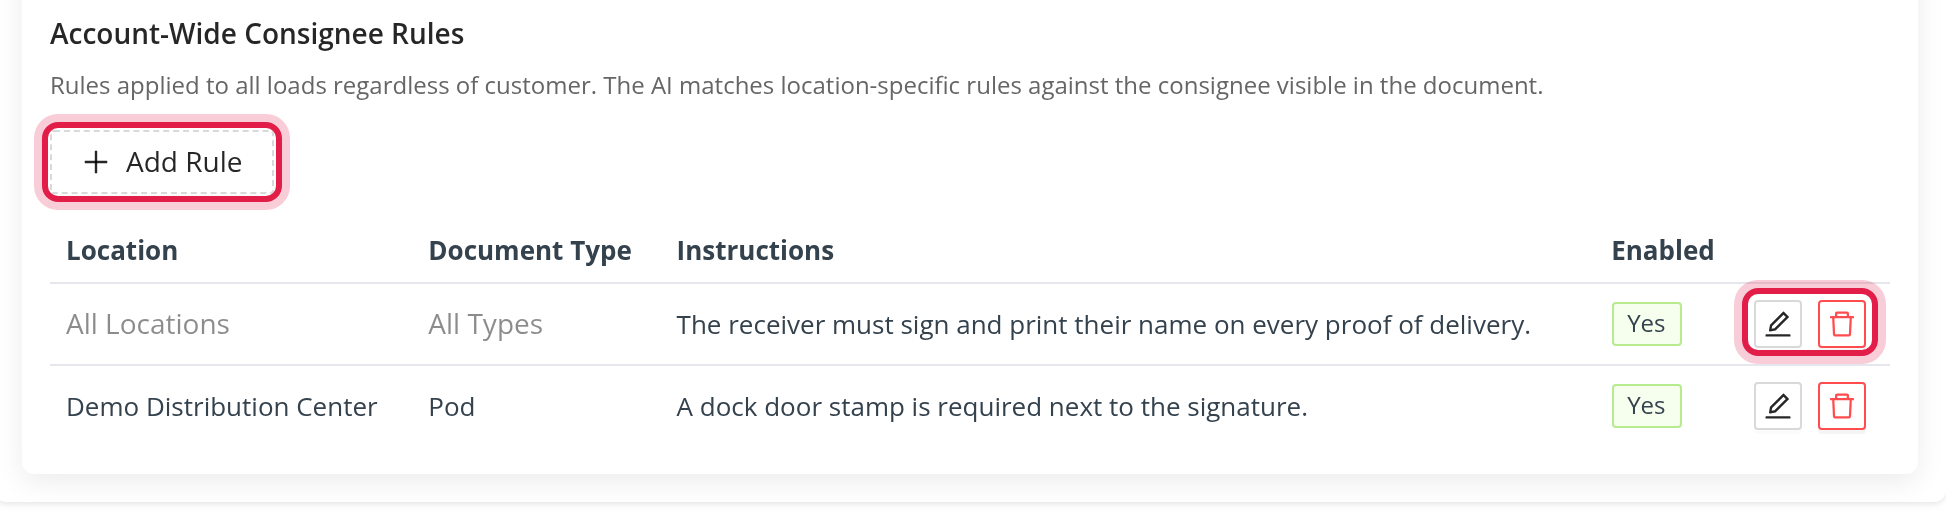
Rules apply to every load, whatever the customer. Use them for requirements that depend on where the freight is delivered, for example "the receiver must sign with a printed name".
- Click Add Rule.
- Fill in:
- Location Filter: a consignee name or a city. Leave it blank for All Locations. The robot compares it with the consignee it reads on the document. - Document Type: All Types, POD, Scale Ticket, Lumper Ticket or Miscellaneous. - Instructions (required): what the document must show. - Enabled: switch a rule off to stop using it without deleting it.
- Click Save. Saving a rule is immediate; it does not wait for the page Save button.
The table lists each rule with Location, Document Type, Instructions and Enabled, with icons to edit or delete it (deleting asks for confirmation).
What the robot does with a document
- Sending. Right after a driver's upload is saved, OpenRoad sends the document and the load's details (references, customer, stops, truck and trailer numbers, load instructions, your prompt and rules) to OpenRoad's document verification service.
- Approved. The upload is confirmed automatically. On the Confirmed tab its Confirmed By shows System, and the load log gets a line "[AI Verification] <type> (<file name>) — automatically approved". A Miscellaneous document may first be reclassified to the type the robot recognises.
- Not approved. The upload stays unconfirmed and moves to the Needs Review tab, with the robot's written Reason. The load log gets "[AI Verification] <type> (<file name>) — left for manual review". Open the file, decide, and confirm or reject it as usual.
- No answer. If OpenRoad cannot reach the service, or the service never answers, the upload simply stays on the Unconfirmed tab. Confirm it by hand, or use Send to verification to try again.
a confirmation by the robot does not run the steps that a person's Confirm triggers for bill of lading notifications and FourKites proof of delivery.

Send one upload to the robot by hand
On the Unconfirmed tab, the paper plane icon (Send to verification) asks you "Are you sure you want to send to verification this file?" and sends that upload to the robot. It works only for an upload that is attached to a load and not yet confirmed, and it ignores the Document Types selection (the other conditions still apply: the robot must be enabled and the document must be of a type the robot checks). You see "Sent to verification".
The daily report
Every day at 7:00 AM OpenRoad e-mails a report for the previous day, if the robot confirmed or flagged anything. The subject is "Unconfirmed Uploads – Daily Verification Report" with the date and your company name. The e-mail has two attachments:
- Confirmed.csv: Load #, Document Type, Driver, Processed At, Load Link.
- Needs_Review.csv: the same columns plus Reason.
Recipients are set under Settings → Preferences → Email Notifications → Unconfirmed Uploads Daily Verification Report. The address starts as the placeholder [BILLING TEAM EMAIL]; replace it with your real addresses, or no report is sent.
Check how well the robot does
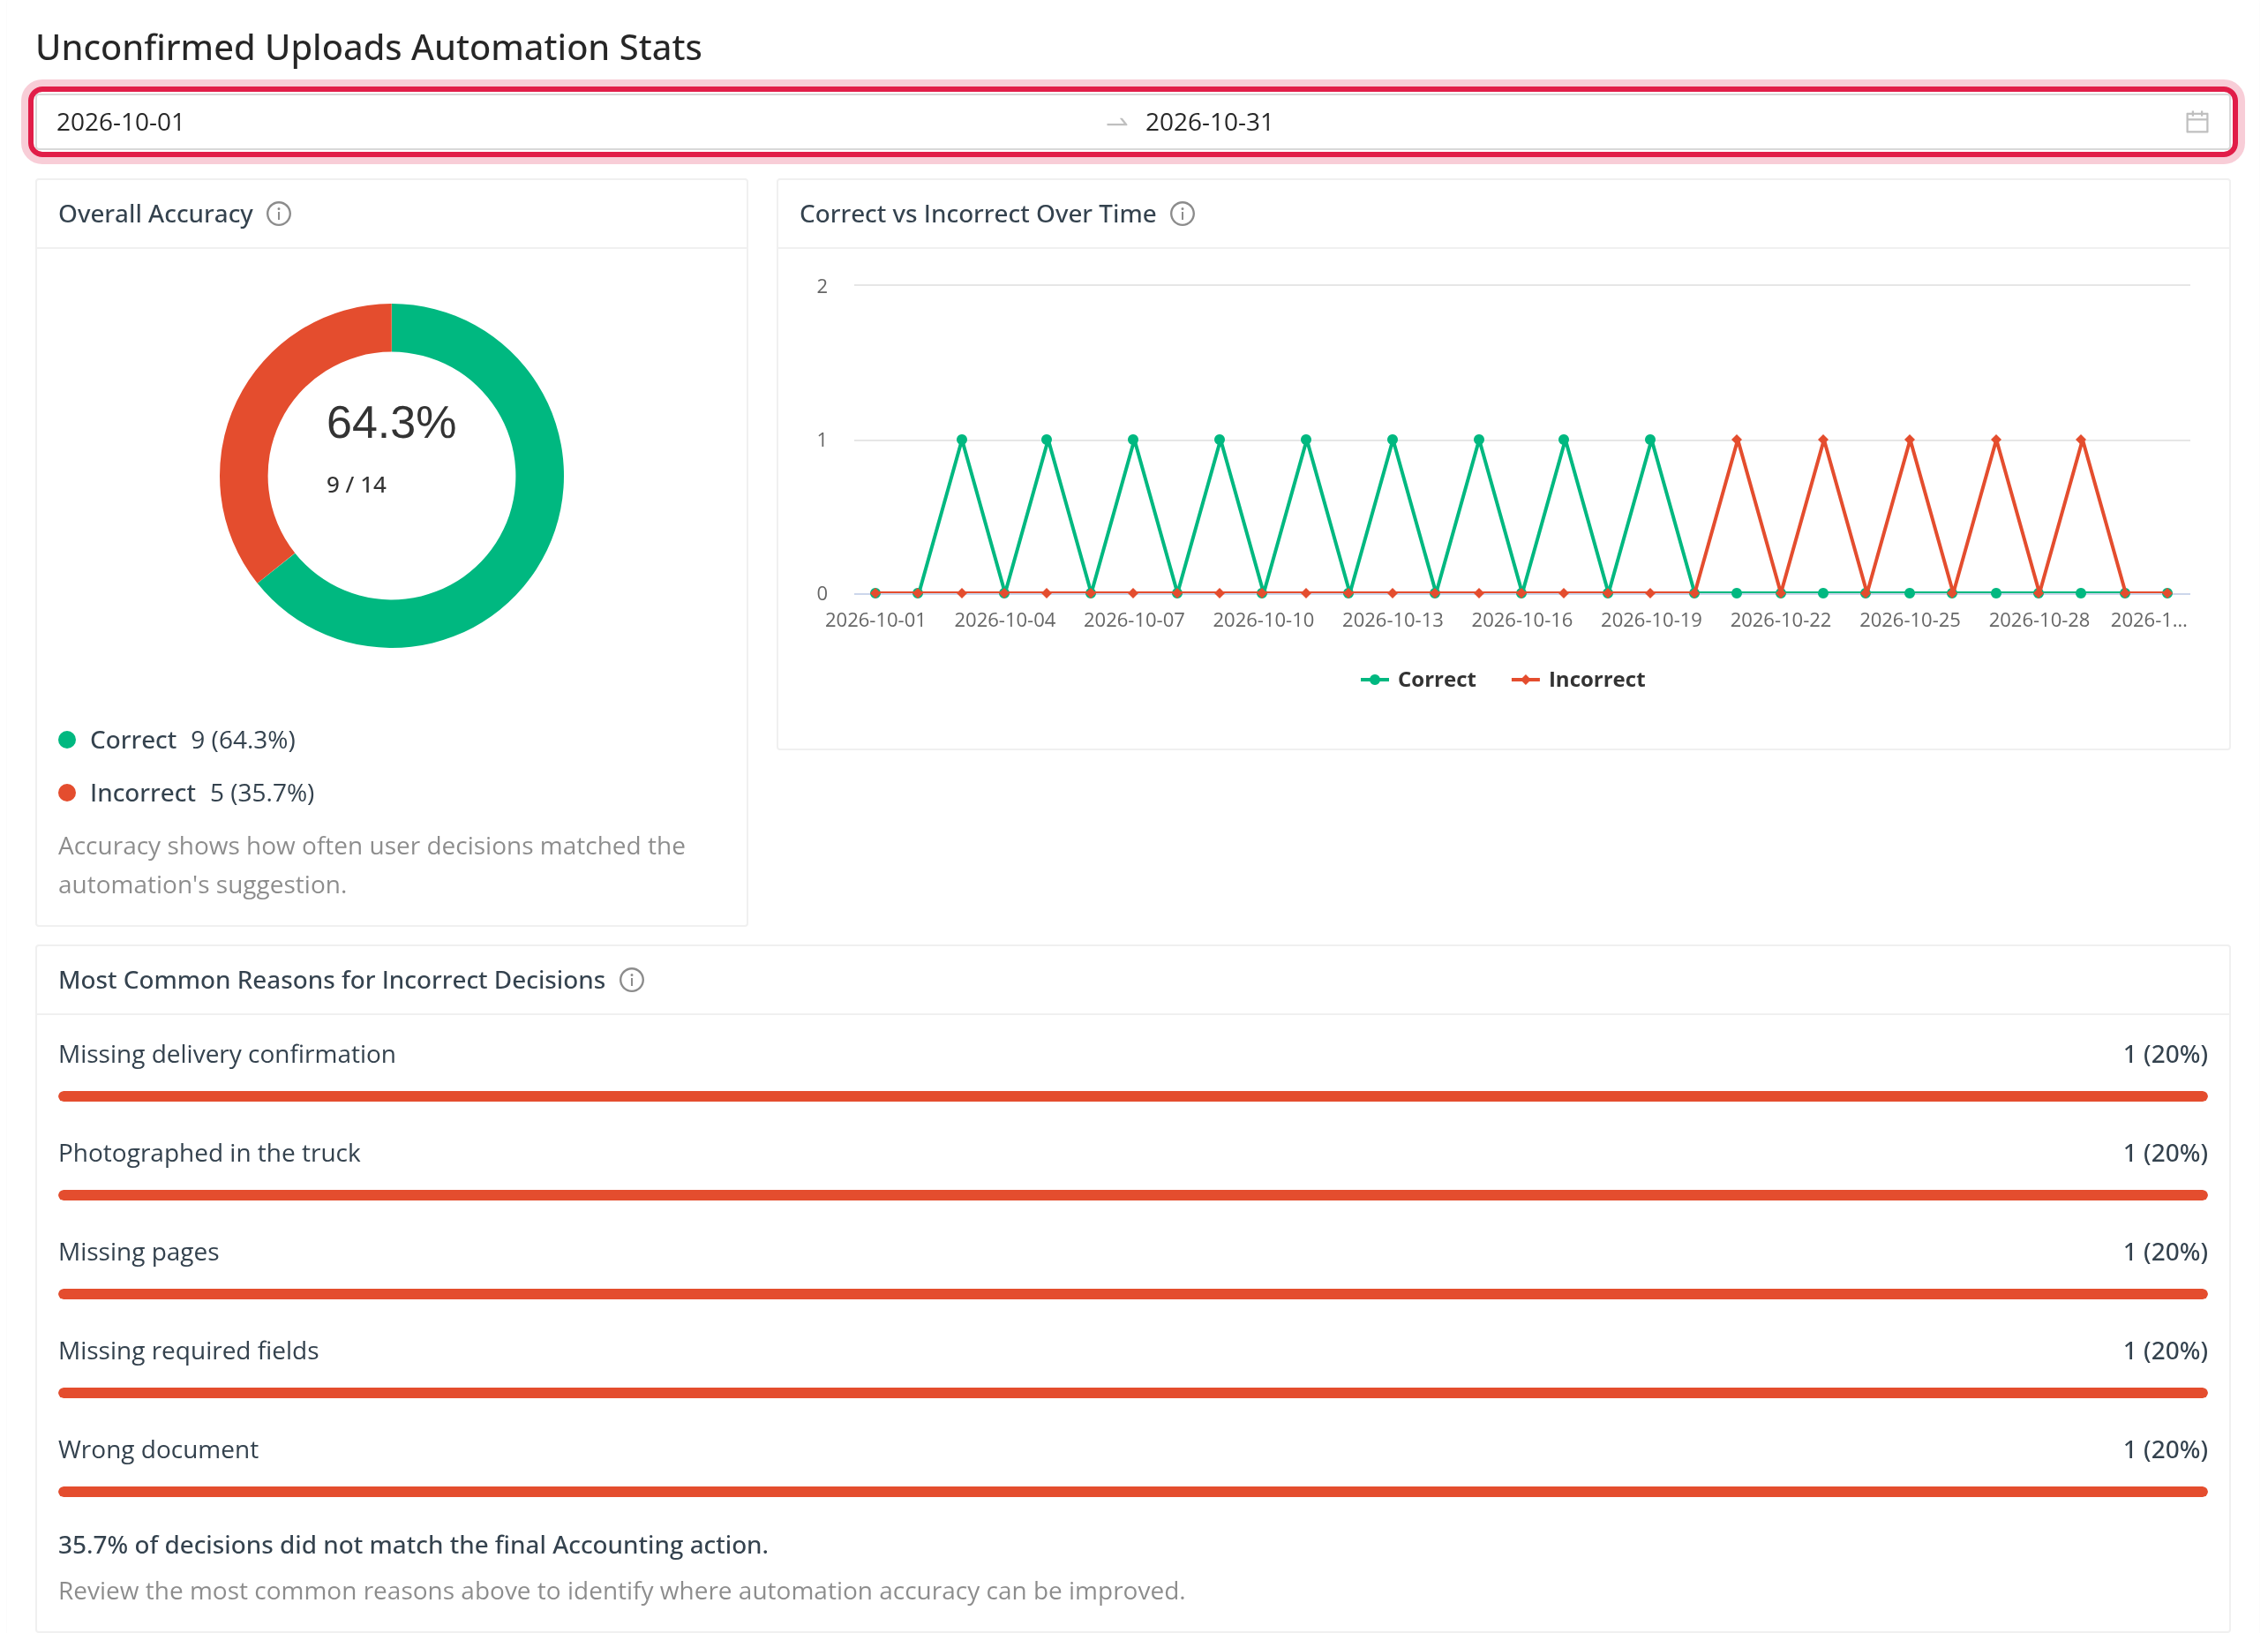
Accounting Stats shows Unconfirmed Uploads Automation Stats at the top, for the dates you choose (the previous month by default):
- Overall Accuracy shows how often your team's decision matched the robot's. A document the robot approved counts as correct unless someone then deleted it. A document it left for review counts as correct if someone rejected it, and incorrect if someone confirmed it.
- Correct vs Incorrect Over Time shows the same by day.
- Most Common Reasons for Incorrect Decisions groups the robot's reasons into categories: Missing delivery confirmation, Poor image quality, Missing pages, Photographed in the truck, Missing required fields, Wrong document, Missing load reference and Other. Use it to see which instructions to improve.
- Uploads from the last 3 days are not counted yet.
Frequently asked questions
Was this article helpful?
That’s Great!
Thank you for your feedback
Sorry! We couldn't be helpful
Thank you for your feedback
Feedback sent
We appreciate your effort and will try to fix the article