The Access page decides who can open each part of OpenRoad TMS and what they can do there: view, create, edit or delete. You set the rights once per role, and you can make an exception for one user. This article explains the page, what Yes, No and Not Set mean, how to give one user different rights than their role, when a change reaches your team, and what to check so nobody is locked out.
Before you begin
- Only a Superadmin can open Settings, and only a Superadmin can open Access. No other role can be given this page. A Superadmin is always allowed to do everything and has no row on the page.
- Rights come from the user's role. The roles on the page are Admin, Accounting, Capacity, Fleet Manager, HR, Maintenance and Safety. The page cannot add, rename or delete roles. To choose a user's role, see Users: find, add and edit a user (list, search, New User form, roles, status).
- A change is not instant. It reaches users after a short delay (see "When a change takes effect").
- Be careful with every change. A wrong setting can take a button or a whole page away from your team. Every change is recorded automatically in Settings → Audit Logs, so you can see who changed what.
Part 1: Open the page
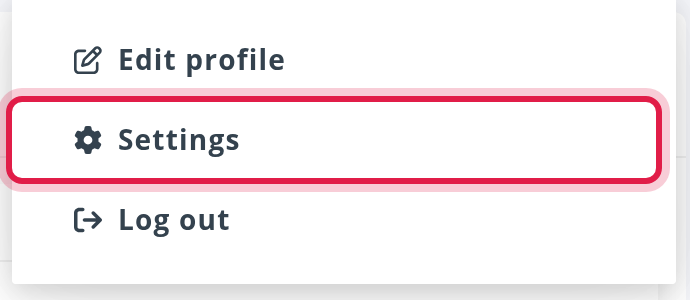
- Select your avatar in the top right corner and choose Settings.
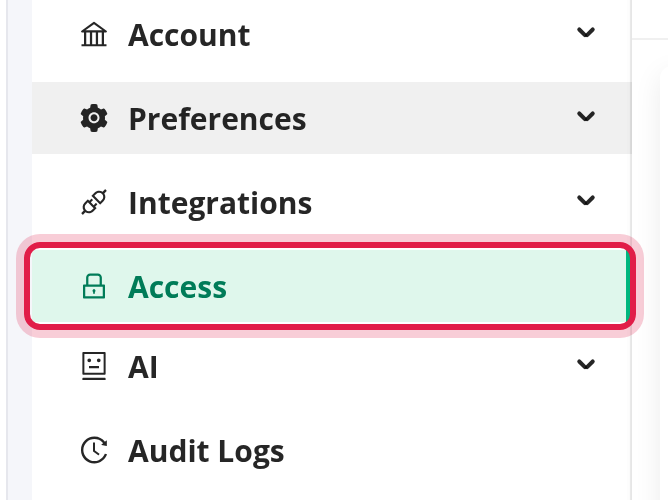
- In the Settings menu on the left, select Access.
Part 2: How the page is built
Access is organized by area, one business area at a time, such as Loads, Customers, Trucks or Payroll.
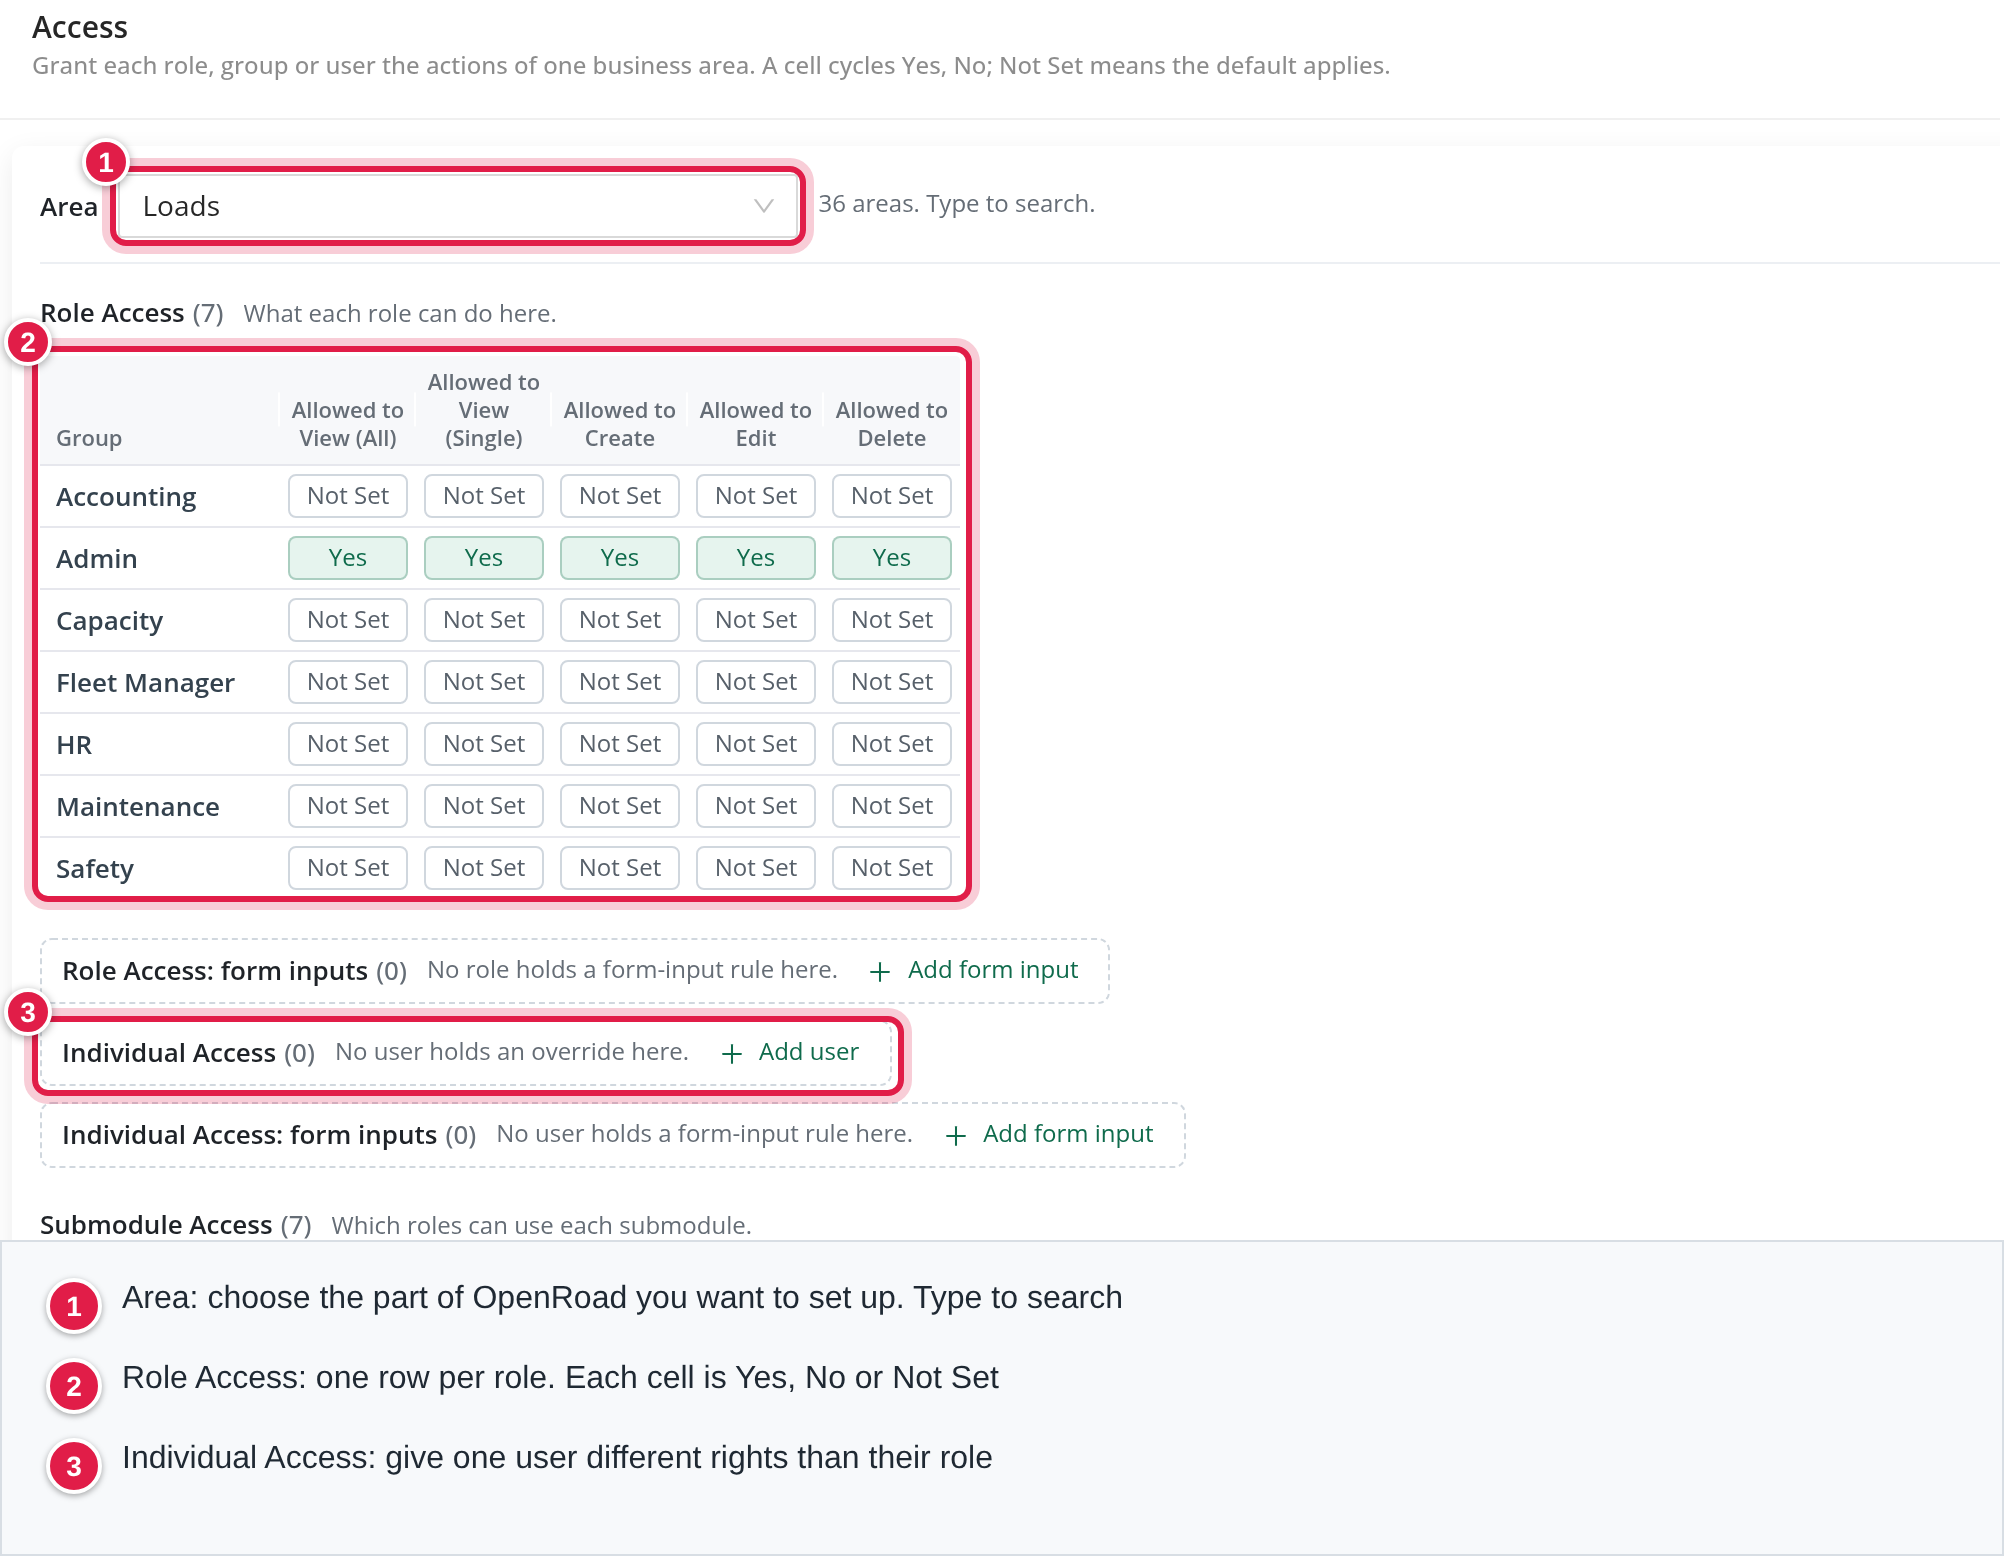
- Area is a list you can type in to search. The hint next to it tells you how many areas your account has. The area you pick stays in the link of the page, so you can bookmark it.
- Some areas appear only when the feature is switched on for your account (for example Places and Yards, the EDI areas, Load Board and Automatic Load Entry Config).
- Under the area you see up to six sections:
| Section | What it is |
|---|---|
| Role Access | What each role can do in this area. One row per role. |
| Role Access: form inputs | Rules for single fields of a form, for a role. |
| Individual Access | An exception for one user, who then follows their own row instead of the role's. |
| Individual Access: form inputs | Rules for single fields, for one user. |
| Submodule Access | Which roles can use each smaller function of the area. |
| Submodule Access by user | An exception for one user. |
A section appears only when the area has it.
A few areas, such as Drivers, Planner and Load Tenders, are shown as Group Permissions and Individual Permissions instead. They work the same way, with the actions Show, Create, Update and Destroy and, for some areas, extra actions.
The actions
The columns of Role Access are the actions of the area. Most areas offer Allowed to View (All), Allowed to View (Single), Allowed to Create, Allowed to Edit and Allowed to Delete, and some have fewer. For example Tolls has view, create and edit, Payroll and Reviews have view (all and single), and Stats, Mileage and Load Map have view only.
Part 3: Change what a role can do
Each action is a button that shows Yes, No or Not Set. Click it to change it:
- Not Set becomes Yes.
- Yes becomes No, and No becomes Yes.
- You cannot go back to Not Set by clicking. To return a user to their role's rules, remove the user's row (see Part 4).
The change is saved the moment you click. There is no Save button, no confirmation and no success message. If saving fails you see "The access change was not saved." and the page reloads the area.
What Not Set means
- View, Create, Edit and Delete: Not Set means not allowed, unless a Yes is set for that user or role. A new account starts with Yes everywhere for Admin and Not Set for the other roles, so those roles have no rights in an area until you give them.
- Submodule Access: Not Set means allowed, except a few sensitive functions that start as not allowed (for example Accessorial Limit Override).
- Form inputs: a field with no rule can be seen and edited.
The sentence under the page title says "Not Set means the default applies". For View, Create, Edit and Delete, the default is that the action is not allowed. Check an area after you set it by signing in as a user of that role, or ask the user.
When a change takes effect
A change does not reach users at once. Rights are rebuilt in the background every 10 minutes for most areas, and every 15 minutes for the areas shown as Group Permissions. To apply a change to one user sooner, a Superadmin can open the user in Users and select Regenerate Access; it also takes a moment. See Locked accounts and MFA (Unlock Account, Reset MFA, Regenerate Access).
Part 4: Give one user different rights than their role
Use Individual Access when one person needs more or fewer rights than the rest of their role.
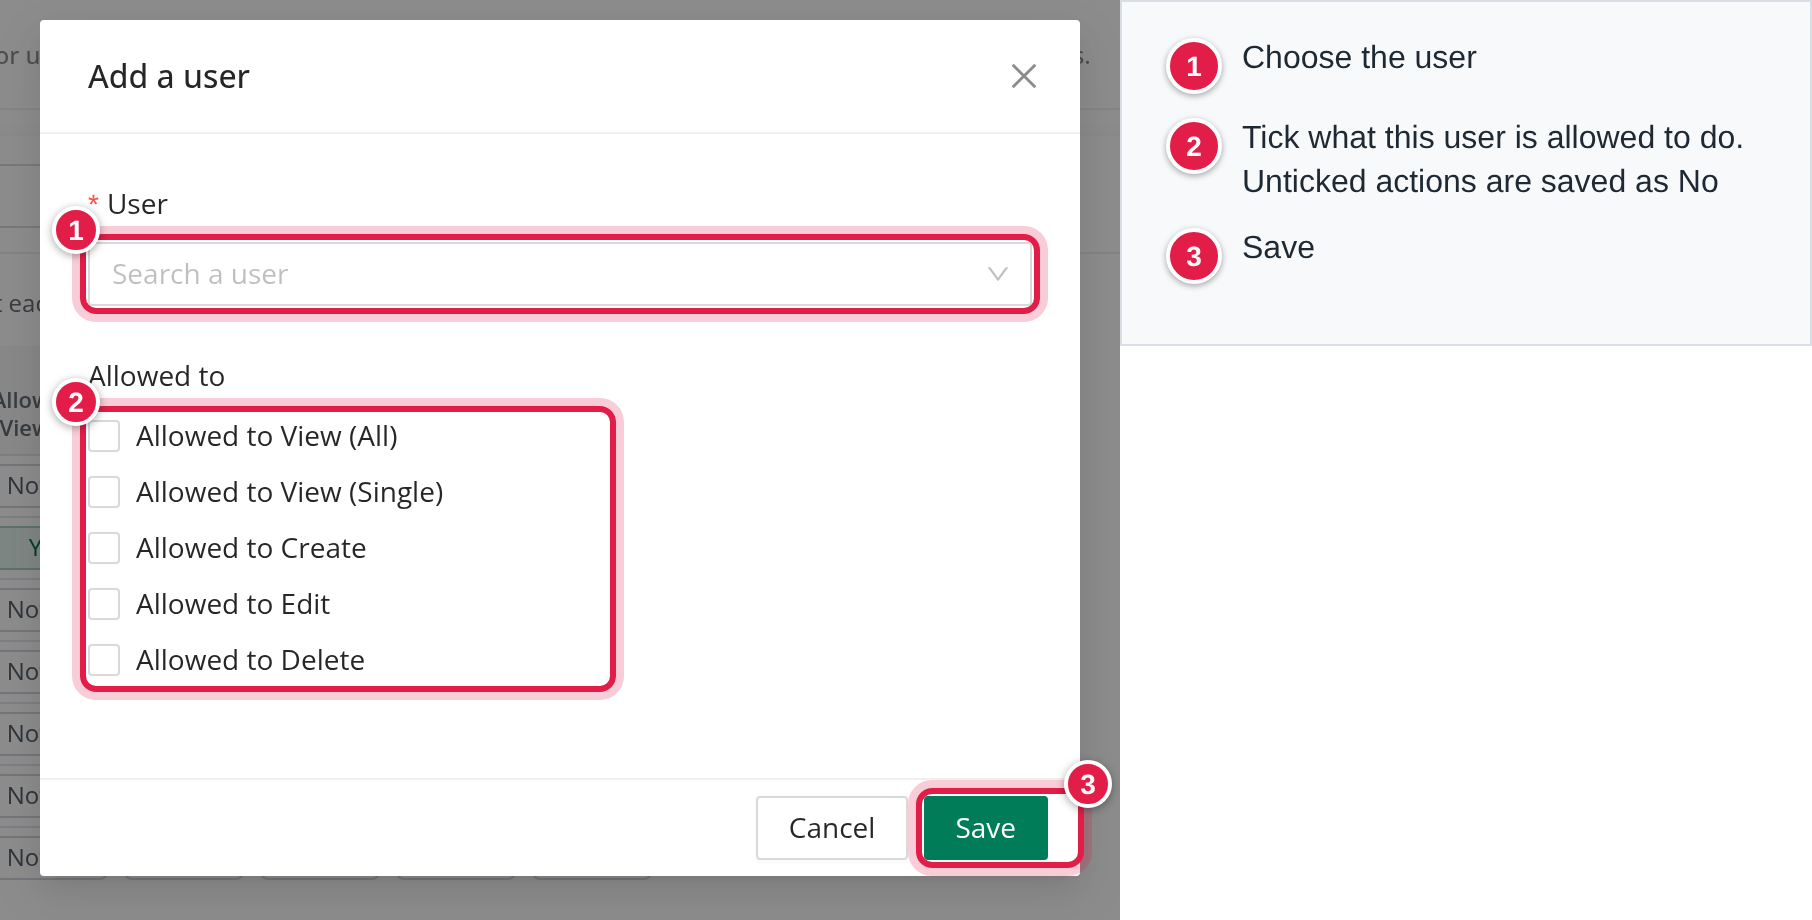
- Select the area, then Add user next to Individual Access.
- Choose the user. Users who already have an exception in this area are not offered again.
- Tick what the user is allowed to do. Unticked actions are saved as No, not as Not Set.
- Select Save, then confirm Save in the Save changes? window. You see "Changes saved successfully."
- A user's own row wins over their role's row. After that, each cell of the user's row works like a role cell: click it to change it.
- On a Group Permissions area, a user's row replaces the group's row completely: an action that is not allowed in the user's row is not allowed, even when the group has it.
- To remove an exception, select the bin icon on the user's row and confirm Delete in the Delete setting? window. The user then follows the role again.
Part 5: Submodules
Submodule Access controls smaller functions inside an area, for example in Loads the functions Copy Loads or Edit Time In and Time Out.
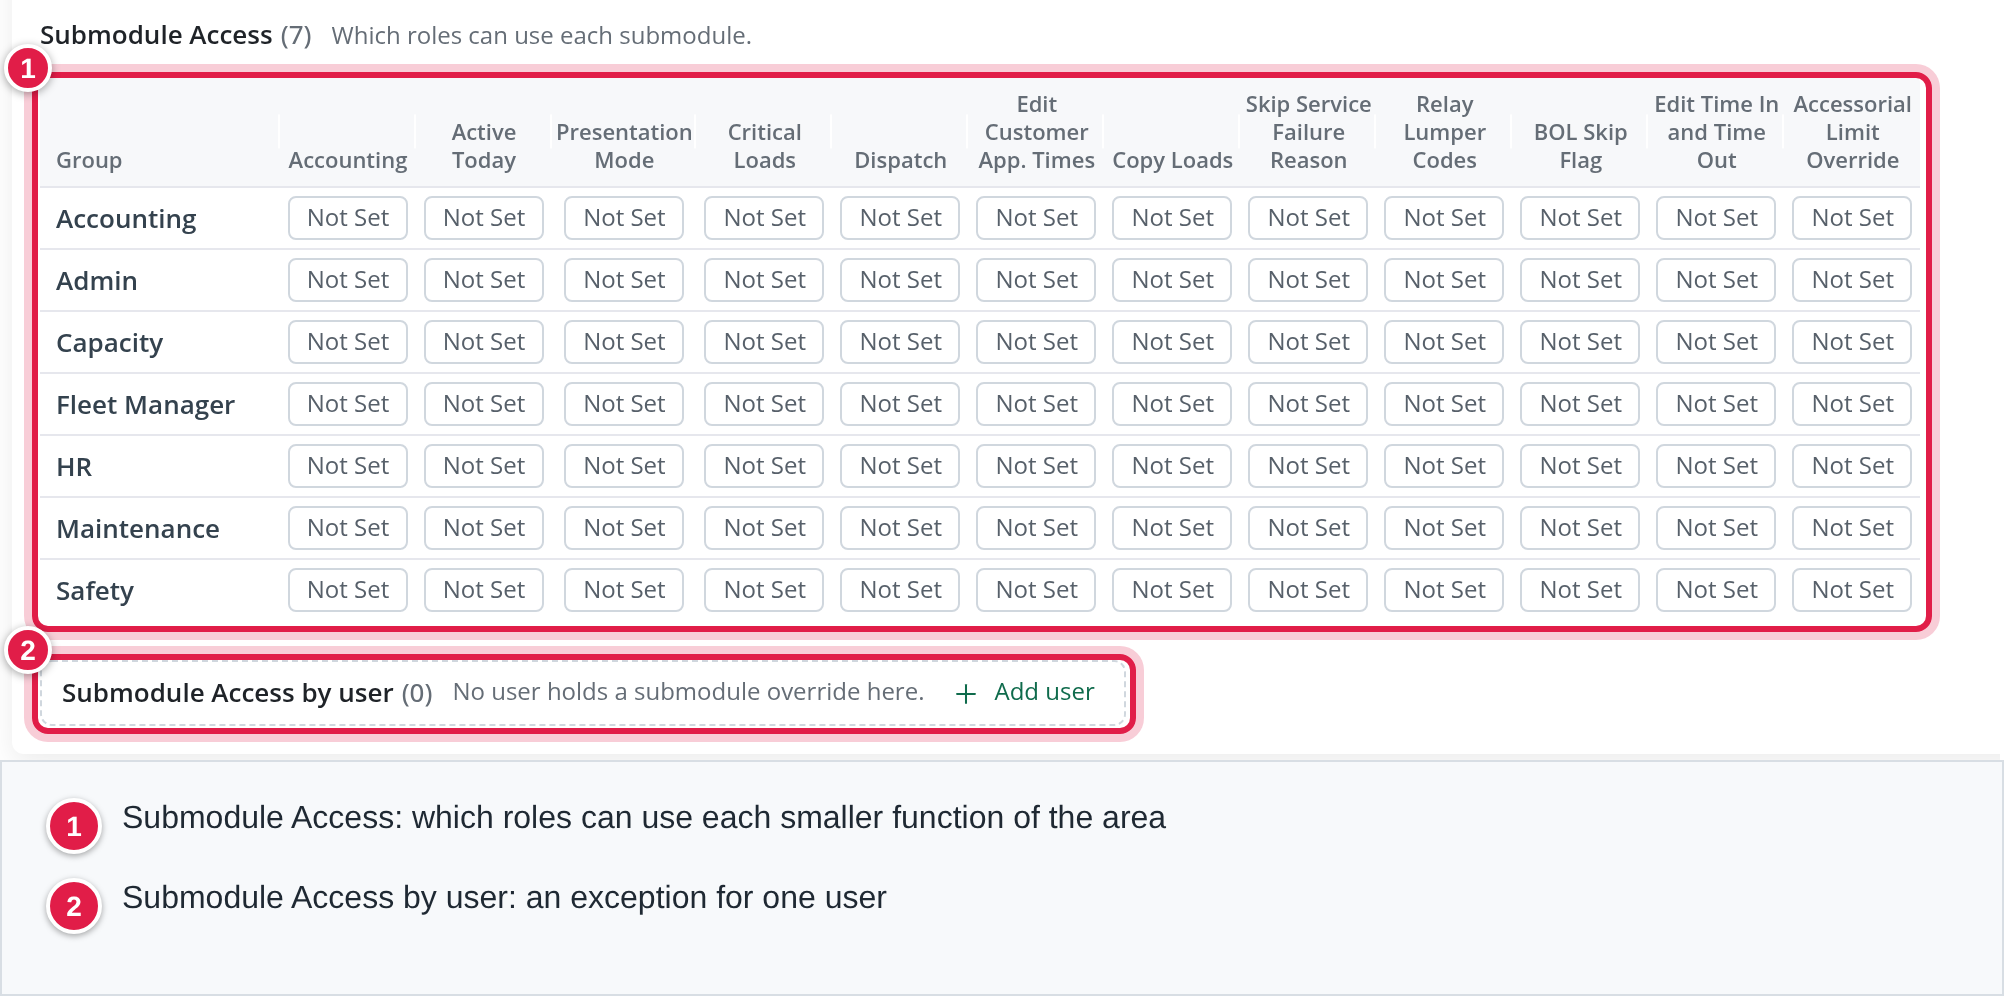
- Click a cell to switch a function on or off for a role (Yes or No).
- Use Submodule Access by user and Add user for an exception for one user.
Part 6: Single fields (form inputs)
Add form input lets you control one field of a form, for example who may see or change it.
- Select Add form input under Role Access: form inputs (for a role) or Individual Access: form inputs (for a user).
- Choose the Role or User, then the Input.
- Tick Allowed to view, create or edit, and save.
A field that has no rule can be seen and edited by everybody who can open the form.
Good to know
- A Superadmin is always allowed. Superadmins are not on the page.
- The Settings pages are for Superadmins no matter what the page shows. Giving a role the Settings area does not open the new Settings pages for them.
- Every toggle, added row and removed row is recorded in Settings → Audit Logs with the old and new value.
Frequently asked questions
Was this article helpful?
That’s Great!
Thank you for your feedback
Sorry! We couldn't be helpful
Thank you for your feedback
Feedback sent
We appreciate your effort and will try to fix the article